Showing posts with label Digital Citizenship. Show all posts

Tuesday, October 18, 2016

FTT - Quizlet Live

Racing Towards Mastery with Quizlet LIVE

@joe_edtech/@LisaBerghoff


A couple of weeks ago, I was conducting a site visit at DHS and we walked into one of our Spanish classes. The kids were excitedly working together, competing in teams using a tool called Quizlet Live. I've used Quizlet a lot as a flashcard generator, but I hadn't seen Quizlet Live. It is an easy to use tool that turns group activities into fun and challenging games. So, I had to ask the teachers to write about it. This is the resulting
guest post by DHS Spanish Teachers Mercedes Koch (@Profe_Koch) and Matt Wallace

Do your students use Quizlet to study key vocabulary terms?  Do your students like to play collaborative and interactive games in class?  If so, Quizlet Live is perfect for you and your students!

In the very recent past, Quizlet has released Quizlet Live, which takes existing Quizlet sets and creates a collaborative, interactive game using the information contained in the set.  The general idea is very similar to that of Kahoot!.  However, there are a few differences which will be highlighted below.  Here is a brief overview of how to access Quizlet Live and how to play.

Step 1: in order to access Quizlet Live, you must request access.  Email beta@quizlet.com  with your username and request access to Quizlet Live.  You will receive an email once it is active on your account and at the top of each Quizlet set you will see this icon:  


Step 2: When you are ready to start a game with a particular set, click “Live”.  You will be taken to a page with a “Create Game” link.  Click “Create Game” and the next step is when your students will become active.  The next page will look like this:


You will want to project your screen to the class so that the students can see and enter the code at quizlet.live.  They will enter their names, and the names will show up in the black portion on the right side of the page.  If a student enters an inappropriate name, simply click on the name to erase it and ask that student to re-enter their information.

Step 3: When all students are in the game, and when you click Create Game, Quizlet will randomly group the students in your class into groups of 3 or 4 and the groups will be given a team name. Apparently Quizlet is very animal-friendly because the team names are always names of animals.  You will want the students to sit next to each other during the game, so they should find their teammates and sit next to them at this point.  You are now ready to start the game.

Step 4: The actual game consists of the students seeing some sort of question posed to them, a vocabulary term for example. Then, they are given multiple options.  However, not all students on the team will have the correct answer as one of their options.  This is where the collaboration comes in. They also see the options given to their teammates.  This is what a student sees:

The middle column contains their options and the two columns on the sides contain their teammates’ options.  The students must discuss to determine the correct answer, and the student with the correct answer on their screen is the only one who can select it.

One difference between Quizlet Live and Kahoot! Is that the questions posed to one group will be different from those posed to another group.  Let’s say that your Quizlet set has 50 terms.  Each group’s questions will be a completely random sampling of those 50 terms.

Step 5: How does a team win?  When a team answers a question correctly, Quizlet Live automatically moves them onto the next question (which is different from Kahoot! where everyone is working on the same question at the same time).  While teams are accumulating points, the teacher screen tracks their points:
The first team to 12 correct answers wins. HOWEVER, when a team answers incorrectly, their points are reset and they start over at zero.  The new questions posed to the group are again chosen at random from the set, not a repeat of what they already answered.

A few extra notes:  
  • If you want to play another game/round but also want change the groups, you can do so with the click of a button.  
  • You can add students to the game using the game specific code.  
  • After completing a game, you can see the stats of the game.  This may be helpful for identifying common misconceptions related to the content.

--------------------------------------------------------------------------------------------------------------------------
I'd like to thank Mercedes and Matt for "volunteering" to write this week's post. If you are using a cool free tool to improve learning in your classroom, tell us about in the comments below - or email me and author an upcoming post!



Tuesday, October 11, 2016

FTT - Seesaw

Student Driven Digital Journals and Portfolios? Yes Please!

@LisaBerghoff/@Joe_EdTech

This week's free tech tool comes to us from HPHS world language teacher Weifang Wang (@WangWeifang).


The sweet spot for teachers of any content is when you have students who are taking ownership for their work, reflecting on their learning, and articulating all of that both in and outside of the classroom. As a teacher, the joy is in guiding students towards learning and then getting out of their way so they can express their understanding of new ideas, concepts, and analysis of information, while connecting this new understanding in a way that is meaningful.

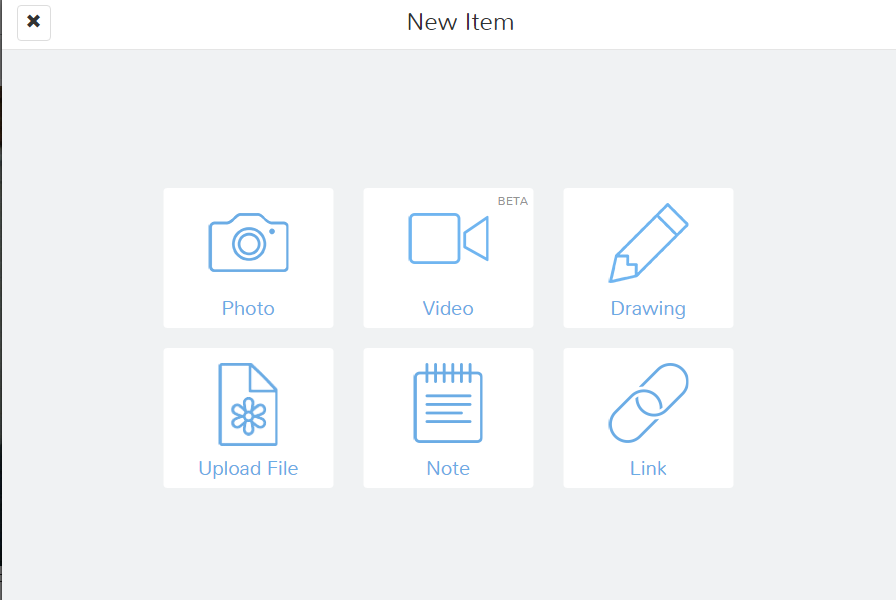
The Seesaw platform is designed for student-driven digital portfolios. It is so simple to use, it quickly became a favorite of elementary teachers because kids can truly do it on their own. What I love about Seesaw for high school students is that even though it is easy to use, the tools are powerful and robust. As we are searching for tools that help us to differentiate for all of our students, Seesaw allows for students to add photos and videos (uploaded OR recorded on Chromebooks), drawings, links, text, notes, or files to be uploaded. Once added, our students can write captions or leave voice recordings of their reflections. Seesaw also has the ability to set up a class blog for you. You can password protect it and decide if you want to allow comments. Once your blog is set up, both teachers and students can post to it. 

Here's how it works:
1. Students log in using their Google account and they input the class code that teachers get when they create a class.

2. As a teacher, you can post to an entire class or just to select students. You might post a prompt and ask your students to show their work, reflect, and respond.

3. If you just want your students to begin without a prompt from you, they can click on the green plus button to add an item. Students can easily use their Chromebook camera to take photos or videos and add them into their seesaw journal. 

4. Once they have added an item, your students will add a caption OR leave a voice recording that talks about the work they are displaying. 

 5. Teachers must approve students' journal entries so we are able to help guide them towards habits that will help them create a positive digital footprint. While they are learning, Seesaw provides a safe environment. Seesaw has earned a very high rating on common sense education, which is a very respected reviewer of educational applications. 

From another perspective, as a parent, it is difficult for me to know what is going on with my kids schoolwork now that they are doing so much of their work digitally. I can't just go into their backpacks and look through their folders (thank goodness!). All of the digital work can be unnerving because I want to support my kids and have conversations about what they are doing in school. 
Seesaw makes it easy to connect parents to see their students' work and be able to have a "window into my child's school day", according to the seesaw website. This of seesaw as a communication platform between students, parents, and teachers.  

Seesaw can be used on any device and the free version has an outstanding platform with features that students will actually want to use. 


Here is a screenshot of my first photo journal entry to my Seesaw class!


Are you using Seesaw or digital portfolios and blogs in your classes? Post in the comments below and share your thoughts. 

Tuesday, September 27, 2016

FTT - ePals for Global Connections

From the ePals Website
Making Global Connections in Your Classroom

@joe_edtech/@LisaBerghoff

One of the many things that has impressed me in my short time in District 113 is how globally aware our staff and students are. As proud as we are to be Giants and Warriors, I don't get an insular feeling of isolation at all. All eyes are focused on the future of our global community.

With technology in the hands of all of our staff and students, our global connections can become more than just theoretical. However, based on several conversations I've had this year, there is a little bit of trepidation about connecting our kids with that global community online. At a National School Board Conference a short time ago I was introduced to the online tool called ePals, designed to give students authentic cross-cultural experiences in a completely safe, managed environment.

From the ePals website, "Teachers use the free ePals Global Classroom to create real world, culturally- enriching learning experiences for their students. With ePals classroom matching, a high school class studying Chinese can connect with a class studying English in China, or the classes can work on a special project together." While ePals is great for World Language, it is also perfect for any globally minded classroom.

Here's a short video that shows you what ePals can do and how to get started:


For the High School Classroom:
There are a lot of tools included in the ePals suite, and you may want to use some of them with your classes. I've found that the tools we have in Google Apps are probably better for collaboration and production with high school students, but ePals overall has been designed to be a safe place for students as young as the elementary age to develop authentic global connections. The "Classroom Match" tool is what really makes ePals powerful for high school students.
--------------------------------------------------------------------------------------------
Have you used ePals or a similar tool to make global connections in your classroom? If so, please share your experiences below.

Tuesday, March 22, 2016

FTT - Tools to Maximize YouTube in Class


Maximize The Benefits Of YouTube, Minimize The Annoyances

@LisaBerghoff/@Joe_Edtech


It is so exciting to see how many teachers are taking advantage of YouTube in the classroom. According to Digital Stat Articles 2/14/2016, 82% of internet users aged 14-17 use YouTube. It makes sense that we would leverage this user- friendly, engaging, massive collection of videos for our students' benefit. There are endless possibilities when it comes to learning applications with video. As much as I love YouTube, there are a few minor inconveniences that can feel not so minor when you are in front of a room of 25 adolescents.  First of all, how often have you cued up an amazing video for your class but first you must awkwardly sit through a 15 second commercial?  I am usually just crossing  my fingers that it's an ad for something that is  age appropriate and extremely boring. Otherwise, guess what my students take away from the whole lesson?  That's right! All of that time I spent searching for the perfect video is completely wasted because of one 15 second ad.  Ok, here's another one.  The video is over, the students were completely amazed and are ready to discuss, apply, and extend what they have learned (work with me here) but YouTube shows an entire screen of additional videos that I may or may not want to show.  While we're at it, does anyone else find the strip of related videos down the side of the screen very distracting?

You get the point.
What's a teacher to do?

I have a few tools for you to try that are designed to eliminate these annoyances and maximize the benefits of video.

Adblock for YouTube 

This is a chrome extension which means it lives in the upper right corner of your chrome address bar. Little known fact, that chrome address bar is called the omnibox. There will be extra credit for anyone who uses the word omnibox in a sentence today. The Adblock for YouTube extension magically takes away those ads that automatically play before your actual video plays.


Quietube and Viewpure


Removing the video ads is wonderful but what Quietube and Viewpure do is absolutely amazing. These free tools eliminate the distractions such as suggested videos, comments, and ads.  When you go to Quietube's website you will be very underwhelmed. These are no frills tools that deliver on their promise to do a specific job. All you need to do on your end is drag the quietube button up to your bookmarks bar and when you are watching a video on YouTube, simply click the button.  You will get a clean screen with nothing but a viewing box showing your video.  Viewpure works very much the same way.  You can drag the "purify" button up to your bookmarks bar or insert the YouTube link into the space on the website and click "purify" to get the new link. Under the viewing box you can click to get a short link to share with your students so they too will only see the video.  You can put that link into Google classroom or whatever system you use to  share content with your class.  When your students click the link, they will view the video in quietube format.  You also have an option for a black background.  Here is a 35 second tutorial:


DF YouTube (Distraction Free) 


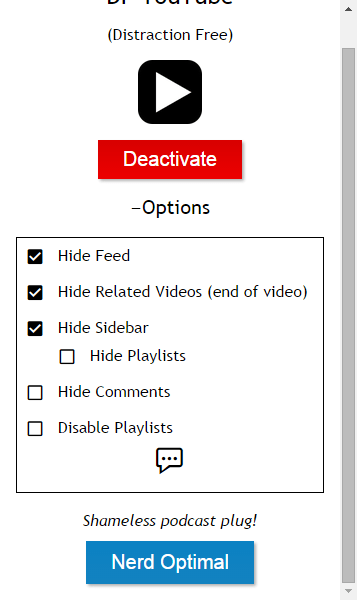
If you're still reading this post then your persistence will be rewarded. I have saved the best (in my opinion) for last.  DF YouTube is a chrome extension that takes away the ads, thumbnails, video recommendations grid that appears at the end of a video, comments, etc.  The extension makes all of these settings configurable!  You can click on the extension and click "options" to easily check or uncheck what items you would like to hide.  The one downside to DF YouTube that I can see is that it does not give you a link to share with your students.  This extension is perfect for displaying a video to a group.  If you are sharing a video with students and you want it to be without the distractions, I would suggest using Quietube or Viewpure.


As we continue on this journey of transforming education through the use of new tools and a new way of thinking about teaching and learning, I am confident that video will remain a fan favorite in our classrooms.
-----------------------------------------------------------------------------------------------------------------
How are you using YouTube with your students?  Post in the comments below. I'd love to hear from you!

Tuesday, March 8, 2016

FTT - Blendspace

What's The Best Tool For The Job? Blendspace Makes Blended Learning Effortless!

@LisaBerghoff/@Joe_EdTech


I get asked the following question at least once on a typical day: "If I'm going to use technology, can you teach me how to use the absolute best._______ ?" Go ahead and fill in the blank.  I'm often (but not always) hesitant to answer this question as many tools are more appropriate for some tasks while other tools are better suited for other tasks.  There is also the factor of personal preference that must be taken into account.  As busy teachers, we don't really have extra free time to spend learning how to use technology that we may or may not end up using.

That is why I am a huge fan of "blended learning", which is a mixture of face to face interaction along with web-based digital and media tools. There is no need to completely abandon those tried and true lessons that we know our students respond to.  There is also no need to constantly try to create something brand new.  The internet is a sea of rich resources that can be utilized for a huge range of teaching opportunities.  One issue however is that the internet  at times seems unwieldy because it can be endless and sorting out the quality from the crap can be tricky.

For those of you giving me a virtual high five right now, I'm happy to introduce you to Blendspace.  This free website and chrome app is there to help you create digital lessons in 5 minutes! It makes planning, building, and delivering lessons that integrate content straightforward and painless. You can create interactive, creative lessons with  some of the tools you are already using like YouTube, digital media, and your own files.  You can also take advantage of TES resources, which is a marketplace that helps teachers find free and paid online resources that are created by other teachers. and are available on Blendspace.  You can add a quick quiz, text, or bring in any files from your Google drive or your computer. 

Here is a 1- minute tour of Blendspace: 


Not sure you want to be creating digital lessons? How about having your students use Blendspace for digital storytelling, biographies,  or collaborative research projects? Students can use Blendspace for quiz and test review materials. Tired of slideshow presentations? Have your students use Blendspace to create an interactive presentation that will have everyone interested and engaged. Students can store their links, videos, pdfs, presentations and other digital content in an organized, interesting, and FREE way.

Want to see an example of a Blendspace lesson? Below is a lesson on magnetism that I created in less than 2 minutes.  Imagine what I could have produced in 5!  You can see that it has two powerpoint presentations, a worksheet, videos and images.  My students can access this resource at their own pace and I can easily track their progress.


Give Blendspace a try.

What are some of your favorite blended learning tools?  Post them in the comments section below.


Tuesday, March 1, 2016

FTT - Choosito!

Using Choosito! to Differentiate by Reading Level

@joe_edtech / @LisaBerghoff

Technology changes. Sometimes, I don't like the changes. But it happens and I learn to get over it. For instance, I have spent a lot of my time teaching people how to search well using Google's Advanced Search features - and one of the things I loved to teach about was sorting results by reading level. OK, Google didn't give you Lexile levels or anything like that, but the search engine used to categorize the results by Basic, Intermediate, or Advanced reading levels. Alas, Google giveth, and Google taketh away - reading levels are no longer available in Google's Advanced Search. 

However, Choosito! is a free Web2.0 tool that will allow you to search the web, and their curated library, and filter by both content and reading level. Here's a short video to help explain Choosito! a little better:


Once you create a free account and log in, you can go to Choosito! Search. Simply enter the topic as you would on Google, then choose your categories. What reading level do you want? Are you looking for that topic in Humanities or Business & Career? And are you searching the web, the Choosito! Library, or are you searching for a school safe image?
When you get your results, you get a little more than a link to a website. You get a preview of the page, the website "ranking" from other Choosito! users, and the ability to add the resource to your own curated page (click the "+"). Some of your resources may have an icon that looks like a little red schoolhouse. That means the resource has been vetted by a number of other teachers and librarians and added to the Choosito! library.
____________________________________________________________________________

If you've found other ways to get differentiated Internet search results, please tell us about them below.


Tuesday, April 7, 2015

FTT - ePals


ePals Logo
Making Global Connections in Your Classroom

@joe_edtech

One of the many things that has impressed me in my short time at Deerfield is how globally aware our staff and students are. As proud as we are to be DHS Warriors, I don't get an insular feeling of isolation at all. All eyes are focused on the future of our global community.

With technology in the hands of all of our staff and students, our global connections can become more than just theoretical. At a National School Board Conference a short time ago I was introduced to the online tool called ePals, designed to give students authentic cross-cultural experiences and provide teachers with ideas and tools to work with partners in other parts of the world.

From the ePals website, "Teachers use the free ePals Global Classroom to create real world, culturally- enriching learning experiences for their students. With ePals classroom matching, a high school class studying Chinese can connect with a class studying English in China, or the classes can work on a special project together."

Here's a short video that shows you what ePals can do and how to get started:


For the High School Classroom:
There are a lot of tools included in the ePals suite, and you may want to use some of them with your classes. I've found that the tools we have in Google Apps are probably better for collaboration and production with high school students, but ePals overall has been designed to be a safe place for students as young as the elementary age to develop authentic global connections. The "Classroom Match" tool is what really makes ePals powerful for high school students.
--------------------------------------------------------------------------------------------
Have you used ePals or a similar tool to make global connections in your classroom? If so, please share your experiences below.

Tuesday, February 10, 2015

FTT - Free Screencasting

photo credit: YouTube website screenshot via photopin (license)
Three "Free" Screencasting Tools for Teachers

@joe_edtech

Flipped and Blended classes are all the rage. And whether you are creating content for your students or having them create something to share with the class, personally created video is one of the best ways to take full advantage of a 1:1 classroom. There are some very good - and very expensive - screencasting tools that you can purchase, but unless you need really robust editing tools, there are also plenty of free options. Since several teachers are going to be offering sessions on using video in class at our upcoming district institute day, I thought today would be a good day to look at three good options for recording your screen for free.

My favorite free screencasting option is Google + Hangouts. If you start a Google Hangout on Air with yourself, you can record any browser screen on your computer. And, the real reason I like it so much is that Google + Hangouts provide you with a great way of not only recording your screen, but also recording you, meaning your students are getting personalized instruction from you anywhere they have access to the Internet. I've created a direction set for you (click here to access), but here's a very quick demo:


Screencast-O-Matic is a tried and true, bi-platform method for screencasting. The free version of Screencast-O-Matic allows you to upload 15 minute video chunks to YouTube. If you are recording more than 15 minutes, this isn't the option for you - but most of the evidence out there suggests that your personally created lessons should be shorter than that. Here is a quick video tutorial:


If you want your students to record their Chromebook screens, Snagit is a decent option. In order to use Snagit, you need to go to the Chrome Web Store and search for Snagit. You need to install both the App and the Extension for it to work properly. The downside of Snagit is that if your Chromebook doesn't have a fast processor, Snagit will not record video - or it will be choppy. But the upside is that it is extremely easy to use whether you are screencasting or taking still screenshots. Here's a little more information on Snagit for Chrome by TechSmith:


-------------------------------------------------------------------------------------------
Do you have a favorite Free Screencasting tool? Share it with us below.

Tuesday, January 13, 2015

FTT - "Free" Images and Videos

From photopin.com
Getting Great Digital Resources & Respecting Copyright Laws

@joe_edtech

There have been some very well meaning and good-hearted teachers that I have worked with over the years who have either misunderstood the "Fair Use Exception" to the US Copyright Law or simply decided it was too difficult to live within its legal restraints. But as we move to a more digital world, don't we want to teach our kids to be good digital citizens? Don't we want to teach them to respect digital copyright laws? And more importantly, don't we want to teach them about citation and attribution before they go to college and are really expected to know it?

A full discussion of the "Fair Use Exception" is still coming, but for today let's just beat the dead horse one more time. I've heard teachers say, "Since I'm using it in the classroom, Fair Use allows me to use anything." Um, no. But there are enough resources out there that you can provide your students with several different avenues for finding images and media that they can use in their projects while respecting copyright laws. In a previous post, I told you about Creative Commons Search as a great way to find digital images and media. Today I want to tell you about two more: PhotoPin for digital images and Next Vista For Learning for digital media.

Photo Pin is an easy to use search engine for Creative Commons licensed digital images. That means you can use them in any classroom product you'd like as long as you cite the source. Go to photopin.com and search for an image or a topic. A pop up box will appear with the different sizes that are available to you. Download the one you want. Then simply copy and paste the HTML Attribution code onto your website, blog, or whatever.  

Next Vista for Learning is actually the brain child of Rushton Hurley, a fantastic speaker I first came to meet at the ISTE Conference last Fall. He talked about the power of using, analyzing, and creating digital media in the classroom. Next Vista for Learning has videos to search and contests to enter. The front page of the website explains that "Next Vista For Learning provides a library of free videos made by and for teachers and students everywhere," and just like most of the images found in PhotoPin, all of the products are licensed Creative Commons Attribution, which means you can feel free to use them in any project or on any classroom website as long as you cite properly and give credit.
Search for great videos for and by teachers on Next Vista for Learning


So, while they might not be the commercially created videos or pictures your students would really like to use, Next Vista for Learning and PhotoPin give us access to beautiful digital images and media that can greatly enhance our digital curriculum, and they give us excellent opportunities to teach about responsibility and digital citizenship.
------------------------------------
Have a favorite site or search engine for finding Creative Commons Digital Media? Please share it in the comment box below.

Thursday, November 20, 2014

Digital Portfolios

photo credit: JD Hancock via photopin cc
What Is Important To Your Students?

@joe_edtech

There has been a convergence of ideas in the books I've read recently. Daniel Pink's books Drive and A Whole New Mind both discuss the need for our schools to move beyond the structure and thinking of the Industrial Revolution and to provide students with multiple opportunities to think, create, and design for themselves. Sir Ken Robinson's Finding Your Element expands on his earlier work and criticized the artificial hierarchy and division of subjects and the need for all students to find support for their passions in schools. Danah Boyd's It's Complicated spends some time discussing the need for teens to develop autonomy and voice even when fear and adult overreaction often restrict them from doing so. 

It seems to me that simply adding more elements of student inquiry and student choice into the educational process can move us closer to the ideas written about by Pink, Robinson, and Boyd - and that without spending a single additional cent from already tight budgets.

Do you use student portfolios? If so, are kids instructed what to place in those portfolios and when? What would happen if you offered the portfolio as an opportunity instead of an assignment? What would it look like if it was offered as an opportunity school wide and all your departments supported it?

Two years ago I worked with the coordinators of a high school Literacy Lab to develop a template for all of their students to create a digital portfolio showcasing the work they completed in their high school years. The template included a blank page and directions for each of their four years. It was a great idea (not mine, of course - I was just happy to support it). But, I think it is time for a little revision.

Last Spring I had the opportunity to attend a workshop lead by George Couros, Division Principal for a school district in Alberta, Canada (@gcouros). The students in his school district create digital portfolios as well. However, when they get to high school, the students decide what, when, and how they post their work to their portfolios, and the portfolios can include not just classroom pieces, but blogs and photos if students choose to include them.

The idea is that in the elementary and middle school years teachers provide more support for students as they choose works to post online, and help them organize their portfolios in a way that makes sense. In high school, though, teachers encourage students to become digital leaders and develop a digital footprint that "won't just keep them from getting a job, but will actually lead to them getting additional opportunities" (probably not an exact quote, but I wanted to give George Couros credit for the thought).

Since I don't work in a k-12 district, we don't see our students until they are in 9th grade. So we can't follow the k-12 model. However, we can spend freshmen year focusing on digital literacy and provide them scaffolding and support for creating a positive digital footprint, then encourage them to create their own portfolios beginning with their 10th grade year. What would happen if we kept the structured template for the freshman year but then just provided them with a platform for them to create their own voice and vision throughout their high school years?
--------------------------------------------------------
Do your students create digital portfolios? How much autonomy do your students have in creating their digital portfolios?

Thursday, November 13, 2014

Teaching Digital Citizenship #2

The Lawn off of which you should stay! Pre-raking.
Using Digital Images

@joe_edtech

Here in the United States, we respect property rights. Before you ask, no, I am not sitting on my front porch yelling at the neighborhood kids to, "Stay off my lawn!" It is very cold out, so I posted a sign.

Seriously, respecting property rights means respecting digital property rights as well. As we move towards 1:1 environments, we are increasingly asking our students to create digital projects, videos, presentations, collages, etc. We want our students to create beautiful, content rich products, and that frequently means we are asking them to use existing digital images to convey a message, create a mood, or even get a laugh. So how do we get them to produce good quality stuff and still respect digital copyright laws? I suggest there are two simple steps that we can take as teachers and educational leaders that will go a long way to guiding our students in the direction of good citizenship.

The first thing sounds easy, and it is completely within our control, but it may require some additional time and effort. As we move towards more digital curricula, most of us are creating class websites, utilizing Learning Management Systems, blogging, or flipping our classrooms. We should be doing our best to dress those sites up - always thinking about design - with copyright free images (that usually means open license with attribution required). Then secondly, we should model searches for copyright free digital images anytime we work with students on visual projects.  (By the way, I am trying to practice what I preach on this blog.  So far, every image used on this blog has been in the public domain or licensed attribution only, except for screenshots, which fall under the Fair Use exemption in the context of a review. And of course the picture of my lawn above, which is mine. Stay off.)

So, where can you find good open content to use? You can find copyright free digital images in an advanced Google Search, in some Flickr feeds, or a search of Wikimedia Commons. But my favorite place to start is Creative Commons.

Creative Commons Search Page


On the Creative Commons search page, you can simply enter your topic and decide where you would like to search for your ready to use educational content. I usually start by coming to this page and searching Google Images, but there are thousands of great images in Flickr and Wikimedia Commons. Virtually any kind of image is yours to download and use for educational purposes, as long as you give credit to the owner.

There is probably a dissertation to be written about digital media in schools (I'm not going to write it - I've got my own dissertation to worry about), but if we take just these simple steps, we can help our students be better digital citizens.
--------------------------
If you have a favorite way of searching for copyright free or creative commons images, please share with us in the comment box below.

Thursday, November 6, 2014

Google Research Tools in Drive

"Search It Up!"

@joe_edtech

My daughter coined a new phrase recently in a meeting with her teacher, or at least I'm giving her credit for it. There was some question about the history of an activity at her school and the teacher said, "I just don't know that information." The student looked at him and said, "Well then get out your iPad and let's search it up!"

I'm not sure that is always the best way to meet the Common Core requirements on inquiry in the classroom, but I do think that the relatively new feature of Research Tools inside Google Drive is an interesting way to add some inquiry and research to even the most workaday writing assignment. How many times have you been grading student essays and written, "Can you prove this?" Well, now with a couple of clicks you can change your language and just tell them to, "Search it up!"
Get to a search menu in any Doc

In any Document Drive, if you simply click "Tools" and select "Research" from the drop down menu, you can open a research pane and look up topics without navigating away from your document. Not only that, the search bar gives you all of the features of the search bar in regular Google Search along with an easy to select option to look only in Google Scholar, for images, quotes, or for dictionary entries.

Every item, including regular web entries, gives you a preview option. Perhaps my favorite thing about Google Research is that when an image is dragged to a document from the research bar, a footnote citation is automatically added. I can't tell you how many years I've preached to staff and students alike that at the very least we should be teaching our students to cite the sources of the digital materials they include in papers and projects. Research tools makes that a no brainer. And you can also choose between APA, MLA, and Chicago for the style of citation.

Sample "Research" Pane
Personally, I love the idea of including more research in student projects, and I even like the idea of automating the citation process. However, I have two major reservations about Research Tools inside of Google Drive as a regular research solution. First, it certainly doesn't foster the idea that good research and good writing needs to be planned out carefully in advance. And secondly, and less significantly, all of the automatic citations are done in footnote instead of endnote form. That is not a deal breaker, it would simply require a different way of thinking and teaching about citation than what we are used to in high schools.

Research tools can be extremely useful if students use Google Drive to conduct research, compose outlines, and collaborate with teachers and fellow students. And it is an excellent tool for teaching about proper citation. So I see potential, and maybe it requires a slightly more creative thinker to realize the real power of this tool. 

But in the mean time, I certainly do hope that students and teachers alike use this tool to "Search it up!"

--------------------------------------------------
If you'd like to access my direction sheet on getting started with Research Tools in Drive, click here.

Thursday, October 30, 2014

Teaching Digital Citizenship


Logo from commonsensemedia.org
It belongs in our curriculum...

@joe_edtech

October is "Connected Educator Month," and we just came out of "Digital Citizenship Week." It is a good time to remind ourselves about our responsibility to teach digital citizenship, especially when we are in a 1:1 environment.

Once in a great while, and usually quite by accident, the Illinois General Assembly passes a really useful and meaningful piece of legislation.  In 2007, they passed Public Act 095-0869. That catchy title means that every public school in the state of Illinois must teach some component of Digital Citizenship to its students every year from 3rd grade all the way through their senior year of high school.  

If you've never looked at the law, the most salient part says, "[B]eginning with the 2009-2010 school year, a school district must incorporate into the school curriculum a component on Internet safety to be taught at least once each school year to students in grade 3 or above. The school board shall determine the scope and duration of this unit of instruction. The age appropriate unit of instruction may be incorporated into the current courses of study regularly taught in the district's schools, as determined by the school board."

In order to meet the letter of the law, school districts can include any individual unit of study - which would likely include a disconnected assembly or lecture from a media specialist. However, we are entering a 1:1 world where nearly every classroom is a computer lab and most of our students have access to the Internet 24/7, and the statistical data from disconnected programs like that (DARE for instance) are not good.
Word Cloud of Nancy Willard's CyberSavvy Approach

In order to meet the spirit of the law, and in the spirit of good teaching, shouldn't we weave elements of Internet Safety and Digital Citizenship instruction into every classroom as a part of our standard operating procedure?  

So, what is the first step in teaching Digital Citizenship? Actually, good teachers have been teaching about good classroom citizenship for years. Our students know how to behave towards each other and their instructors in the classroom, they know the kind of language that is acceptable and the kind of language that is not, and they know the expectations for studying, completing, and turning in assignments. Perhaps the first step in teaching Digital Citizenship is establishing the same expectations for students' online lives.  In other words, if our students email us, do they know the format and language that is acceptable to use in their school email accounts?  When our students post to our Wikis or Edmodo pages, do they know the kind of behaviors that are expected of them?  Do they know how to evaluate websites and scrutinize authors online to determine their appropriateness for class?  If not, isn't that the first place we should start?

--------------------------------------------------------------------------

Incidentally, I always recommend that teachers start by looking at Nancy Willard's Embrace Civility in a Digital Age and Common Sense Media's site for Educators for positive, research based approaches to teaching Internet Safety and Digital Citizenship.  There are several more great resources out there, but these two are my favorites.

If you have others that you use and love, please leave them in the comment box below.

Thursday, September 4, 2014

Image Search in Google

photo credit: Skiwalker79 via photopin cc
Searching For God's Eye With Google Chrome

@joe_edtech

The other night, my daughter and I were watching our favorite TV show, "The Big Bang Theory," and she asked about a picture that hangs on the wall of the set. I said I was pretty sure it was the image of a nebula. I couldn't remember the name of it, but maybe we could search for the image.

Google Search App - Search
by taking a picture

She grabbed her iPad and started typing "nebula" into Google, and I said, "No, I mean, let's actually search the image." I paused the DVR, pulled up the Google App on my iPhone, and snapped a picture of the image on TV. In a few seconds, we had thousands of results and I remembered that it is the "God's Eye Nebula."

You don't have to have an iPhone to search a digital image. Any device with Google Chrome installed will do. Simply click and drag any digital image into a Google Search window and wait for the results.

My daughter isn't the only one surprised by the ability to search with digital photos. When I do Digital Citizenship presentations to parent groups, I always mention this capability and watch the eyes of the Moms and Dads in the room get really wide. It is a wonderful search tool with powerful implications for the classroom. But it is also affords us another opportunity to remind our students - and our own kids - to be smart and safe with the digital cameras they keep in their pockets.
Dragging a digital image into a Google Search window.
-------------------------
Got any other Advanced Search Tips? Share them in the comments section.