Showing posts with label differentiation. Show all posts

Monday, December 4, 2017

FTT - Nearpod

Turn Any Presentation Into an Interactive Presentation with Nearpod

@Joe_EdTech/@LisaBerghoff


Originally posted for DHS in 2015 - Revised and updated for 2017!

When I was teaching full time, I would frequently use PowerPoint Slide Shows in class. The secret I never told my students is that the important things that happened in class, the real moments of cognitive engagement, had little or nothing to do with the PowerPoint Slides. Mostly I used the slides to keep myself on topic - and sometimes that worked.

In class, I really wanted the students to engage in the conversation with me. I didn't want them to just spew historical facts back at me, I wanted them to think about the situations that arose, try to understand why people acted the way they did, postulate what they might have done differently, and so on. But what I mostly saw when I used PowerPoint was a furious dash to write down every word that was printed on the slide as if it were Gospel. And why did they do that? Somewhere along the line they learned that what was important in class would be on the next exam, and everything that was on the next exam would be written on the board or included in the slide show (and yes, I'm sure that I was complicit in that at some point).

Nearpod is a Web 2.0 tool that offers us a chance to change the game a little. If you use Nearpod, and your students download the app to their Chromebooks, you can push presentations to them so that each slide appears on the screen of their device. If they are of the type that wants to write down every word, they can actually just take screenshots and go back to engaging in the discussion in class. Not only that, though, Nearpod gives you a chance to insert polls, quizzes, and other interactive slides into your presentations. With all of the power of a student response system, you can embed formative assessment into your classroom presentations and ensure some level of universal participation. You can even have students create drawings or graphs using their track pads, and share individual drawings to the entire class.

At the risk of being accused of burying the lead, though, Nearpod also serves one other purpose for your 1:1 classroom. While I am still of the mindset that the best way to make sure that your students aren't distracted by the technology is to be engaging with your teaching, teachers who are new to the 1:1 environment often cite classroom management/device management as one of their major concerns. If you use Nearpod for classroom presentations, you can easily see which students are actively engaged in your classroom activity. There is even an "attendance" button on the top left of the teacher screen that lets you see if any of your students have navigated away from your Nearpod presentation. So, while it doesn't lock your students into one screen, it gives you clear evidence of who is engaged in the lesson, and who is not.

Here is Nearpod's short explanation of how it all works:


On the upside, Nearpod continues to offer updates that make the product better and more efficient. With a free personal account, you can present PPT presentations or presentations saved to PDF. You can also share those presentations with other teachers. Additionally, the company recently rolled out a feature that allows students to see quiz and poll results whether they are seeing a teacher led classroom session or an asynchronous session. On the downside, they would really like for you to pay for a school or district license, which really means that storage is limited in the free version. But, this is a pretty decent tool to use in a 1:1 classroom no matter which device your students are using.

--------------------------------------------------------------------------------------------
Have you used Nearpod with your class? Or do you have another classroom presentation / classroom management tool that you use? Tell us about it in the comments section below.

Tuesday, October 18, 2016

FTT - Quizlet Live

Racing Towards Mastery with Quizlet LIVE

@joe_edtech/@LisaBerghoff


A couple of weeks ago, I was conducting a site visit at DHS and we walked into one of our Spanish classes. The kids were excitedly working together, competing in teams using a tool called Quizlet Live. I've used Quizlet a lot as a flashcard generator, but I hadn't seen Quizlet Live. It is an easy to use tool that turns group activities into fun and challenging games. So, I had to ask the teachers to write about it. This is the resulting
guest post by DHS Spanish Teachers Mercedes Koch (@Profe_Koch) and Matt Wallace

Do your students use Quizlet to study key vocabulary terms?  Do your students like to play collaborative and interactive games in class?  If so, Quizlet Live is perfect for you and your students!

In the very recent past, Quizlet has released Quizlet Live, which takes existing Quizlet sets and creates a collaborative, interactive game using the information contained in the set.  The general idea is very similar to that of Kahoot!.  However, there are a few differences which will be highlighted below.  Here is a brief overview of how to access Quizlet Live and how to play.

Step 1: in order to access Quizlet Live, you must request access.  Email beta@quizlet.com  with your username and request access to Quizlet Live.  You will receive an email once it is active on your account and at the top of each Quizlet set you will see this icon:  


Step 2: When you are ready to start a game with a particular set, click “Live”.  You will be taken to a page with a “Create Game” link.  Click “Create Game” and the next step is when your students will become active.  The next page will look like this:


You will want to project your screen to the class so that the students can see and enter the code at quizlet.live.  They will enter their names, and the names will show up in the black portion on the right side of the page.  If a student enters an inappropriate name, simply click on the name to erase it and ask that student to re-enter their information.

Step 3: When all students are in the game, and when you click Create Game, Quizlet will randomly group the students in your class into groups of 3 or 4 and the groups will be given a team name. Apparently Quizlet is very animal-friendly because the team names are always names of animals.  You will want the students to sit next to each other during the game, so they should find their teammates and sit next to them at this point.  You are now ready to start the game.

Step 4: The actual game consists of the students seeing some sort of question posed to them, a vocabulary term for example. Then, they are given multiple options.  However, not all students on the team will have the correct answer as one of their options.  This is where the collaboration comes in. They also see the options given to their teammates.  This is what a student sees:

The middle column contains their options and the two columns on the sides contain their teammates’ options.  The students must discuss to determine the correct answer, and the student with the correct answer on their screen is the only one who can select it.

One difference between Quizlet Live and Kahoot! Is that the questions posed to one group will be different from those posed to another group.  Let’s say that your Quizlet set has 50 terms.  Each group’s questions will be a completely random sampling of those 50 terms.

Step 5: How does a team win?  When a team answers a question correctly, Quizlet Live automatically moves them onto the next question (which is different from Kahoot! where everyone is working on the same question at the same time).  While teams are accumulating points, the teacher screen tracks their points:
The first team to 12 correct answers wins. HOWEVER, when a team answers incorrectly, their points are reset and they start over at zero.  The new questions posed to the group are again chosen at random from the set, not a repeat of what they already answered.

A few extra notes:  
  • If you want to play another game/round but also want change the groups, you can do so with the click of a button.  
  • You can add students to the game using the game specific code.  
  • After completing a game, you can see the stats of the game.  This may be helpful for identifying common misconceptions related to the content.

--------------------------------------------------------------------------------------------------------------------------
I'd like to thank Mercedes and Matt for "volunteering" to write this week's post. If you are using a cool free tool to improve learning in your classroom, tell us about in the comments below - or email me and author an upcoming post!


Tuesday, October 11, 2016

FTT - Seesaw

Student Driven Digital Journals and Portfolios? Yes Please!

@LisaBerghoff/@Joe_EdTech

This week's free tech tool comes to us from HPHS world language teacher Weifang Wang (@WangWeifang).


The sweet spot for teachers of any content is when you have students who are taking ownership for their work, reflecting on their learning, and articulating all of that both in and outside of the classroom. As a teacher, the joy is in guiding students towards learning and then getting out of their way so they can express their understanding of new ideas, concepts, and analysis of information, while connecting this new understanding in a way that is meaningful.

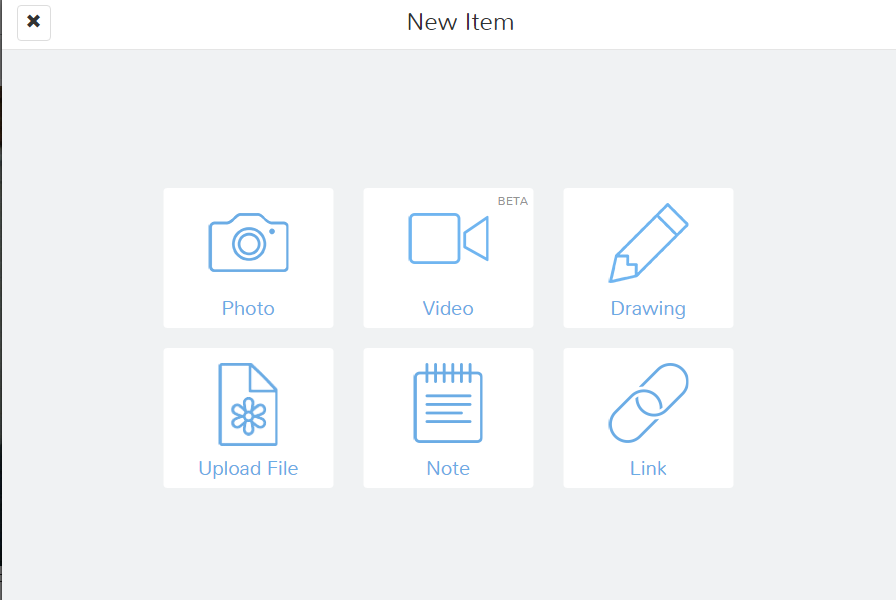
The Seesaw platform is designed for student-driven digital portfolios. It is so simple to use, it quickly became a favorite of elementary teachers because kids can truly do it on their own. What I love about Seesaw for high school students is that even though it is easy to use, the tools are powerful and robust. As we are searching for tools that help us to differentiate for all of our students, Seesaw allows for students to add photos and videos (uploaded OR recorded on Chromebooks), drawings, links, text, notes, or files to be uploaded. Once added, our students can write captions or leave voice recordings of their reflections. Seesaw also has the ability to set up a class blog for you. You can password protect it and decide if you want to allow comments. Once your blog is set up, both teachers and students can post to it. 

Here's how it works:
1. Students log in using their Google account and they input the class code that teachers get when they create a class.

2. As a teacher, you can post to an entire class or just to select students. You might post a prompt and ask your students to show their work, reflect, and respond.

3. If you just want your students to begin without a prompt from you, they can click on the green plus button to add an item. Students can easily use their Chromebook camera to take photos or videos and add them into their seesaw journal. 

4. Once they have added an item, your students will add a caption OR leave a voice recording that talks about the work they are displaying. 

 5. Teachers must approve students' journal entries so we are able to help guide them towards habits that will help them create a positive digital footprint. While they are learning, Seesaw provides a safe environment. Seesaw has earned a very high rating on common sense education, which is a very respected reviewer of educational applications. 

From another perspective, as a parent, it is difficult for me to know what is going on with my kids schoolwork now that they are doing so much of their work digitally. I can't just go into their backpacks and look through their folders (thank goodness!). All of the digital work can be unnerving because I want to support my kids and have conversations about what they are doing in school. 
Seesaw makes it easy to connect parents to see their students' work and be able to have a "window into my child's school day", according to the seesaw website. This of seesaw as a communication platform between students, parents, and teachers.  

Seesaw can be used on any device and the free version has an outstanding platform with features that students will actually want to use. 


Here is a screenshot of my first photo journal entry to my Seesaw class!


Are you using Seesaw or digital portfolios and blogs in your classes? Post in the comments below and share your thoughts. 

Tuesday, September 13, 2016

FTT - EDpuzzle and PlayPosit

http://nyphotographic.com/

Alternatives to Zaption: EDpuzzle and PlayPosit

@joe_edtech/@LisaBerghoff

For good and for ill, technology is always changing. The company that created and supported Zaption, one of our favorite "Free Tech Tools," was sold and the new company announced that the product would be taken offline.

The good news is that while we tend to highlight our favorite online tools, there are usually pretty decent alternatives in the EdTech world. EDpuzzle and PlayPosit (formerly eduCanon) are both great alternatives for teaching with online video. Like Zaption, both allow you to take ANY online video, embed questions, and assign it to students or groups of students. 

EDpuzzle 

Edpuzzle.com is a free Web2.0 tool that is designed to help teachers make any digital video interactive. With a few clicks of a button, teachers can add personalized introductions, comments, or questions to any portion of any digital video available through the products listed to the left. Furthermore, the videos can be assigned to groups or classes, and teachers can monitor student progress as they view the videos and answer questions, and the videos can be locked so students can't skip important parts just to answer the questions.

Videos and lessons created on Edpuzzle.com are public and searchable within the platform. The idea is that we are all creating products that could potentially help other students. So part of the power is that you can simply log into to Edpuzzle.com and find a video lesson that has already been created and assign that to your students. You don't always have to start from scratch. 

To get started, simply select your video source and use the embedded video editing guides to add voice-overs, comments, or questions. As an added bonus, EDpuzzle.com integrates nicely with Google Classroom, allowing you to easily import your roster and share "puzzles."


PlayPosit - formerly eduCanon

PlayPosit works pretty much the same way EDpuzzle.com does except that it has been designed to integrate nicely with any LMS, whether you use Google Classroom, Edmodo, or Schoology. Rather than "puzzles," you create and assign "bulbs" to your students.

The best way to see the way PlayPosit works is to try it out. Click here to open a public "bulb" created for a Ted Talk video. Notice, you'll have to answer the embedded questions before you can move on in the video.


Here's how my friend Mike uses PlayPosit in his classroom:

I use PlayPosit for a couple of purposes. One of them is to disseminate information via the flipped classroom model. Students can access the lesson that I've created in PlayPosit and watch the video presentation for class discussion the following day. The best part of PlayPosit is that during the presentation, kids have to answer a few questions during the video. This serves the purpose of not only checking for accuracy in their viewing, but also as a focus point. It also allows me as a teacher to design questions that are timed to emphasize the points that I wish for them to know. Finally, the questions are required. The video will not go on until the question is answered. It is a creative and interesting way to get started with the flipped classroom model.

----------------------------------------------------------------


Have you used EDpuzzle or PlayPosit in your classroom? Tell us how. OR tell us if you use a different tool for embedding interactive videos in your classroom.

Tuesday, September 6, 2016

FTT- Recap

Video Reflection Made Easy with Recap!


@LisaBerghoff/@joe_edtech


More and more, we are asking our students to reflect on their learning. We want them to think about their thinking and we want to know what they are thinking! Having a conversation with each student to hear about their thought process and connections they are making is an unbelievably powerful tool for teachers. Regular conversations are often tricky to schedule, time-consuming and then there is the matter of what the rest of the class is busy doing while you are meeting with each individual student. Many teachers have been dabbling with the idea of video reflection as a means for more frequent formative assessment. Given that each of our students has a Chromebook with a webcam, this is a fantastic idea.

I am so excited to introduce you to my new favorite free tech tool, Recap, the free video response and reflection app! This app gives you a secure, and user friendly way to use video in the classroom. It is brought to us by a company called Swivl. They make that amazing Robot camera that moves as you move around the classroom. They completely understand the power of video images for learning.

Recap allows students to respond on video to questions created by their teacher and then it asks them to rate their response. Student responses are recorded privately, within the app, and teachers can then review answers all in one place. This easy to use format gives teachers insights into how individual students are thinking, while also collecting data on the whole class. Since Recap can be used on any device and is so easy to use, it can be utilized for frequent video formative assessments. There are many options for sharing responses so teachers can highlight or share responses with parents, case managers, other teachers, or an entire class.
How it works...


  • Teachers assign a question or group of questions to a student, a group of students, or a whole class. The questions can be in text or video format. The teacher can decide how long the student responses can be, the shortest is 30 seconds and the longest is 2 minutes. Students do not have to use the whole time. 

  • As students respond, teachers can watch their videos and leave written feedback for them. They can also share responses with other students for peer review, teachers, or parents. 

  • Teachers can look at the whole class's data and see how they rated their responses.

Ready to give Recap a try?


Just go to Letsrecap.com and sign in as a teacher. From there, you can have your students create private student accounts or you can use your class pin and add student names. When your students enter your class, they will click on their name. 

When you sign up, you will be given a "demo class" with some student video responses already there for you to try. You can set up assignments and give feedback in your demo class just to try it out and see how it works.

Here is a 2 minute quick start video from Recap:


Recap Quick Start from Swivl on Vimeo.


Are you using video reflection in your classroom? Going to give Recap a try? Feel free to comment below!

Tuesday, April 19, 2016

FTT - OpenBadge.me

Changing the Educational Game
with Digital Badging

@joe_edtech/@LisaBerghoff


A couple of years ago, I attended a conference that hosted a TEDx event instead of a Keynote address. Perhaps the most outstanding speaker I saw that night was Ali Carr-Chellman from Penn State University who talked about her program, "Re-Engaging Boys." If you have a few minutes, you can watch her TED Talk below:


If you don't have time to watch the whole thing, here's a brief summary of a couple of the statistics she cites:

  • For every 100 girls suspended from school, there are 250 boys suspended from school.
  • For every 100 girls expelled from school, there are 335 boys expelled from school.
  • For every 100 girls in special education, there are 217 boys.
  • For every 100 girls diagnosed with emotional disturbance, there are 324 boys.
  • The numbers are worse for boys of color, or boys who come from economically challenged homes.
  • Boys are 4 times as likely as girls to be identified with ADHD.
  • 60% of Baccalaureate Degrees go to women - some universities are approaching 70%
One of Professor Carr-Chellman's suggestions is that we can re-engage boys by utilizing video games in the classroom. While her research might be the most extensive on the topic, Professor Carr-Chellman's conclusions are not unique. There is a growing chorus of teachers out there who suggest that adding some elements of gamification can boost student engagement across the board, but especially in boys. 

I started thinking about this topic again because Lisa and I attended the CoSN conference two weeks ago, and the most dynamic session I attended while I was there was about gamification in the classroom by Dr. Liz Kolb from the University of Michigan. Dr. Kolb said her research was really in its beginning phases, but she had seen some positive results by adding elements of gaming to her preservice education courses, and she reported that those gains were highest amongst her male students.

Dr. Kolb suggested that it is fairly easy to start the process of gamification by instituting some student choice into your classroom activities and awarding students digital badges based on accomplishments. I think I'll have much more to offer the district from Dr. Kolb's work in the very near future, but for those of you who might be ready to start badging in the classroom, you need two things. You need a site for creating badges, and you need a site for posting and awarding your badges. For this week, let's focus on creating digital badges.

Part of the Mozilla Open Badges Project, OpenBadges.me allows you to create simple graphic badges that you can download to your computer and post to any website. According to the website, the OpenBadges.me "designer provides a simple way to layer different shapes and images on top of each other to create an attractive Open Badge graphic. The tool lets you add text, color elements, move certain elements and even fade items in and out - all presented in an easy-to-use web page."


Click here for an easy to follow guide on using OpenBadges.me. If you get stuck, you can even go to the guide and post a question. Someone from the Open Badges community will respond to your question.
----------------------------------------------------------------------------------------------------------------------

Next week, I'll provide you with three different platforms for posting and awarding badges to your students.

Tuesday, March 22, 2016

FTT - Tools to Maximize YouTube in Class


Maximize The Benefits Of YouTube, Minimize The Annoyances

@LisaBerghoff/@Joe_Edtech


It is so exciting to see how many teachers are taking advantage of YouTube in the classroom. According to Digital Stat Articles 2/14/2016, 82% of internet users aged 14-17 use YouTube. It makes sense that we would leverage this user- friendly, engaging, massive collection of videos for our students' benefit. There are endless possibilities when it comes to learning applications with video. As much as I love YouTube, there are a few minor inconveniences that can feel not so minor when you are in front of a room of 25 adolescents.  First of all, how often have you cued up an amazing video for your class but first you must awkwardly sit through a 15 second commercial?  I am usually just crossing  my fingers that it's an ad for something that is  age appropriate and extremely boring. Otherwise, guess what my students take away from the whole lesson?  That's right! All of that time I spent searching for the perfect video is completely wasted because of one 15 second ad.  Ok, here's another one.  The video is over, the students were completely amazed and are ready to discuss, apply, and extend what they have learned (work with me here) but YouTube shows an entire screen of additional videos that I may or may not want to show.  While we're at it, does anyone else find the strip of related videos down the side of the screen very distracting?

You get the point.
What's a teacher to do?

I have a few tools for you to try that are designed to eliminate these annoyances and maximize the benefits of video.

Adblock for YouTube 

This is a chrome extension which means it lives in the upper right corner of your chrome address bar. Little known fact, that chrome address bar is called the omnibox. There will be extra credit for anyone who uses the word omnibox in a sentence today. The Adblock for YouTube extension magically takes away those ads that automatically play before your actual video plays.


Quietube and Viewpure


Removing the video ads is wonderful but what Quietube and Viewpure do is absolutely amazing. These free tools eliminate the distractions such as suggested videos, comments, and ads.  When you go to Quietube's website you will be very underwhelmed. These are no frills tools that deliver on their promise to do a specific job. All you need to do on your end is drag the quietube button up to your bookmarks bar and when you are watching a video on YouTube, simply click the button.  You will get a clean screen with nothing but a viewing box showing your video.  Viewpure works very much the same way.  You can drag the "purify" button up to your bookmarks bar or insert the YouTube link into the space on the website and click "purify" to get the new link. Under the viewing box you can click to get a short link to share with your students so they too will only see the video.  You can put that link into Google classroom or whatever system you use to  share content with your class.  When your students click the link, they will view the video in quietube format.  You also have an option for a black background.  Here is a 35 second tutorial:


DF YouTube (Distraction Free) 


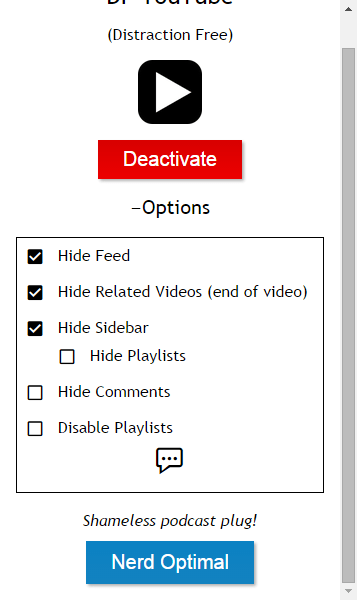
If you're still reading this post then your persistence will be rewarded. I have saved the best (in my opinion) for last.  DF YouTube is a chrome extension that takes away the ads, thumbnails, video recommendations grid that appears at the end of a video, comments, etc.  The extension makes all of these settings configurable!  You can click on the extension and click "options" to easily check or uncheck what items you would like to hide.  The one downside to DF YouTube that I can see is that it does not give you a link to share with your students.  This extension is perfect for displaying a video to a group.  If you are sharing a video with students and you want it to be without the distractions, I would suggest using Quietube or Viewpure.


As we continue on this journey of transforming education through the use of new tools and a new way of thinking about teaching and learning, I am confident that video will remain a fan favorite in our classrooms.
-----------------------------------------------------------------------------------------------------------------
How are you using YouTube with your students?  Post in the comments below. I'd love to hear from you!

Tuesday, March 1, 2016

FTT - Choosito!

Using Choosito! to Differentiate by Reading Level

@joe_edtech / @LisaBerghoff

Technology changes. Sometimes, I don't like the changes. But it happens and I learn to get over it. For instance, I have spent a lot of my time teaching people how to search well using Google's Advanced Search features - and one of the things I loved to teach about was sorting results by reading level. OK, Google didn't give you Lexile levels or anything like that, but the search engine used to categorize the results by Basic, Intermediate, or Advanced reading levels. Alas, Google giveth, and Google taketh away - reading levels are no longer available in Google's Advanced Search. 

However, Choosito! is a free Web2.0 tool that will allow you to search the web, and their curated library, and filter by both content and reading level. Here's a short video to help explain Choosito! a little better:


Once you create a free account and log in, you can go to Choosito! Search. Simply enter the topic as you would on Google, then choose your categories. What reading level do you want? Are you looking for that topic in Humanities or Business & Career? And are you searching the web, the Choosito! Library, or are you searching for a school safe image?
When you get your results, you get a little more than a link to a website. You get a preview of the page, the website "ranking" from other Choosito! users, and the ability to add the resource to your own curated page (click the "+"). Some of your resources may have an icon that looks like a little red schoolhouse. That means the resource has been vetted by a number of other teachers and librarians and added to the Choosito! library.
____________________________________________________________________________

If you've found other ways to get differentiated Internet search results, please tell us about them below.


Tuesday, February 23, 2016

FTT - Student Backchanneling

Encouraging Productive Online Conversations in the Classroom with Today's Meet and 81 Dash

@LisaBerghoff/@Joe_EdTech


I was at a conference a few years ago and even though the session that I was in was fascinating, it had been a long day and in typical fashion, I found my mind wandering.  Typically, I would have started making lists of things that I needed to accomplish in the upcoming week, ingredients that I needed to pick up from the supermarket, or my March Madness picks.  However, at this particular session the presenters had set up a backchannel.  I was new to the idea of a backchannel and was curious to give it a try.  One of the presenters was moderating the backchannel while the other was presenting.  Before I knew it, I was exchanging ideas with other participants in the room.  Did we stay on topic the entire time? Absolutely not. Was I more on task using the backchannel than I would have been if I was writing out my grocery list? Definitely. Also, I was actually interacting and creating meaning with other educators and not just sitting and consuming information. During this particular conference session, the backchannel gave me permission to converse with other teachers who were also in the room without disrupting the session. I was hooked!

The term backchannel refers to a digital conversation that runs concurrently with a face to face activity. Backchannels have many applications in our classrooms. They empower student voice and help allow every student in the room to feel that they are participating in the knowledge building that is taking place in class.

Here is a just a short list of ways to use backchannels in class:

  1.  Assess prior knowledge. Have students use the backchannel to share what they already know about a topic.
  2.  Hold discussions of video content shared in class.
  3.  Have a "fishbowl" conversation where the students observing are actually interacting digitally.
  4. Check for understanding after a lesson.
  5. Crowdsource feedback from students on learning activities and then use the information for future lessons.
  6. Take a poll on a particular debate issue or topic. All students can participate in an unobtrusive way.
  7.  Have students ask questions or ask for clarification on something they don't yet understand.
  8. Engage shy students in classroom conversations.
  9. Brainstorm ideas for a project.
  10. Do a collaborative note taking activity.


Credit to Sylvia Rosenthal Tolisano: http://www.langwitches.org/blog

I'm ready to start using backchannels! Where/how do I start?

Ok, there are always multiple tools to use and people prefer some over others for various reasons.  Here are two backchannel tools that won't steer you wrong.

Today's Meet


Today's Meet is the most widely known backchannel. It is incredibly easy and a teacher can quickly set up a backchannel room in less than 30 seconds. Getting students on a Today's Meet backchannel room is quick and does not require a student log in but you can set your room for students to log in if you choose.  This backchannel is free and you can set your room to remain open for as little as a few hours or a full year. I'm excited to tell you that Today's Meet has recently added some teacher friendly features that were previously unavailable such as a projector view and built in QR code for your room but they also now have their "teacher tools", which are a paid upgrade. Join my Today'sMeet room here. 

81DASH  

81Dash was developed by teachers for teachers and they promise that it will always be free because they believe teachers should get free stuff.  How do you not love that?  This backchannel is perfect for classroom use because it is safe in that the teacher has the ability to monitor and control the discussion environment, called the "room" by 81 Dash.  Students can be uploaded by the teacher or the link to the room can be shared.  It also has the ever popular share to Google Classroom button. Conversation transcripts can be easily saved in pdf format and if a student deleted a comment, that comment will appear on the transcript in red. You can have unlimited students in a room and they are limited to 160 characters per comment in order to make the conversations easy to follow. Students can create their own private notes for themselves and you can create task lists for everyone in the room. You can also open or lock a room to control when comments can be added.  It sounds complicated doesn't it?  I promise that it is not. Here is a handy instruction sheet. Want to try it?  Join my room here and check it out.  


Tuesday, February 16, 2016

FTT - Side by Side Data Maps

Comparing and Creating Side-by-Side Maps with GE Teach

@joe_edtech/@LisaBerghoff

You know what has been really fun about the Presidential Primaries so far? I don't either, but as the traveling circus goes from state to state, and the candidates talk about issues affecting our globe, we have an excellent opportunity to engage our students in real conversations about how geography, political and physical, impact economic and political choices. What impact can we see on the primaries in New Hampshire and South Carolina based on issues like demography, population density, and migration? Is there anything about geography that makes one group of candidates more popular in the northeast and another group popular in the south?

GE Teach is a fairly basic web 2.0 tool that you could give to your students to explore those kinds of issues. Furthermore, since GE Teach is built on Google Maps, you can have your students simply use the maps provided inside the tool, or they can import and analyze their own maps from Google. In it's basic form, GE Teach lets students compare different data sets in side-by-side or layered maps, or it lets students annotate and determine measurements for distances and altitudes.

If you are thinking of working with teachers from other disciplines, GE Teach is a simple tool that can be used to start conversations. What better way to discuss science, history, politics, language, and statistics that with comparative map data?

GE Teach is a relatively new tool, and it continues to change as it's creator, high school teacher Josh Williams adds and improves features. While it is fairly intuitive, it is easy to get lost playing with the maps and layers. The site offers several tutorial videos, and I would suggest starting with them instead of hunting and pecking on the site. But my best advice is to turn your students loose. Let them explore and create with the site. That might actually provide a leadership role to some of the students in your class who are great with these kinds of tools but who haven't always been seen as "academic" leaders in your class.

Here's Mr. Williams' intro video. It is almost 9 minutes, but provides a great overview to all of the basic capabilities of the site:


------------------------------------------------------------------------------------------------------------------
Can you think of a good lesson using GE Teach? Tell us about it in the comment section below.

Tuesday, January 5, 2016

FTT - Text 2 Mind Map

Text 2 Mind Map Home Screen
Support Both Linear & Non-Linear Thinkers With Text 2 Mind Map

@joe_edtech/@LisaBerghoff

You don't have to spend very much time trying to solve a problem or work through a set of directions with a group of people before you figure out that people think about things differently. I have two friends who love to put things together and are considerably better at that than I am. However, they go about it in very different ways. One is meticulous about reading every word of the directions provided or manuals included before he ever attempts construction. Then he will lay out all of the materials and tools and follow the directions line by line until he is finished. Friend number two is a tinkerer. He believes that directions and manuals represent the least possible creative way to complete the job. Since I've seen them both build some amazing and beautiful things, it is impossible for me to say which one of them is doing it "the right way."

The same kind of thing applies to the classroom. I've worked with teachers who insisted that their students take notes a certain way, sometimes using a certain color of pen, highlighting, and underlining, and numbering the items exactly as the teacher would have done it if the teacher were taking the notes. I even understand this method of teaching - some students really need some directions on taking notes. However, in my first year of teaching AP European history, I met a student that simply didn't think in a fashion that fits with structured note taking. Often times, when he was trying to understand relationships, he would draw pictures. Since he was easily the best, and most engaged student in the class, it would have been silly for me to require him to take notes in a manner that is awkward and foreign to him. That is why I believe it is important for us to offer students choices, and help them learn how they best learn.

In a previous blog post, I wrote about the importance of making Mind Mapping available to kids who don't necessarily think in a linear fashion. But what do you do if you have to accomodate both linear and non-linear thinkers in one group? Text 2 Mind Map is a pretty simple Web 2.0 solution that allows kids to create Mind Maps from outlines. They maps can be downloaded or shared via email. Here is a brief overview of using Text 2 Mind Map:


The downside to Text 2 Mind Map at the moment is that it isn't truly a collaborative Web 2.0 tool. In other words, your students can't create accounts (that is a premium feature) and share editing privileges with another student or with you. This is strictly for creating a mind map from an outline.

-----------------------------------------------------

What tools do you use to help kids think about their own thinking?


Tuesday, December 8, 2015

FTT - Grammarly for Chrome


Using Grammarly To Improve Online Writing

@joe_edtech / @LisaBerghoff

I grew up watching Kelsey Grammer playing Frasier Crane on tv, a character who frequently corrected people's grammar. Kelsey and I have some traits in common and I have often quoted his Frasier when I've had to do something uncomfortable or hypercritical, "It's like correcting people's grammar. I don't do it to be popular." Apparently, we share quite a few traits.
"I don't do it to be popular."

I've found that there are two types of people in the world. Type 1 will post something on Facebook confusing "their" with "there" and "two" with "to," and Type 2 will post a comment correcting both misspellings. I am Type 2, usually. 

Back in the day, we all learned grammar and usage by endlessly diagramming sentences on the blackboard. Then the world changed and Bill Gates taught everyone to rely on Microsoft Word to correct their spelling and grammar mistakes. Then the world changed again and we all started writing online - where there is no reliable grammar check! The horror!

Grammarly is a Web 2.0 program and a browser extension that can help civilize Internet writing. Once the plugin is installed, Grammarly can help correct your grammar mistakes in Gmail, on Facebook posts, in LinkedIn, on WordPress, or literally anywhere you write online. I'm sure it would work in Blogger if I needed it.  (Insert sly smiley face here.)

After you've installed the extension and created a free account, there are two simple ways to use Grammarly. Anytime you are writing online, you can simply click the extension button on your browser, and Grammarly will launch a grammar and spelling checker. Just like in Microsoft Word, Grammarly will underline detected mistakes and make suggestions. You can choose to accept Grammarly's suggestions or not. 

If you need something more, you can create or upload writing drafts to your account on grammarly.com. Online, you can use Grammarly's plagiarism checker and benefit from tools like the sentence structure suggestion. If you are working on something really important, and you purchase a premium account, you can even consult with one of their professional proofreaders. However, most people will be just fine with the free service they provide online.

The best solutions to your grammar, spelling, and usage problems are careful composition and meticulous proofreading. However, when you are writing quickly for a public audience, Grammarly can be a pretty useful substitution for meticulousness. 

---------------------------------------------------------------------------------------------------
If you've got some time, here is Dottotech's Review of Grammarly:

Tuesday, December 1, 2015

FTT - Bee Line Reader


Easy On The Eyes! Read More In Less Time With Bee Line Reader

@Lisa Berghoff /@Joe_EdTech


In the past several years there has been a giant push for educators to have a better understanding of literacy skills.  We know that reading is imperative for learning and we know that comprehension plays a major role in multiple subject areas.  However, certain aspects of reading that often get overlooked are fluency,  decoding speed, and tracking ability, especially when dealing with reading digital text.  As more and more of our text is presented in digital format, it is necessary for educators to explore ways to help our students follow what they read with increased speed and decreased eye strain.  

Bee Line Reader makes reading faster and easier by making a color gradient that guides your eyes from the end of one line to the beginning of the next.  I have been using the Bee Line Reader for 2 weeks and this simple tweak does seem to be helping me with both focus and eye strain.  The Bee Line Reader is an extension that can be found in the chrome web store.   You can use it as much as you want for free for 30 days. After that, you can continue to use it 5 times per day for free or upgrade to the pro version.  

I believe that the Bee Line Reader can benefit all of our students, but it might be a game changer for our kids with dyslexia, ADD, or students  who struggle to decode. 

Here's the explanation of how it works, while using the Bee Line Reader: