Showing posts with label Web 2.0 Tools. Show all posts

Tuesday, November 22, 2016

FTT - Triventy

From the Triventy Website
Sharing the Load: Collaborative Online Quiz Creation with Triventy

@joe_edtech/@LisaBerghoff

It is the day before Thanksgiving Break and I think one of my friend's Facebook Posts from last night summed up everyone's feelings perfectly, "I have decided that I no longer want to be an adult. If anyone is looking for me, I will be in my blanket fort, coloring."

It has been an eventful and crazy Fall. After suffering through 108 years of abject failure, the Cubs won the World Series and an entire region of the country came together to celebrate a victory which transcended baseball. As a country, we are dealing with an election cycle that more closely resembled a badly staged reality TV show than anything I've ever seen before. Even still, with seismic social events going on, our lives, and our students' lives, go on. Kids are dealing with classes, activities, medical issues, family issues, stress about the future, and the pitfalls of navigating everyday spaces in high school. This Fall, more than almost any other, I'm conscious of the fact that our kids need us to talk to them - they need to know that there are adults who care about them and will be there for them. It is a reminder that the most important thing that we do is teach kids, not content.

But having said that, class goes on. And we are faced with meeting the challenges of providing our students with the skills and knowledge necessary to be successful at the next level. Especially when demands are high, and timelines are tight, I think we have to find ways to share the load and work together. If we've lost some class time this Fall because of, well, the world interfering with our plans, we at least have great colleagues on whom we can rely and with whom we can collaborate. 

Generally speaking, the Free Tech Tools that we choose to share are selected to provide you with a different way of engaging students. Today's tool was selected as a different way of engaging your colleagues and capitalizing on our shared ideas and efforts.

Most of us are familiar with online quiz/gaming tools like Socrative, Kahoot, and Quizlet (see our previous blogs for detailed information about all three). Triventy.com is not a paradigm shifting online quiz platform. It is an online quiz platform that makes it easy for several teachers to work together to create a quiz. Need to pare down a lesson to its most important skills to save time? Or do you want to spend a little time during your late start working together focusing on the essential questions from a unit of study? Triventy.com is a tool that can facilitate some of that work.

Start by going to Triventy.com and sign up for a free account. Since Triventy integrates nicely with Google Classroom, make sure that you use your district email account when you sign up. Also, in order to use the full product for free, you'll need to select the Free Edu version and identify District 113 when you sign up.

Once you've signed up and you begin writing your first quiz, the platform will look a lot like other quiz creation tools. You can add images to identify topics. You compose questions and answer choices. Decide if you want the questions to be worth points and have a right answer, or serve as a poll/discussion starter. There is even a place to provide hints and feedback.


What makes Triventy different, though, is the ability to invite others to add questions to the quiz.


Once you click the button to invite question contributors, you get a link that you can share with your colleagues in a variety of different ways (email seems to be the most efficient). Your colleagues click the link and add questions. As the owner of the quiz, you can always decide to edit or remove any questions that have been added to your quiz. Also, if you have a group of people adding questions, their will be an author's name attached to each question. No question is submitted anonymously.


Finally, since you can integrate the tool into Google Classroom, you can actually invite your students to create quiz questions. Never underestimate the power of asking your students to find the right questions to ask! The same rules apply to students. They cannot submit questions anonymously, and all questions they submit will have to be approved by the quiz owner.

Here is a short video introduction to Triventy.com from Richard Byrne, author of the Blog Free Technology for Teachers. (I highly recommend his blog - if you are ever stuck for an idea, that is a great place to start.)


-------------------------------------------------------------------------------------------------------------
Got any other tools that help you share the workload with your colleagues? Tell us about them below!


Tuesday, November 1, 2016

FTT - VideoNot.es & Google Drive

Flipped or Blended - Make Taking Notes on Videos Easy and Visible with VideoNot.es

@joe_edtech/@LisaBerghoff

One of the common complaints I hear about Chromebooks is how difficult it is to multitask on them. Sure you can open an endless number of tabs across the top, but moving between tabs to accomplish goals can be difficult. So, what do you do if you have a presentation or a video you want to give to your students, but you also want them to actively take notes or synthesize material?

If you are using an online video, VideoNot.es could be a great solution for your students. An add-on to Google Chrome, VideoNot.es allows you to split your screen and watch an instructional video on the left and take time-stamped notes on the right.


And because it is all integrated with Google Drive, it is simple to share notes in collaborative groups or just between student and teacher.

VideoNot.es can be found on the Chrome Web Store by clicking here. VideoNot.es is an extremely simple tool to use, but here is a quick video demo from Teacher's Tech:


-----------------------------------------------------------------------------------------------------------

What notetaking or multitasking shortcuts have you found for the Chromebook?

Tuesday, October 25, 2016

FTT - Google Read & Write

Improve Reading and Writing Confidence With Read&Write


@LisaBerghoff/@Joe_EdTech


Remember the first time you saw Google docs? The whole idea of students being able to share documents, work collaboratively, embed links, images, etc. regardless of the device and regardless of physical location still completely blows my mind. The list of things we are now able to do to help our kids learn keeps growing but one thing remains, reading and writing is key for student success in any  subject area.Yes, even math. The big question is, what do we do when we have students who are struggling with reading and writing? There is a company called TextHelp whose mission is to bring literacy to life for everyone. They have several amazing products but today I want to highlight my favorite. 

Read&Write for Google is an extension that is free. Many of our students are already using it but may not know the full extent of what it can do. For those of you who are new to Read&Write, it allows students to hear words, passages, or whole documents read aloud with highlighting that makes it easy follow. It has both a text and picture dictionary. Students can hear words translated into many languages. The read aloud and translating features are free for everyone. TextHelp gives teachers their premium version for FREE and it's yours forever (their words not mine). To sign up and get your free premium version, click here after installing the extension. Students can sign up for a fee 30 day trial of the premium version. The upgraded version, which is completely free for teachers, also has word prediction, speech to text, voice notes, highlighted text can be automatically converted into a new document. The list goes on because TextHelp is constantly adding features. 
Read&Write works on Google docs and on any web based text. For example if you have students reading an article on National Geographic's website, they can use the read aloud features for that article, hopefully with headphones. The premium version also includes pdf, epub, and kes files. 

Adding and using Read&Write is extremely easy. Just go to the chrome web store from your apps doc or click here. Once you click to add Read&Write, you need to give it permission to access your google account. Once it is successfully installed, you will notice a little purple puzzle piece that will show up near the top of your screen. Clicking on that puzzle piece activates the Read&Write features. As you hover over the icons, you will see text pop up that explains what everything does, though I bet you can guess which button stands for "play" and which one stands for "stop".

Helping your students add Read&Write is going to be a breeze because it's the same process. The kids can control the speed and the voice that is used for the read aloud by clicking on the gear icon in Read&Write. Since it is an extension, it will work on whatever device the student is using, as long as they are logged into chrome.

Giving your students access to Read&Write helps them to utilize the supports that they need independently. I'm not sure how it looks in your classes but in my biology class, having a teacher sit next to you and read to you can really negatively affect your self esteem as a student. When my students are able to use supports in a way that does not draw attention, they are more likely to use the supports. Also, having those supports available gives them more confidence in their reading and writing and therefore makes them more likely to participate actively in class. 

Here is a short video introduction to Read&Write:


Are you or your students using Read&Write? If so, post in the comments section below and let us know how it's going. 

Tuesday, October 18, 2016

FTT - Quizlet Live

Racing Towards Mastery with Quizlet LIVE

@joe_edtech/@LisaBerghoff


A couple of weeks ago, I was conducting a site visit at DHS and we walked into one of our Spanish classes. The kids were excitedly working together, competing in teams using a tool called Quizlet Live. I've used Quizlet a lot as a flashcard generator, but I hadn't seen Quizlet Live. It is an easy to use tool that turns group activities into fun and challenging games. So, I had to ask the teachers to write about it. This is the resulting
guest post by DHS Spanish Teachers Mercedes Koch (@Profe_Koch) and Matt Wallace

Do your students use Quizlet to study key vocabulary terms?  Do your students like to play collaborative and interactive games in class?  If so, Quizlet Live is perfect for you and your students!

In the very recent past, Quizlet has released Quizlet Live, which takes existing Quizlet sets and creates a collaborative, interactive game using the information contained in the set.  The general idea is very similar to that of Kahoot!.  However, there are a few differences which will be highlighted below.  Here is a brief overview of how to access Quizlet Live and how to play.

Step 1: in order to access Quizlet Live, you must request access.  Email beta@quizlet.com  with your username and request access to Quizlet Live.  You will receive an email once it is active on your account and at the top of each Quizlet set you will see this icon:  


Step 2: When you are ready to start a game with a particular set, click “Live”.  You will be taken to a page with a “Create Game” link.  Click “Create Game” and the next step is when your students will become active.  The next page will look like this:


You will want to project your screen to the class so that the students can see and enter the code at quizlet.live.  They will enter their names, and the names will show up in the black portion on the right side of the page.  If a student enters an inappropriate name, simply click on the name to erase it and ask that student to re-enter their information.

Step 3: When all students are in the game, and when you click Create Game, Quizlet will randomly group the students in your class into groups of 3 or 4 and the groups will be given a team name. Apparently Quizlet is very animal-friendly because the team names are always names of animals.  You will want the students to sit next to each other during the game, so they should find their teammates and sit next to them at this point.  You are now ready to start the game.

Step 4: The actual game consists of the students seeing some sort of question posed to them, a vocabulary term for example. Then, they are given multiple options.  However, not all students on the team will have the correct answer as one of their options.  This is where the collaboration comes in. They also see the options given to their teammates.  This is what a student sees:

The middle column contains their options and the two columns on the sides contain their teammates’ options.  The students must discuss to determine the correct answer, and the student with the correct answer on their screen is the only one who can select it.

One difference between Quizlet Live and Kahoot! Is that the questions posed to one group will be different from those posed to another group.  Let’s say that your Quizlet set has 50 terms.  Each group’s questions will be a completely random sampling of those 50 terms.

Step 5: How does a team win?  When a team answers a question correctly, Quizlet Live automatically moves them onto the next question (which is different from Kahoot! where everyone is working on the same question at the same time).  While teams are accumulating points, the teacher screen tracks their points:
The first team to 12 correct answers wins. HOWEVER, when a team answers incorrectly, their points are reset and they start over at zero.  The new questions posed to the group are again chosen at random from the set, not a repeat of what they already answered.

A few extra notes:  
  • If you want to play another game/round but also want change the groups, you can do so with the click of a button.  
  • You can add students to the game using the game specific code.  
  • After completing a game, you can see the stats of the game.  This may be helpful for identifying common misconceptions related to the content.

--------------------------------------------------------------------------------------------------------------------------
I'd like to thank Mercedes and Matt for "volunteering" to write this week's post. If you are using a cool free tool to improve learning in your classroom, tell us about in the comments below - or email me and author an upcoming post!


Tuesday, May 24, 2016

FTT - Screencastify / CaptureCast

Photo Available on Pixabay CCO
When One Door Closes - Find a New Door

Two Great Alternatives to Snagit

@joe_edtech/@LisaBerghoff

Earlier this month, TechSmith announced that it was ending support for most of its free educational programs, including SnagIt, which had been the easiest screencasting tool available for the Chromebook. It happens. TechSmith will make most of their programs available for the cost of a license (per student no doubt). So, let me be the first to declare it in no uncertain terms - SnagIt is DEAD TO ME. With resources tight and other options out there, I don't see any reason to pay TechSmith for this service - and I think this will hurt their overall educational market.

So, we move on. There are two other great options for screencasting on Chromebooks, and both of them have a few more features than that old program we used to use. CaptureCast and Screencastify are both free and available on the Chrome Web Store for your students to use. 

Screencastify is a free Chrome extension available on the Chrome Web Store. Once you've installed the extension, and given it access to your Google Drive Account, the Screencastify icon appears in your Chrome tool bar. Click it and you can record an active Chrome Tab, the entire internal display - great for recording a full screen presentation, or recording from your Chromebook's camera. If you are flipping your lessons, you might consider selecting the option to embed the webcam in the bottom-right corner of the screen. That way your students connect with you and not just your content.

One of the features I really like about Screencastify is that you can pause your screen recording and continue with the same recording later on, handy for transitions or breaks in the recording.

When you finish recording, you have the option of making the video a little more polished by trimming the beginning or ending. Also, assuming you checked this option when setting it up, your video will never be stored locally on your computer. It will automatically be saved to a Screencastify folder in "My Drive."

Here are two sets of directions on getting started with Screencastify. First, traditional written directions using Google Slides:


Secondly, video instructions posted on YouTube (I originally created this for a classroom of students, so you can share this with your classes if you want):


The one problem that I've encountered with ScreenCastify is that it doesn't work on older Chromebooks (like the original Samsungs) and it won't work if the students have saved a large number of files to their local storage on the Chromebook.

CaptureCast is new to me, but it works very much the same way. One of the differences between CaptureCast and Screencastify is that CaptureCast will allow you to link to either YouTube or Vimeo, if you prefer Vimeo. Here is the official getting started video for CaptureCast:


Both of these tools allow you to record your screen and use your webcam to record your face while you are presenting. That is a nice way to add a social presence to a flipped, blended, or personalized lesson.

Tuesday, May 3, 2016

FTT - Psnap.it

Make More Positive A Snap 
With Psnap.it


@LisaBerghoff/@joe_edtech


This is a pretty big week!

Happy Teacher Appreciation Week to all of my wonderful colleagues and friends who are working tirelessly to provide our students with the absolute best learning experiences possible.  AND an early Happy Mother's Day (on Sunday- take the hint) to all of the moms who do the world's hardest job each and every day.

Since we're in the spirit of appreciation and gratitude (especially now that PARCC testing is over), this seems like the perfect time of year to introduce you to my latest discovery and absolute favorite free tech tool: Psnap!  

Psnap is my favorite because it is all about storing and sharing moments of positivity.  On the surface, Psnap may seem like a fluffy, cutesy system for giving people props. Actually, it was carefully created by the fantastic people at PF Loop, Inc. They have been looking at scientific research that shows the impact that remembering moments that matter and exchanging positive expressions has on one's health, wealth, and wellbeing. A partial list of the researchers and academic published writings that helped guide the development of Psnap can be found here.  The idea is that often when something wonderful happens whether it be a really big deal or just a small random act of kindness, over time we will most likely forget that positive moment. Psnap allows us to capture that moment and store it, share it, or take it out later and remember it.  Remembering and celebrating positive things in our lives can make a big difference. 


Here is how it works...

Go to psnap.it to create an account. You can send a Psnap to anyone with an email address. Once they accept their Psnap,  an account is automatically created for them.  To create a Psnap, just click on the "create" button at the top of the screen.  You will add the receiver's email address and then choose the type of Psnap you want to send. The images that are there will change daily. You can also add your own image or leave it blank.  Next, you will type in the subject and then a message. You will choose a category and add a tag value for this Psnap. As you send and receive Psnaps, you will be able to sort and filter by category and tag value. Click the orange "Psnap.It" button and you've sent a Psnap!


When you open a Psnap, it looks like this..


Make sure that you have all of your email addresses listed in your profile so you can send and receive to and from family, friends, colleagues, etc. Your Psnap dashboard shows all of your psnaps and is a wonderful scrapbook of positive moments that you can look back on and smile. 
Psnap is a "work in progress" and the developers are always looking for feedback and suggestions. 

Let's put some positive into the world this week with Psnap. Thank a colleague, appreciate a friend, let your mom know she's amazing, etc. Receiving an email that you have a Psnap waiting will definitely make you smile. 

How many Psnaps can we send in May?  Let's find out. Let us know what you love about Psnap. Feel free to add to the comments below. 


Tuesday, April 12, 2016

FTT - Google Keep

Do You Have To-Do Lists On Your To-Do Lists? Organize and keep it all straight with Google Keep.

@LisaBerghoff/@joe_edtech


Spring is here! The sun is shining earlier in the morning, the birds are chirping, the winter coats are getting closer and closer to the closet. I'm hoping to actually put them away very soon. This time of year always motivates me to clean out the clutter and reevaluate my organizational systems. My friends who are not teachers often make comments like "Oh, things must be winding down for the end of the school year." Ha! Those of us who work in schools know that the end of the year is actually something along the lines of running full speed into a brick wall.  Fourth quarter just gets busier and busier until it comes to a screeching halt.  I often wonder how it will all get done. This is when I really need some help with productivity and organization. My to-do lists start branching off into other lists and I begin to worry that something is going to fall through the cracks. 

Our buddies at Google have created a little known tool called Google Keep. Google Keep is a note-taking service that allows you to make virtual sticky notes. You can create lists, use images, color code your notes, and of course share your notes with others so you can collaborate and keep everyone in the loop.  GKeep is friendly, colorful, and easy to use. Also, you can use your Google apps account information to log in so there is no need to create a new account and create another password that you may or may not remember. There is a GKeep app that can be added to your android phone, iphone, or tablet. Think of Google Keep as a digital version of that little notebook that you may carry around with you. I keep a composition book in my bag and will often write little notes to myself or start brainstorming ideas in that book. With Google Keep, I don't need to have my book with me because I can access it from pretty much anywhere.
Screenshot from Lisa's computer using GKeep

Using Google Keep (or GKeep as the cool kids call it) makes a lot of sense for helping to keep track of your own to-do lists, big ideas, reminders, etc. As with all Google apps, it saves automatically and syncs to all of your devices. You can also add labels to make it even easier to locate all of your incredible ideas and important information. Of course you can search your notes so when you have amassed a large amount of amazing, inspiring, thought-provoking ideas you can retrieve them without a problem. 

When I think of classroom applications for GKeep, I know my students would benefit from using it when they are working on group projects. Imagine if a group of students used shared to-do lists which they can check off as tasks are completed.  Or at the very start of a project, they could create notes to keep track of their brainstorming thoughts. When we think about next generation skills, we know that being able to effectively work in groups on collaborative projects is extremely important. 
Students can use Google Keep for their own notes in class and can set reminders based on date and time OR location. For example, it can be set to remind me to update my blog when I get to my house. 

Got 47 seconds?  Here's an informational video about Google Keep:


What are some other ways that you use Google Keep in the classroom? Feel free to share in the comments section below.

Tuesday, March 22, 2016

FTT - Tools to Maximize YouTube in Class


Maximize The Benefits Of YouTube, Minimize The Annoyances

@LisaBerghoff/@Joe_Edtech


It is so exciting to see how many teachers are taking advantage of YouTube in the classroom. According to Digital Stat Articles 2/14/2016, 82% of internet users aged 14-17 use YouTube. It makes sense that we would leverage this user- friendly, engaging, massive collection of videos for our students' benefit. There are endless possibilities when it comes to learning applications with video. As much as I love YouTube, there are a few minor inconveniences that can feel not so minor when you are in front of a room of 25 adolescents.  First of all, how often have you cued up an amazing video for your class but first you must awkwardly sit through a 15 second commercial?  I am usually just crossing  my fingers that it's an ad for something that is  age appropriate and extremely boring. Otherwise, guess what my students take away from the whole lesson?  That's right! All of that time I spent searching for the perfect video is completely wasted because of one 15 second ad.  Ok, here's another one.  The video is over, the students were completely amazed and are ready to discuss, apply, and extend what they have learned (work with me here) but YouTube shows an entire screen of additional videos that I may or may not want to show.  While we're at it, does anyone else find the strip of related videos down the side of the screen very distracting?

You get the point.
What's a teacher to do?

I have a few tools for you to try that are designed to eliminate these annoyances and maximize the benefits of video.

Adblock for YouTube 

This is a chrome extension which means it lives in the upper right corner of your chrome address bar. Little known fact, that chrome address bar is called the omnibox. There will be extra credit for anyone who uses the word omnibox in a sentence today. The Adblock for YouTube extension magically takes away those ads that automatically play before your actual video plays.


Quietube and Viewpure


Removing the video ads is wonderful but what Quietube and Viewpure do is absolutely amazing. These free tools eliminate the distractions such as suggested videos, comments, and ads.  When you go to Quietube's website you will be very underwhelmed. These are no frills tools that deliver on their promise to do a specific job. All you need to do on your end is drag the quietube button up to your bookmarks bar and when you are watching a video on YouTube, simply click the button.  You will get a clean screen with nothing but a viewing box showing your video.  Viewpure works very much the same way.  You can drag the "purify" button up to your bookmarks bar or insert the YouTube link into the space on the website and click "purify" to get the new link. Under the viewing box you can click to get a short link to share with your students so they too will only see the video.  You can put that link into Google classroom or whatever system you use to  share content with your class.  When your students click the link, they will view the video in quietube format.  You also have an option for a black background.  Here is a 35 second tutorial:


DF YouTube (Distraction Free) 


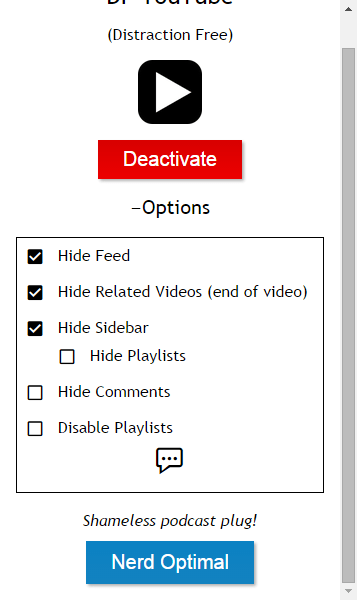
If you're still reading this post then your persistence will be rewarded. I have saved the best (in my opinion) for last.  DF YouTube is a chrome extension that takes away the ads, thumbnails, video recommendations grid that appears at the end of a video, comments, etc.  The extension makes all of these settings configurable!  You can click on the extension and click "options" to easily check or uncheck what items you would like to hide.  The one downside to DF YouTube that I can see is that it does not give you a link to share with your students.  This extension is perfect for displaying a video to a group.  If you are sharing a video with students and you want it to be without the distractions, I would suggest using Quietube or Viewpure.


As we continue on this journey of transforming education through the use of new tools and a new way of thinking about teaching and learning, I am confident that video will remain a fan favorite in our classrooms.
-----------------------------------------------------------------------------------------------------------------
How are you using YouTube with your students?  Post in the comments below. I'd love to hear from you!

Tuesday, March 8, 2016

FTT - Blendspace

What's The Best Tool For The Job? Blendspace Makes Blended Learning Effortless!

@LisaBerghoff/@Joe_EdTech


I get asked the following question at least once on a typical day: "If I'm going to use technology, can you teach me how to use the absolute best._______ ?" Go ahead and fill in the blank.  I'm often (but not always) hesitant to answer this question as many tools are more appropriate for some tasks while other tools are better suited for other tasks.  There is also the factor of personal preference that must be taken into account.  As busy teachers, we don't really have extra free time to spend learning how to use technology that we may or may not end up using.

That is why I am a huge fan of "blended learning", which is a mixture of face to face interaction along with web-based digital and media tools. There is no need to completely abandon those tried and true lessons that we know our students respond to.  There is also no need to constantly try to create something brand new.  The internet is a sea of rich resources that can be utilized for a huge range of teaching opportunities.  One issue however is that the internet  at times seems unwieldy because it can be endless and sorting out the quality from the crap can be tricky.

For those of you giving me a virtual high five right now, I'm happy to introduce you to Blendspace.  This free website and chrome app is there to help you create digital lessons in 5 minutes! It makes planning, building, and delivering lessons that integrate content straightforward and painless. You can create interactive, creative lessons with  some of the tools you are already using like YouTube, digital media, and your own files.  You can also take advantage of TES resources, which is a marketplace that helps teachers find free and paid online resources that are created by other teachers. and are available on Blendspace.  You can add a quick quiz, text, or bring in any files from your Google drive or your computer. 

Here is a 1- minute tour of Blendspace: 


Not sure you want to be creating digital lessons? How about having your students use Blendspace for digital storytelling, biographies,  or collaborative research projects? Students can use Blendspace for quiz and test review materials. Tired of slideshow presentations? Have your students use Blendspace to create an interactive presentation that will have everyone interested and engaged. Students can store their links, videos, pdfs, presentations and other digital content in an organized, interesting, and FREE way.

Want to see an example of a Blendspace lesson? Below is a lesson on magnetism that I created in less than 2 minutes.  Imagine what I could have produced in 5!  You can see that it has two powerpoint presentations, a worksheet, videos and images.  My students can access this resource at their own pace and I can easily track their progress.


Give Blendspace a try.

What are some of your favorite blended learning tools?  Post them in the comments section below.


Tuesday, February 23, 2016

FTT - Student Backchanneling

Encouraging Productive Online Conversations in the Classroom with Today's Meet and 81 Dash

@LisaBerghoff/@Joe_EdTech


I was at a conference a few years ago and even though the session that I was in was fascinating, it had been a long day and in typical fashion, I found my mind wandering.  Typically, I would have started making lists of things that I needed to accomplish in the upcoming week, ingredients that I needed to pick up from the supermarket, or my March Madness picks.  However, at this particular session the presenters had set up a backchannel.  I was new to the idea of a backchannel and was curious to give it a try.  One of the presenters was moderating the backchannel while the other was presenting.  Before I knew it, I was exchanging ideas with other participants in the room.  Did we stay on topic the entire time? Absolutely not. Was I more on task using the backchannel than I would have been if I was writing out my grocery list? Definitely. Also, I was actually interacting and creating meaning with other educators and not just sitting and consuming information. During this particular conference session, the backchannel gave me permission to converse with other teachers who were also in the room without disrupting the session. I was hooked!

The term backchannel refers to a digital conversation that runs concurrently with a face to face activity. Backchannels have many applications in our classrooms. They empower student voice and help allow every student in the room to feel that they are participating in the knowledge building that is taking place in class.

Here is a just a short list of ways to use backchannels in class:

  1.  Assess prior knowledge. Have students use the backchannel to share what they already know about a topic.
  2.  Hold discussions of video content shared in class.
  3.  Have a "fishbowl" conversation where the students observing are actually interacting digitally.
  4. Check for understanding after a lesson.
  5. Crowdsource feedback from students on learning activities and then use the information for future lessons.
  6. Take a poll on a particular debate issue or topic. All students can participate in an unobtrusive way.
  7.  Have students ask questions or ask for clarification on something they don't yet understand.
  8. Engage shy students in classroom conversations.
  9. Brainstorm ideas for a project.
  10. Do a collaborative note taking activity.


Credit to Sylvia Rosenthal Tolisano: http://www.langwitches.org/blog

I'm ready to start using backchannels! Where/how do I start?

Ok, there are always multiple tools to use and people prefer some over others for various reasons.  Here are two backchannel tools that won't steer you wrong.

Today's Meet


Today's Meet is the most widely known backchannel. It is incredibly easy and a teacher can quickly set up a backchannel room in less than 30 seconds. Getting students on a Today's Meet backchannel room is quick and does not require a student log in but you can set your room for students to log in if you choose.  This backchannel is free and you can set your room to remain open for as little as a few hours or a full year. I'm excited to tell you that Today's Meet has recently added some teacher friendly features that were previously unavailable such as a projector view and built in QR code for your room but they also now have their "teacher tools", which are a paid upgrade. Join my Today'sMeet room here. 

81DASH  

81Dash was developed by teachers for teachers and they promise that it will always be free because they believe teachers should get free stuff.  How do you not love that?  This backchannel is perfect for classroom use because it is safe in that the teacher has the ability to monitor and control the discussion environment, called the "room" by 81 Dash.  Students can be uploaded by the teacher or the link to the room can be shared.  It also has the ever popular share to Google Classroom button. Conversation transcripts can be easily saved in pdf format and if a student deleted a comment, that comment will appear on the transcript in red. You can have unlimited students in a room and they are limited to 160 characters per comment in order to make the conversations easy to follow. Students can create their own private notes for themselves and you can create task lists for everyone in the room. You can also open or lock a room to control when comments can be added.  It sounds complicated doesn't it?  I promise that it is not. Here is a handy instruction sheet. Want to try it?  Join my room here and check it out.  


Tuesday, February 9, 2016

FTT - Dotstorming

Real-Time Group Collaboration with Dotstorming

@LisaBerghoff/@Joe_EdTech


According to Mirriam-Webster, brainstorming is defined as a group problem-solving technique that involves the spontaneous contribution of ideas from all members.  Brainstorming is such an important part of the learning process.  It is imperative that students learn how to generate ideas, collaborate, and then make decisions about next steps for problem-solving. 


The main issue with traditional brainstorming in the classroom is that not every voice is heard. We tend to cater to our outgoing, confident students in these activities.  It's not that the quiet kids don't have thoughts to contribute, they are just, well, quiet.  Also, once your list of ideas has been generated, the next step is to discuss the merits of each idea and then make decisions about next steps.  Again, this is an exercise that will most often involve a few students. It can be awkward to make these choices as a group, even if all voices are heard.  When the goal is to engage and involve all of our students, it's time to add some new tools to our toolbox.

I'm excited to tell you about Dotstorming. Dotstorming is a real-timegroup brainstorming and decision making app.  This free tech tool allows all of your students to participate in brainstorming activities in 4 easy steps.  You create a dotstorming board, invite participants, add ideas, and vote on the ideas that you like. This site is no-frills and easy to use.  You can whip up a dotstorming board right in the middle of class and your students will think you're a genius.  Here is a video showing you the features of Dotstorming


Want to try Dotstorming as a participant? Click on this Dotstorming board to brainstorm your favorite tech tools.  Please feel free to add images or text. Don't have anything to add?  That's ok, just take a look at what is on there and vote for your favorites.  I can't wait to see which one wins!

Happy Dotstorming!

Tuesday, January 5, 2016

FTT - Text 2 Mind Map

Text 2 Mind Map Home Screen
Support Both Linear & Non-Linear Thinkers With Text 2 Mind Map

@joe_edtech/@LisaBerghoff

You don't have to spend very much time trying to solve a problem or work through a set of directions with a group of people before you figure out that people think about things differently. I have two friends who love to put things together and are considerably better at that than I am. However, they go about it in very different ways. One is meticulous about reading every word of the directions provided or manuals included before he ever attempts construction. Then he will lay out all of the materials and tools and follow the directions line by line until he is finished. Friend number two is a tinkerer. He believes that directions and manuals represent the least possible creative way to complete the job. Since I've seen them both build some amazing and beautiful things, it is impossible for me to say which one of them is doing it "the right way."

The same kind of thing applies to the classroom. I've worked with teachers who insisted that their students take notes a certain way, sometimes using a certain color of pen, highlighting, and underlining, and numbering the items exactly as the teacher would have done it if the teacher were taking the notes. I even understand this method of teaching - some students really need some directions on taking notes. However, in my first year of teaching AP European history, I met a student that simply didn't think in a fashion that fits with structured note taking. Often times, when he was trying to understand relationships, he would draw pictures. Since he was easily the best, and most engaged student in the class, it would have been silly for me to require him to take notes in a manner that is awkward and foreign to him. That is why I believe it is important for us to offer students choices, and help them learn how they best learn.

In a previous blog post, I wrote about the importance of making Mind Mapping available to kids who don't necessarily think in a linear fashion. But what do you do if you have to accomodate both linear and non-linear thinkers in one group? Text 2 Mind Map is a pretty simple Web 2.0 solution that allows kids to create Mind Maps from outlines. They maps can be downloaded or shared via email. Here is a brief overview of using Text 2 Mind Map:


The downside to Text 2 Mind Map at the moment is that it isn't truly a collaborative Web 2.0 tool. In other words, your students can't create accounts (that is a premium feature) and share editing privileges with another student or with you. This is strictly for creating a mind map from an outline.

-----------------------------------------------------

What tools do you use to help kids think about their own thinking?


Tuesday, December 8, 2015

FTT - Grammarly for Chrome


Using Grammarly To Improve Online Writing

@joe_edtech / @LisaBerghoff

I grew up watching Kelsey Grammer playing Frasier Crane on tv, a character who frequently corrected people's grammar. Kelsey and I have some traits in common and I have often quoted his Frasier when I've had to do something uncomfortable or hypercritical, "It's like correcting people's grammar. I don't do it to be popular." Apparently, we share quite a few traits.
"I don't do it to be popular."

I've found that there are two types of people in the world. Type 1 will post something on Facebook confusing "their" with "there" and "two" with "to," and Type 2 will post a comment correcting both misspellings. I am Type 2, usually. 

Back in the day, we all learned grammar and usage by endlessly diagramming sentences on the blackboard. Then the world changed and Bill Gates taught everyone to rely on Microsoft Word to correct their spelling and grammar mistakes. Then the world changed again and we all started writing online - where there is no reliable grammar check! The horror!

Grammarly is a Web 2.0 program and a browser extension that can help civilize Internet writing. Once the plugin is installed, Grammarly can help correct your grammar mistakes in Gmail, on Facebook posts, in LinkedIn, on WordPress, or literally anywhere you write online. I'm sure it would work in Blogger if I needed it.  (Insert sly smiley face here.)

After you've installed the extension and created a free account, there are two simple ways to use Grammarly. Anytime you are writing online, you can simply click the extension button on your browser, and Grammarly will launch a grammar and spelling checker. Just like in Microsoft Word, Grammarly will underline detected mistakes and make suggestions. You can choose to accept Grammarly's suggestions or not. 

If you need something more, you can create or upload writing drafts to your account on grammarly.com. Online, you can use Grammarly's plagiarism checker and benefit from tools like the sentence structure suggestion. If you are working on something really important, and you purchase a premium account, you can even consult with one of their professional proofreaders. However, most people will be just fine with the free service they provide online.

The best solutions to your grammar, spelling, and usage problems are careful composition and meticulous proofreading. However, when you are writing quickly for a public audience, Grammarly can be a pretty useful substitution for meticulousness. 

---------------------------------------------------------------------------------------------------
If you've got some time, here is Dottotech's Review of Grammarly: