Tuesday, December 17, 2019

FTT - Gradebooks, Finals, Comments, and more

Gradebooks, Finals, Comments, and More

@LisaBerghoff/@MrKimDHS

With 1st semester winding down, there's a lot to cover: getting our gradebooks in order, final exams, comments, blackout periods and all of that fun stuff. Here's what you need to know:


1. Blackout dates and Schoology/IC Passback Information


2. How to set up/enter Final Exams?

Setting up a final exam can be tricky - here are some questions you should ask yourselves before you try:
  • Does your final exam "live" inside or outside of your semester grade?
    • for example, mine "lives" outside of my semester grade with a breakdown below
  • If so, you'll have to go to your Gradebook to create it. (Don't worry if it doesn't show up immediately. Just hit refresh)
  • Switch from S1-DHS to Final/Midterm Materials
  • Then go to Grade Setup to assign percent values. (Remember to hit save)

  • Do you have multiple parts to your final? Are they weighted as a percent, or by total points? Take a look at this Google Slides presentation for a deeper look into setting up finals.

3. Rounding choices: THSD 113 Rounded .5 vs Round Period/Final Grades

There are two methods to round grades automatically in Schoology. 
  • THSD 113 Rounded .5 - this method is what is most familiar to our staff. A student receiving an 89.5% will earn an "A" for the course, but the value will stay an 89.5%
  • Round Period/Final Grades - this is Schoology's native method. Every final value is rounded to the nearest percent. A student receiving an 89.5% will get a 90%, and a student receiving an 89.4% will get an 89%.
  • DON'T CHOOSE NUMERIC!!


4. Grade Changes and Comments:

  • If your student is on the edge of 2 grades and you'd like to manually change their grade, first you'll need to enable "Course Override Column" in the "Grade Setup" page. 
  • Notice below for Rich Grady - who was at an 89.45% B+. Because I wanted to bump him up to an A-, I wrote in 89.5% in the Overall (Override) column, which gave him the grade bump. 
  • If you want to give a student a grade bump, but do not want to change the % value, you can do that in IC through "Post Grades" (So Rich would keep the 89.45%, but still receive an A-)


  • To add optional comments, you merely need to hover over the "Overall" grade column until the blue chatbox appears. Click on it and type in your comment. 
  • Normally you'd need to click, "Display to Student" for students/parents to see your comments, but not for Semester Grade comments. 


5. Common Mistakes!

Category Calculations: Total Points vs. Percent


The Math department teachers were the ones (no surprise) who first discovered this mistake - when creating your categories, make sure you know the difference between Total Points and Percent. Many teachers, thinking this meant weighted vs. unweighted, chose "Percent" as their grading option. Here is the slight mathematical difference between the two grading styles. 

Let's say little Jimmy has two assessments, one worth 10 points, and one worth 100 points.

Percent:

  • 9/10 = 90%
  • 85/100 = 85%
  • =(90%+85%)/2 = 87.5%

Total Points:

  • 9/10 = 90%
  • 85/100 = 85%
  • =94/110 = 85.5%
The difference is subtle, but can be the difference can affect a lot of students. Be careful changing this setting deep into the semester, as it will change all of your student scores. 

Grading Scale:

This is a relatively simple fix, but important to remember: DO NOT USE NUMERIC as your gradebook scale. It will result in an error when grades are synced with Infinite Campus. You MUST use one of the provided scales. 

6. Infinite Campus - Schoology Sync?

Just to explain how grades go from one system to the other, what happens is every night at around midnight, Schoology will begin dumping their raw data to Infinite Campus. It takes about 3-4 hours for everyone's grades to sync to Infinite Campus. So what do I have to do in Infinite Campus when grades are due?
  • Enter incompletes, drops, and other grading tasks.
  • While you can manually change the final grades in both systems, in Infinite Campus you can change the letter value without changing the numeric value. 
  • You can also enter final grade comments on both IC and in Schoology. 
Happy grading. Any questions? Feel free to contact our team! Dkim@dist113.org - Lberghoff@dist113.org

Monday, December 2, 2019

FTT - Flipgrid


Video Conversations App with Flipgrid

@LisaBerghoff/@MrKimDHS


Receiving insightful, genuine student feedback can be a struggle depending on your students, topic, or classroom makeup. There's a lot going on in a kid's mind, and it is our duty to get them to think and express thoughts and ideas in ways they couldn't on their own. Technology can help with that, and we should build upon technologies students are already comfortable with: Cell phone videos.

So here's what Flipgrid can do: you pose a question or prompt through Flipgrid, and your students can then record their responses via video chat. It's easy, fun, and a novel way for your students to express their thoughts and assertions. 

First, create a Grid

So a "grid" essentially represents a class or learning community, and you can give out your Flipgrid code to get your students to join. You can protect your grid with a password so that only those with access can join and contribute video responses to your grid. 

Creating a Topic

You can pose a question or prompt via text, or you can add a video, image, link, or recording to get students thinking. You can give students anywhere from 15 seconds to 5 minutes to respond.


Get specific with granular settings:
  • Launch and Freeze dates
  • Student-to-Student Replies - allows(or not) students to reply via video to another student
  • Filters, stickers, drawings, and text support for videos and selfies
  • Attach links to their videos (Google Docs, etc)
  • Video/audio teacher feedback
Here's an example of a beginner topic

Mixtapes, Gridpals, and Disco Libraries

Through the Mixtape option you can create a playlist of student responses to showcase particular responses. You can pick any student videos from any of your topics, and even set the order you want the videos to play. This can be used to create highlight videos, student TED talks, or student portfolios.

The #Gridpals option gives you the opportunity to network and connect with fellow Flipgrid educators from all around the world. By connecting with fellow educators, you can share and discuss different Flipgrid topics and videos.

The Disco Library gives you access to popular topics and playlists that are made available to the public for shared use. Different teachers and organizations have created and maintained topics for public use. Check out Microsoft's Hacking STEM options below:

Simply put, Flipgrid can be a fun way for students to think deep about important topics, and express themselves outside of the traditional paper and pen format. Have you used Flipgrid before? Describe your experiences below!


Tuesday, November 26, 2019

FTT - Autocrat

Giving Thanks In A Techno World With Autocrat 

(document merge tool that will make you feel grateful)

@LisaBerghoff/@MrKimDHS

Happy Thanksgiving everyone! 
Did you know that showing gratitude has wonderful benefits for your health?
Check out this 7 minute video, it just might change your perspective.


Ok. Now that we're on the same page with the importance of showing gratitude, here's an opportunity for you to express gratitude to your district 113 colleagues. It won't take more than a minute and you will reap those positive benefits and potentially make someone's day.

Just click this link and fill out the form: DIST 113 Notes of Gratitude
178 messages have already been sent! Join in on the fun. The link will be kept open until winter break.

But wait, you might be wondering how this works. If you fill out the form, how will your recipient get the message? Are Lisa and Dan sitting around all day forwarding messages as they come in?
While I would love to say that we have that kind of free time, the answer is no.  I'm going to pull back the curtain and let you in on how this works.
The messages are automatically sent using an add-on called Autocrat.
Autocrat is one of the most popular add-ons for Google sheets with over 9 million users.
This is basically a document merge tool that creates pdfs, google docs, or even slides from a spreadsheet.
After creating your form, click on the responses tab and create a new spreadsheet. This is where your responses will appear as students fill out the form. You create a template and tell Autocrat which fields to merge using <<merge tags>>.
You could merge data from a Google form directly into a Google slides presentation. You could have a certificate made and sent to each student that completes a form. You could generate shared documents based on the data that is collected in a form. Create personalized documents for parents or groups of students. The possibilities are virtually endless!

Go to the GSuite Marketplace to get the Autocrat add-on. An add-on is like an extension but it only works on specific apps. For example, Autocrat only works with Google sheets.

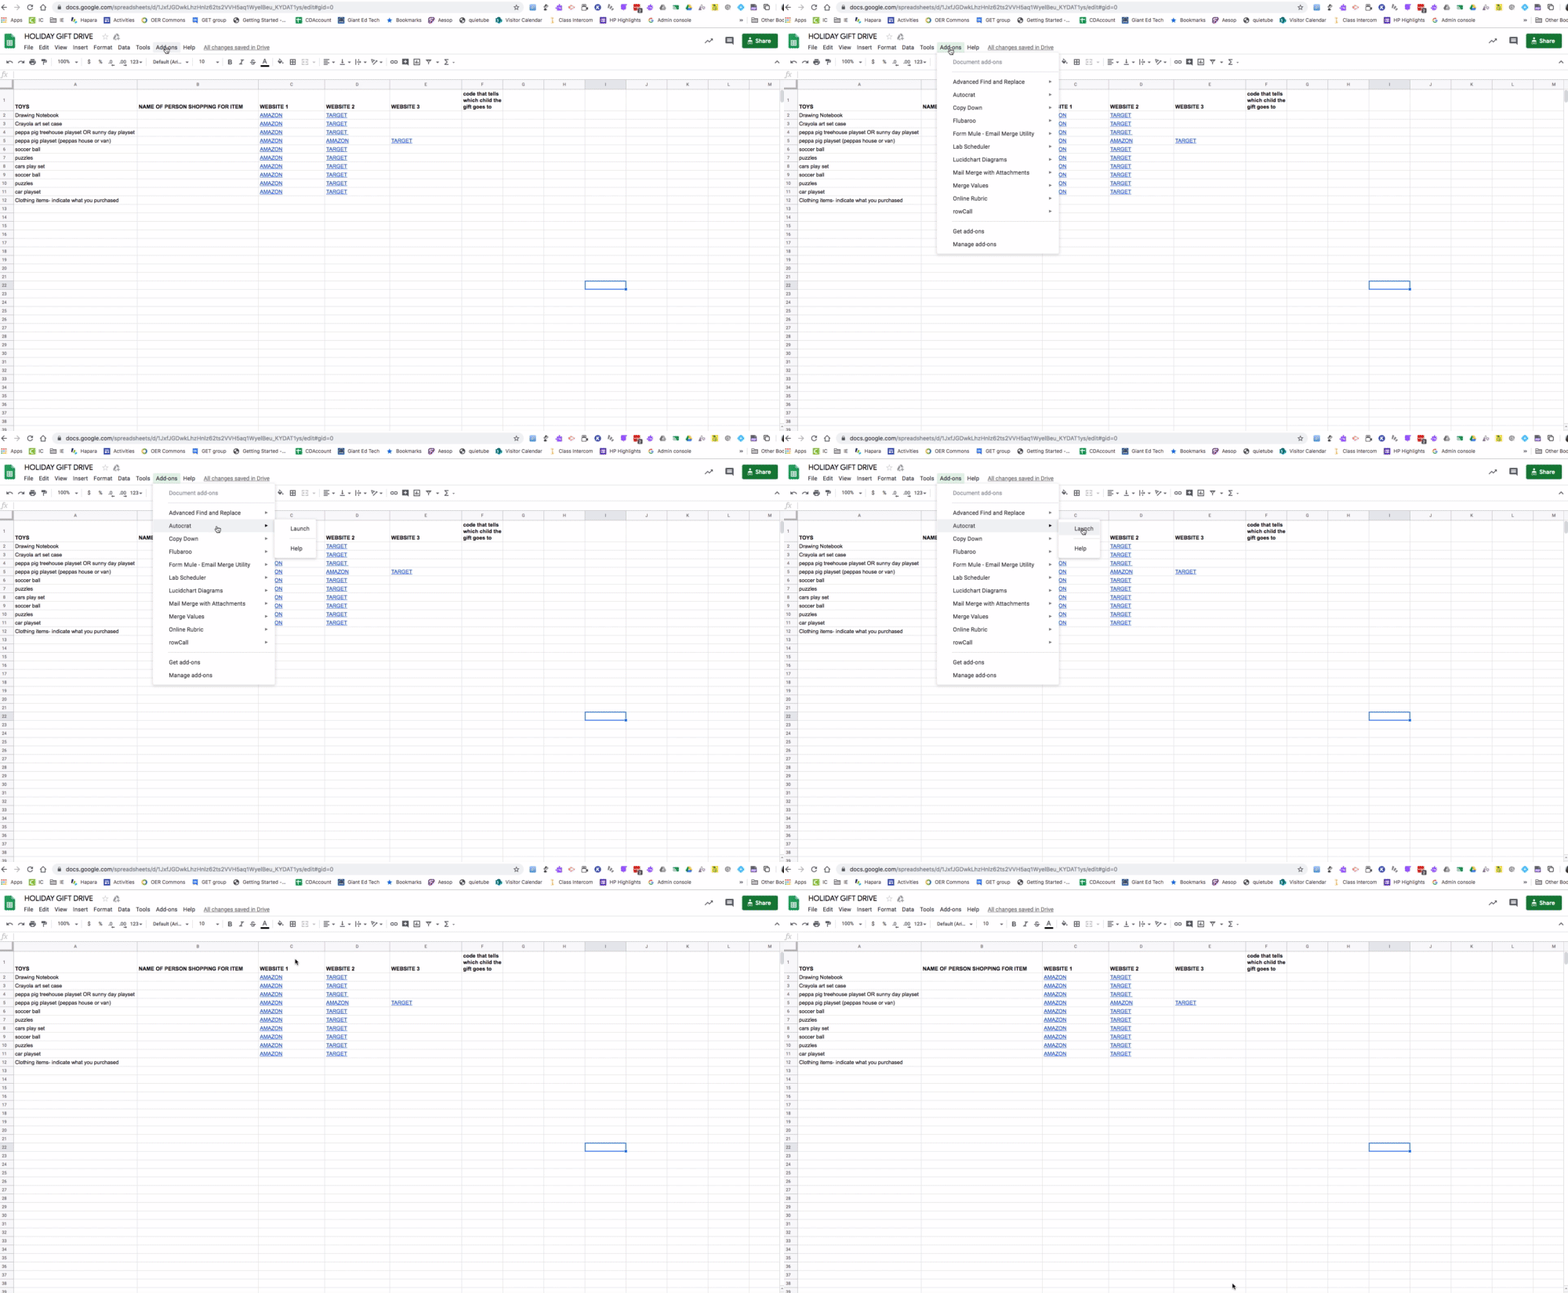
Once you have the Autocrat add-on, go to your spreadsheet and click add-ons. Click on autocrat and click Launch.


Image from Gyazo


Next, you will click New Job and follow the prompts. It will walk you through the whole process.
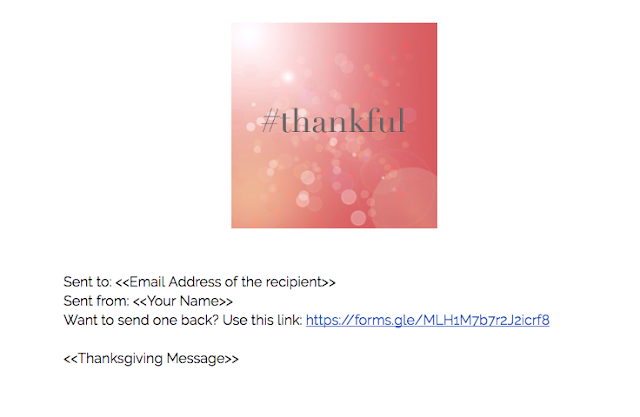
You will want to set up your template and add the <<merge tags>> so Autocrat knows what to put on the new document.
Here is what the template looks like for the gratitude notes. Take a look at the merge tags. You will notice that they match the fields in the form.


Once you have the parameters set up the way you want them, you can decide when you want Autocrat to run. I have the Thanksgiving notes set to run anytime someone fills out the form.
You can set it to only run when you tell it to, or at a specific time.
For example, if you want student answers to a quiz to be sent to them individually but you want to wait until everyone has taken it, you can set Autocrat to run manually and you will decide when they are sent out.

This Thanksgiving, I have so much to be grateful for. I am grateful for my amazing Dist113 community and I am especially grateful that I work with a staff that is willing to try new things if that means it will help students be more engaged in learning.

Want some help with Autocrat? Let us know! Are you already an Autocrat user? Let us know how you're using it.

Happy Thanksgiving!

Monday, November 18, 2019

FTT - Make your Chrome Extensions Work for you!

Make Your Chrome Extensions Work for you!

@LisaBerghoff/@MrKimDHS


Let's face it, the only reason people use Internet Explorer is to download Chrome. It's a sad, sad reality for the once-king of internet browsers. While being one of the biggest RAM hogs in the business, Chrome at the very least offers some serious utility for teachers who are for better or worse, spending more and more time on the internet. Here are two simple, yet useful Chrome Extensions that can give your productivity a boost.

Speaking of RAM

Depending on how many active Chrome tabs you've got open, Chrome can be a super greedy program that can really slow your computer down.  The problem is, I always feel like I NEED every single tab! Although I do a daily Tab Audit to see which tabs I can close down, I still have over a dozen tabs open at once. As a response, there are a number of cool extentions that can freeze your tabs to clear up some RAM.  

The Great Suspender is a quick little extension that essentially freezes or suspends tabs that you aren't actively using. So for example, if I've got an important tab open that I want to keep, but don't view it for a set period of time, the Great Suspender will suspend the tab and clear up any memory or CPU burdens that tab owes. 

As seen below, TGS gives you granular control over what gets suspended (or not). A decent amount of attention has been give to specific time periods, preferential treatment to pinned tabs, tabs playing music, and whitelisted sites. 


Suspended tabs can easily be unsuspended by merely viewing the tab. 

Where do I find things? Black Menu

Have you ever felt slightly overwhelmed by the number of Google-related products or services we use on a daily basis? Right now Google's famous apps launcher (9 dots in a square) does a decent job organizing our tools, but did you know there is a tidier way to access them? 

Black Menu is seriously one of the most underused extension out there, relative to the amount of utility it offers. Essentially it creates a simple menu that has all of your Google services and tools like - Search, Gmail, Drive, Sheets, Calendar, Keep and more. It also comes with a drop-down menu that allows you to use or access the tool without leaving your tab, or better yet, having to create a new one. Confused as to why this is better than Google's Launcher? Check it out below:


Black Menu is simple, light-weight, and easy to use. Perfect for a quick experiment with new tech! Know of any other must-have extensions that increase your quality of work-life? Comment below!

Tuesday, November 12, 2019

FTT - ScreenCastify

Clone Yourself!

(Or Just Record What's On Your Screen) 

With Screencastify

@LisaBerghoff/@MrKimDHS


I have had more and more staff members asking about how to record what is on their screens. Teachers running review sessions, counselors giving presentations, club sponsors sharing information, and students going beyond powerpoint presentations, are all looking for the "best" solution for screen recording (also referred to as screen casting).

There are several fantastic tools out there that will enable you to record what is on your screen, or record from your webcam, or both, but I have found Screencastify to be the simplest to use.

First of all, it has a Chrome extension. That means there is nothing to download and it will save to your Google drive.  Showing a demonstration of how to navigate a website? Screencastify will highlight your mouse clicks and there is also a pen drawing tool to point out important information on a doc. The value of video is indisputable. We are learning more and more from videos. Plus, there are times when students are absent, or just need a chance to hear and see the information again. Offering videos to the students gives them the ability to be in control. They can pause, re-watch parts, and go at a pace that feels right to them and their learning needs.

The biggest question is always, How do I share it? The good news is that Screencastify autosaves to your Google drive. All you need to do is share the link. You can also upload to YouTube or download as an MP4, Gif, or MP3.

Here's how it works:

1. Go to Screencastify.com and add the Chrome extension to your school account. This is helpful because it means that whatever device you are using, you will have access to Screencastify, as long as you are logged in.

2. Ready to record? I suggest writing a script and practicing a few times but if you say you're ready I will believe you. Just click on the Screencastify extension icon in the upper right corner to start using Screencastify.

3. Choose : Browser Tab, Desktop, or Webcam Only to determine what will actually record. 
Make sure your microphone has access (you will need to click allow the first time through) and choose Embed Webcam if you want your face to show in a little box on the screen. Sometimes it's nice to see your face when you are talking:)

4. Click the Blue Record button. It will give you a three second countdown. Need more time? You can adjust to a five or ten second countdown. 

5. Click again to stop recording and wait for your Google drive link.

That's it! You can do this! Let us know how you are using video in your classroom and if you would like some assistance on your first try with Screencastify!


Monday, November 4, 2019

FTT - Google Keep


Organize Your Digital Life with 

Google Keep

@LisaBerghoff/@MrKimDHS


Everyone's got their own method of keeping track of the myriad decisions, reminders, and details that are a critical component of our functioning lives. Meticulously kept notebooks, planners, or colorful sticky notes are tried and true methods that have kept us on track for years. Why fix it if it ain't broke? Here's a free organizational tool that I think is worth trying out. Google Keep is a simple, yet powerful way to digitize some of our organization needs.  It is essentially digital sticky notes and reminders, but are packaged and connected with the power of the Google product family. Here are some cool things you can do with Keep:

More than just a sticky note

Benefits of Sticky Notes on Keep:
  • Permanence: you can't lose them. Even if you lose your phone or your laptop, your digital sticky notes are attached to your Google Account
  • Variety of Note Types: You can create text notes, lists, images, and audio recordings. You can even take pictures of text that can be translated via Optical Character 


                Image Notes                                                                To-Do Lists

  • Collaboration: share a particular note with others and collaborate in real-time. 

  • Reminders: we can all use some help remembering important (or not important) events or tasks we need to do. You can download the Google Keep phone app for scheduled reminders.

  • Inception: Organize your organization tool with Labels: You can create labels or categories for your sticky notes by either color coding them, or by attaching them to labels. Similarly to Gmail, you can, for example, create a "Wrestling" label and all sticky notes relating to Wrestling can be filtered. 

Do you have a preferred tool for organization? Tips or tricks for Google Keep? Comment below!

Tuesday, October 22, 2019

FTT - Schoology Assessments

Schoology Assessments

@LisaBerghoff/@MrKimDHS


I've been just a tad unwilling to write about online Schoology assessments because of some of the difficulties of online test security, extended time, technical logistics, and the cost/benefit analysis of online vs. pen and paper, but more and more teachers have been intrigued about the benefits of Schoology's Assessment capabilities, and honestly Schoology's program is quite good. So here we go: Online testing!

Fluid compatibility

Right off the start you'll see one of the major benefits of using Schoology assessments is how easily questions can be graded and transferred to your gradebook. Initially building an assessment will ask you to assign point values and categories for the transfer of information between your assessment and the gradebook. 


Now Schoology can instantly grade student responses and enter values into your gradebook, but that'll depend on the types of questions you are adding. Multiple choice questions are easily graded and transferred, but short answer/essay questions will need to wait for your input. Either way, student answers and teacher feedback is organized and locked into Schoology. 

Building test parameters


Schoology allows teachers some granular control over what the online assessment will look like:
  • Instructions to be displayed to students before the start
  • Time limits for taking the assessment
  • Randomly order questions
  • Show possible points for each question during an attempt
  • Can students use calculator, and if so is it basic or scientific?
    • Same question for rulers, and protractors
  • Can student eliminate choices for multiple choice?
  • Can students view results immediately after completion?
  • How many attempts can students submit?
And so on...most of your assessment queries can be answered in the Setup tab. 

Question Types


Question type - the menu of options is quite robust:

And each question type can be further fine-tuned and dialed in. Look for example the parameters for a multiple choice question:

Writing the question itself is simple and self-explanatory. You have direct control over how many options there are, the order, and full access to the text editor.


You can also shuffle answer choices, allow multiple responses, or even give partial credit to an alternate answer.


Grading 

You can grade by question, or by student, and doing so gives you a wealth of information such as:
  • The number of student attempts
  • Completion status
  • Last modified
  • Students' elapsed time for completion
Like we mentioned above, certain types of questions can be auto-graded by Schoology, and uploaded to your gradebook. Questions that require a direct look from the teacher will wait for teacher input before the grade is transferred over.

Miscellaneous

Once created you can do a number of things with your assessment for increased utility:
  • You can publish or unpublish your assessment
  • Copy the assessment to another course
  • Save to resources to share with another teacher
  • Print a physical copy

Test Security

This is the big one - how to ask students to take an assessment on their Chromebooks or laptops, but keep them from straying to another site, taking a screenshot, or printing the questions? 

Schoology has partnered with LockDown Browser to cover these concerns. By enabling LockDown Browser you can:

To activate lockdown browser, you must create the assessment first. Then on the left-hand side of your Schoology page, click on "LockDown Browser" to access the conditions above. 

Even with these safeguards, teachers are a bit hesitant to fully embrace online testing as a replacement for the traditional paper and pen. And that's OK. You really only want to adopt a tech option, only if it is a realistic improvement over traditional methods. Some teachers love the assessment option as a formative review, as opposed to a summative assessment. Do you use Schoology's assessment function? Let us know your thoughts below!


Tuesday, October 15, 2019

FTT - Edpuzzle and Schoology

EdPuzzle And Schoology

Almost Like Peanut Butter and Jelly

@LisaBerghoff/@MrKimDHS


I was such a weird kid. I did not like peanut butter and jelly. Instead, I took tuna fish sandwiches to school every day. Now that I'm an adult and have a much more refined palate, I can recognize the brilliance of these two flavors together. They definitely bring out the best in each other.

Two other things that work well together are Schoology and EdPuzzle. Never heard of EdPuzzle? I like it so much there are two previous  blog posts about it. You can find them by searching the Giant EdTech blog.

Here's Edpuzzle in a nutshell:


As more and more classrooms are employing the use of video, EdPuzzle allows teachers to use the video as an actual lesson. EdPuzzle is the perfect tool for allowing students to watch and engage with videos while the teacher gathers data throughout the lesson. Teachers can embed questions within a video and get great formative data on the students' understanding of what was taught in the video. In the dashboard, you can see how long a student spent on the video, you can see their responses, it will even grade for you if the question is multiple choice. You can also turn on the closed captioning and you can click a tab so students won't be able to skip ahead.
Interested?

But wait, now you can embed your EdPuzzle lesson right into your Schoology page.


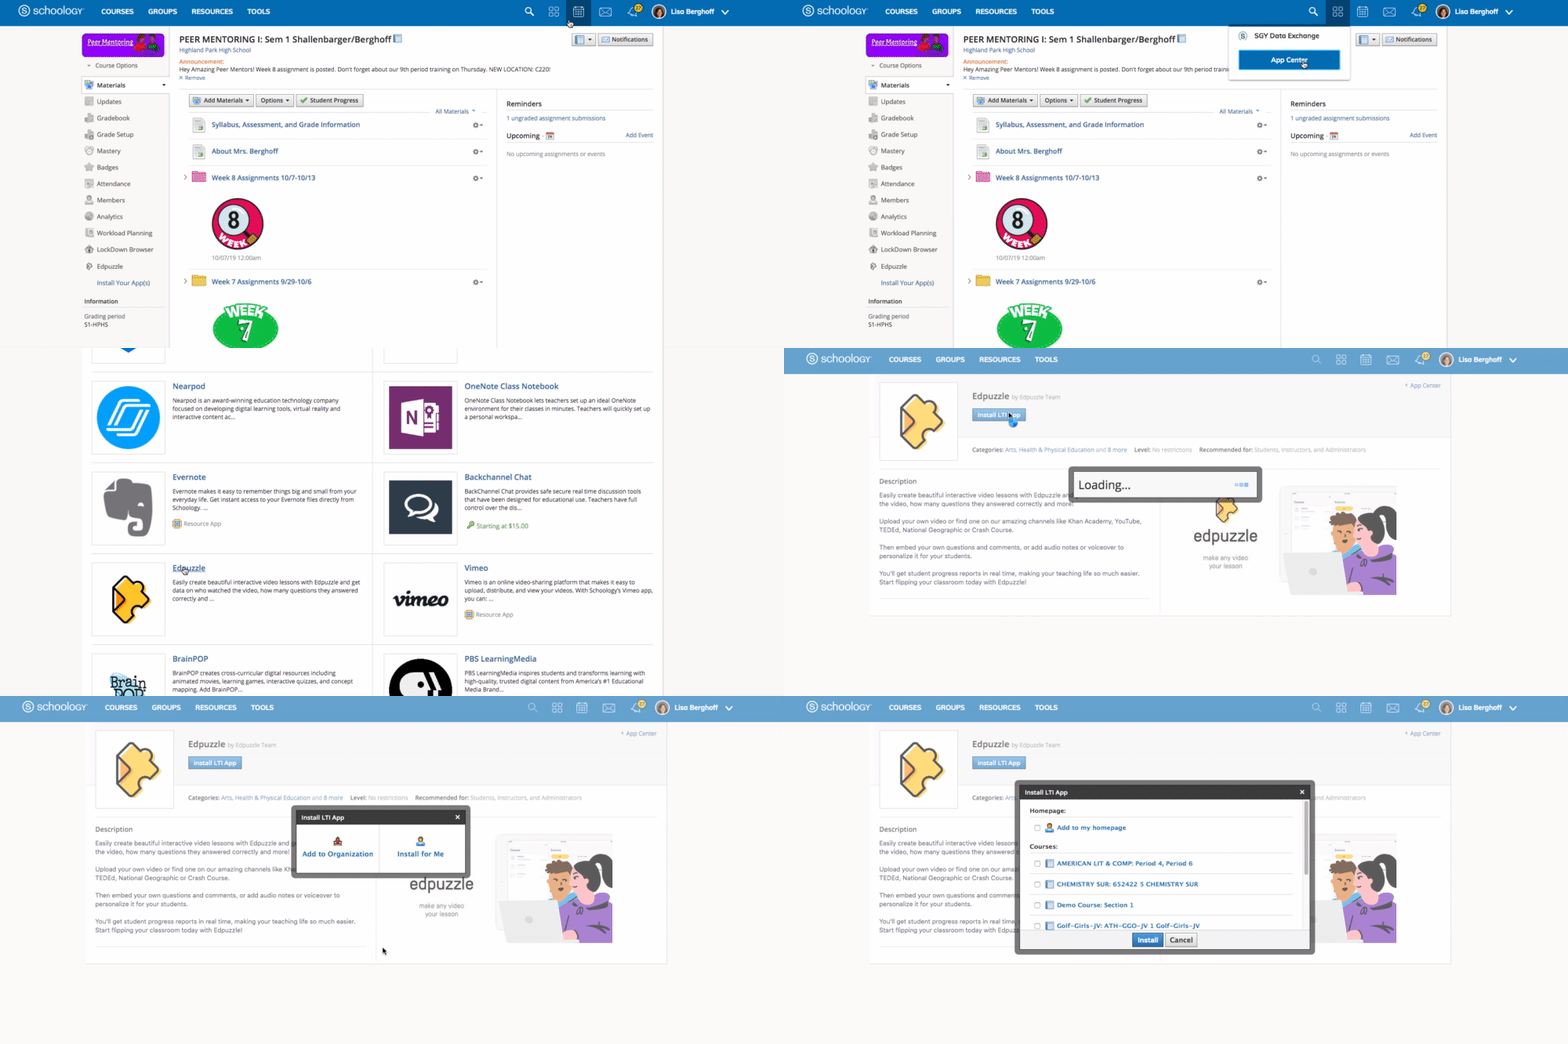
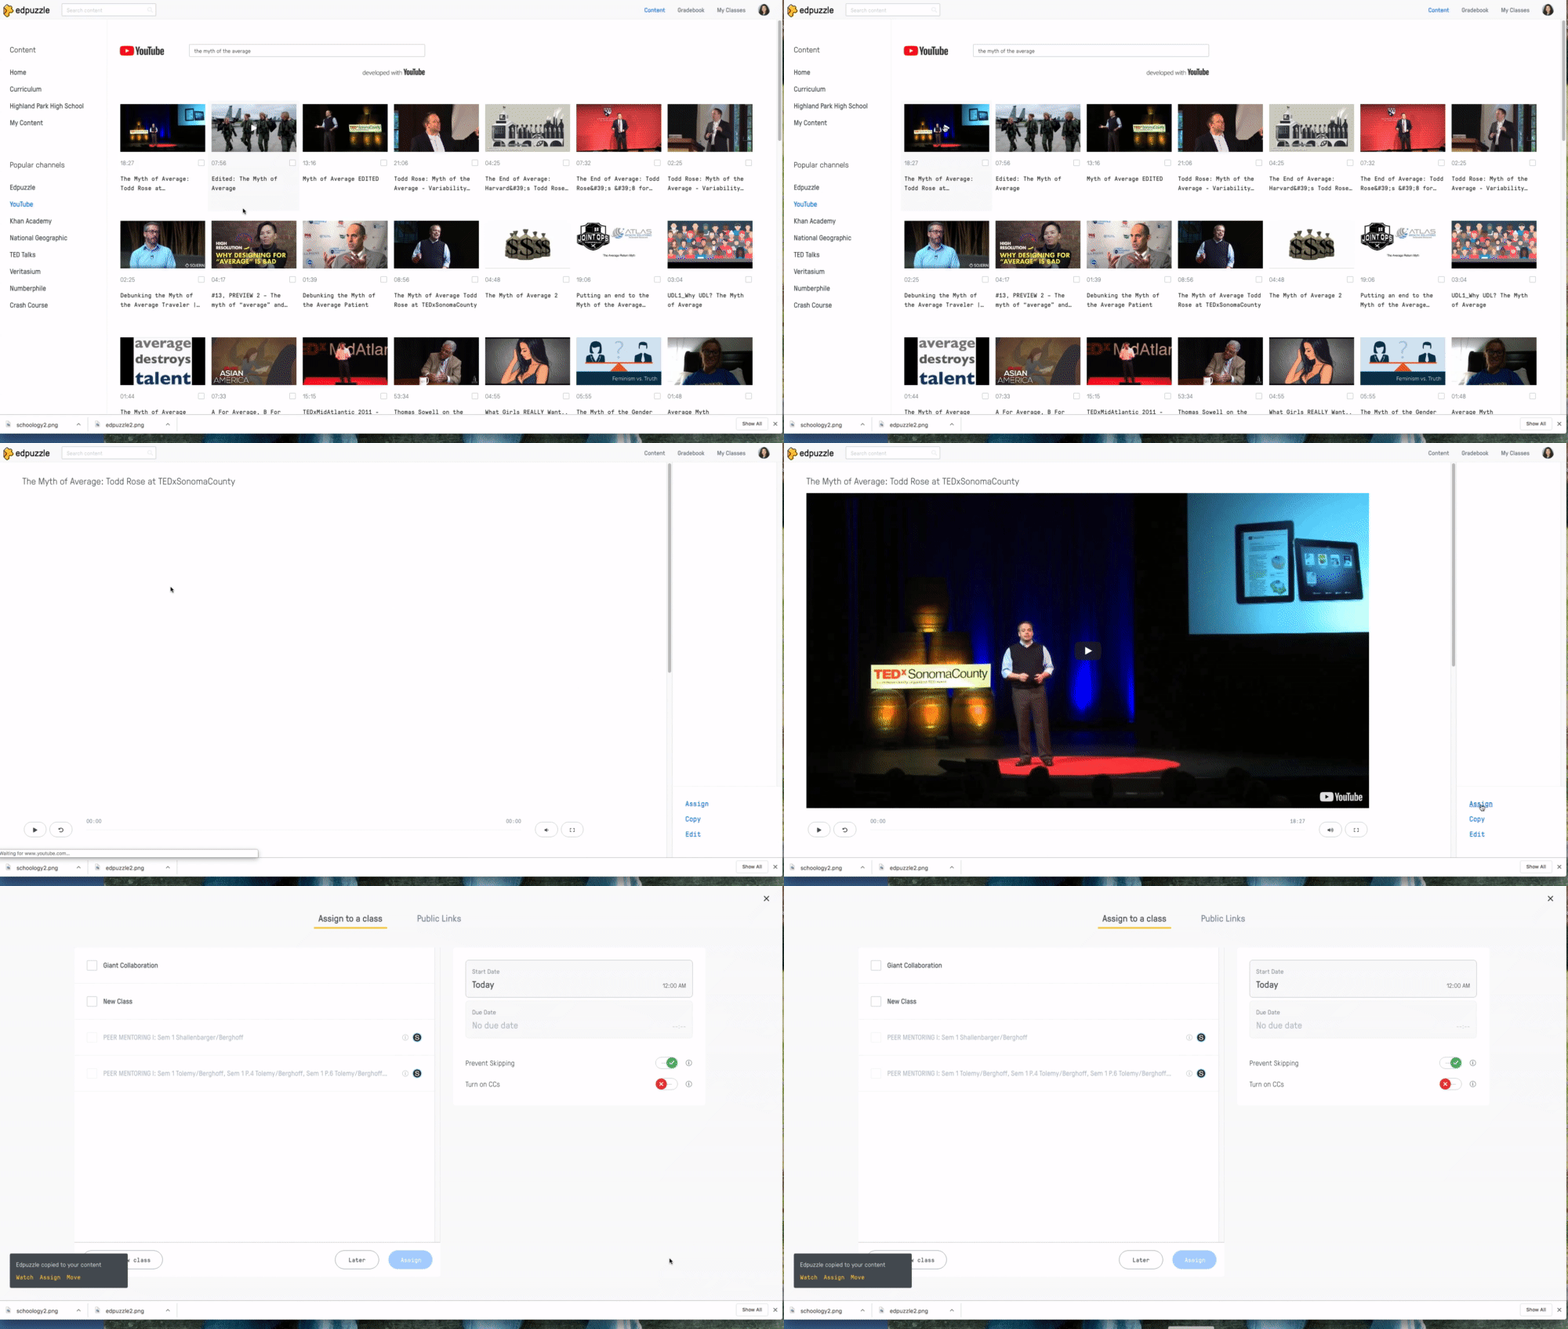
Step1: When you are in Schoology, click on the App Center (4 squares). Scroll to EdPuzzle and click to install. You can decide which classes you want to use it with. I went ahead and added it to all, even if I don't use it right away, at least it's there.
Image from Gyazo


Step 2: When you are in your Schoology class you will see EdPuzzle listed on the left under LockDown Browser. If you click that you can sign in and connect your EdPuzzle account to Schoology. You only need to do this once.


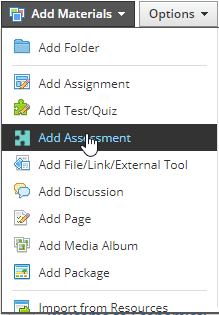
Step 3: From the materials page, click Add Materials and you will see EdPuzzle on the right. If you already have video lessons created in EdPuzzle, you can click right there and you will see your lessons.


Step 4: Don't have any lessons created in EdPuzzle yet? No problem! Just go over to EdPuzzle.com and select your videos and create your lessons. You will need to click "assign" for it to show up in Schoology. 

Image from Gyazo 


And now for the big question, is EdPuzzle free? Take a quick look at the EdPuzzle website and they are very clear that EdPuzzle is free for teachers and students, to a point. The basic/free account will allow you to store up to 20 videos. They have a referral system where you can refer friends and colleagues and when they create their free accounts, you both will get more storage. Otherwise, there is a pro account for purchase.

I can't wait to hear how the great EdPuzzle/Schoology combo works in your classes! Feel free to reach out with questions or if you want to work on your first lesson together. 


Monday, October 7, 2019

FTT - Gmail Filters and Labels


Gmail Filters and Labels

@LisaBerghoff/@MrKimDHS

I think I have a threshold of about 5 or 6 unread emails before I get a little twitchy. I know I probably shouldn't, but I've got my work Gmail attached to my personal cellphone, and I am constantly checking it at home. So I am a little amazed when I see teachers sitting on 10 thousand unread emails. But I am not surprised; teachers can get an absurd amount of emails on a daily basis, and it's about time we clean up our inboxes. 

Filters: You're the boss - make some rules

Filters are essentially rules you make and Gmail will apply theses rules to any email that comes your way. So for example, I was receiving a large number of concussion related emails last year, and while it was eye-opening for me to see the pure volume of students in concussion protocol, those emails were not specifically pertinent to me. So I created a filter - all concussion related emails from our school nurse were tagged with a "concussion" label and filtered from my main inbox, to a side folder. That way I don't necessarily see them in my main inbox, but I can access them anytime I need to. 

1.  First click the down arrow in Gmail's search box
2. This will open up Gmail's advance search settings. Here you can create the parameters to structure your Filter rules. So here's an example:
  • Emails from Dtiveron@dist113.org
  • Has the words: "Makerspace" or "3D printing"
  • Mark as Important and Never Send it to Spam

Now Gmail knows that anytime an email from Derrick Tiveron mentions Makerspace, or 3D printing, it'll follow the rules. Notice there are many different rules we could apply. You can also apply these filter rules to past emails that already live in your inbox!

Gmail Labels - organize your "folders"

Creating Gmail Labels is essentially creating folders to organize your emails - I know many people enjoyed Microsoft Outlook's capacity for storage and organization of emails. So by creating a label, and attaching that label to an email, you're basically tagging that email and organizing it into a folder. So for example, as a wrestling coach, I will often tag my wrestling related emails under the, wait for it, "Wrestling" label, and viola - those emails can all be easily accessed by clicking on the Wrestling label. Here's how:

1. Create labels - on the left hand side of your Gmail page, under "inbox" you will see "More." Click on that, and then you will see "Manage Labels," and "Create Labels." 


2. Once created, to tag an email with a particular Label - just click on the checkbox and then click on the label button to assign.


Do you have a successful or useful filter or label combo? Comment below!

Monday, September 30, 2019

FTT - Peardeck

Looking For Interaction In The Classroom? 

It's All About The Pear!

@LisaBerghoff/@MrKimDHS


I get to be in so many classrooms! I feel so fortunate to have the position that allows me to see so many of our incredible teachers in action. It also gives me a unique perspective on what our students experience on a daily basis. Imagine spending your day with 8 different bosses who each give you a new, independent, set of tasks and expectations. It's pretty exhausting! That is why one of the most common questions I get from teachers is: "How can I make sure my students stay engaged in my class?" As a teacher myself, I know that it is challenging to always make sure my students are moving, interacting, and staying on task. Sometimes, I just need to have a slide deck and a lecture or discussion. That is when we often lose our students. No matter how amazing your graphics are, sometimes it's hard to stay focused during a lecture.

That's where PearDeck comes in!

I will admit, this post is slightly biased because I just spent a day learning and experimenting with PearDeck at the Google office in Chicago and it was outstanding. I did write a post on PearDeck in October of 2018, you can search the blog to find it, but I realize that it's a good time for a refresher. That's how great this tool is!

First, watch this 1 minute video:


Here are five big takeaways about PearDeck...

1. PearDeck integrates with your slides.

If you already have slide decks that you are using, it is seamless to utilize PearDeck. You don't need to change your slides, you can just add a few interactive slides within your existing slide deck. Yes, you can use both Google slides and PowePoint. As you advance your slides, the slides will advance on your students' screens as well. No need to make sure they're all looking at the front of the room.

2. Students can connect to PearDeck using any device that has internet capabilities.

Yes, we're a 1:1 chromebook district, but sometimes those chromebooks are not charged, not working, or in a locker. Not to worry! You know they have their phones on them:) Also, you can run your slide deck from a different device than what is projecting. This allows you to move around the room and interact with your students. No need to stay at the front!

3. There are fantastic templates that are free to use.

Don't have a slide deck? Want to start fresh with PearDeck? Don't have tons of time to create your own interactive lesson? That's ok. PearDeck has so many templates that are already created. Use them as is or edit to make them your own.

4. Flashcard Factory integrates with Quizlet

PearDeck has a game called Flashcard Factory and it is outstanding for vocabulary! Enter your words and your students and then Flashcard Factory does the rest. It will pair your students and they will take turns giving and example and drawing an image that goes with that example. You can see the responses on the teacher dashboard and approve the best ones. THEN, it will make a Quizlet flashcard deck for you and your students to use with their examples and images! (can you tell I'm excited?)

5. You can create self-paced activities

Once you have presented, you might want your students to work through some activities on their own. You can do that right in PearDeck. You will see all of the responses on your teacher dashboard. Then you can choose if you want to show them anonymously or not. There are lots of options available. 


Want to get started with PearDeck? Head over to PearDeck.com to get started.
PS. You will be given a 30 day free trial of the upgraded version, which is better than the free version, but the free version is rad too.
Let me know if you want any help getting started!


Monday, September 9, 2019

FTT - Remind: we have a district license? We sure do.

Remind: we have a district license? We sure do. 

@LisaBerghoff/@MrKimDHS

Unbeknownst to most non-power users of Remind, last year telecommunications company, Verizon Wireless was threatening to impose new texting fees on Remind users in an effort to control and reduce spam messages. This would have effectively shut down relatively tiny app companies like Remind who offer mostly free services. An interesting online campaign (#ReverseTheFee) made up of educators, parents, and students, as well as intense negotiations between eDavid and eGoliath, ended with a win for the little guys and the service is largely unchanged.

And now: we have a district license! Here's how to take advantage


1. Logging On

To enjoy the premium features through our district license, log in here using your Google sign in. 
If you've been previously using a personal account, you'll have to switch over to your district email.


2. Student Onboarding (It's already done!)

Once logged in you'll see that through some Infinite Campus - Remind integration magic, all of your courses have automatically been uploaded to your Remind site. Not only are your courses already created, your students have also been directly added using their IC data. (although it might be a good time to audit your student drops and transfers) To add new students, give them the Class Code that begins with an "@" sign, and is directly under your course name. 


3. Sending Messages

This is where Remind has made some strides in the messaging department. In addition to text messaging, Remind has teamed up with Google Drive, Quizlet, OneDrive, Flipgrid, and a few other apps to beef up your messaging ability. Now you can attach different varieties of files and videos with your Remind message.


Also find that Remind can translate your message into over 50 different languages! 

As usual, you can schedule your messages ahead of time to help with organization and planning.
You can also have some granular control over who you're sending your messages to. You can send a single message to all of your courses, just your homerooms, and even specific groups of people within your courses.


Thank you to the real heroes - the myriad internet Twitter warriors who tirelessly tweeted and retweeted #ReverseTheFee, and forced the evil telecommunications conglomerate to concede. 

Questions? Comment below!