Monday, August 27, 2018

FTT - Schoology Shortcuts and Tips

 August 27th: Schoology Shortcuts and Tips

Schoology Shortcuts and Tips

@LisaBerghoff/@MrKimDHS

Piggybacking off of last week's post on frequently asked questions, this week's post will include a few important tips and tricks you can easily employ to make your Schoology integration that much better! Last week was a busy week, and through your shared experiences with Schoology, we found a few things you should know...


1. Navigating between gradebooks (and courses)

Did you know there's a way to go from gradebook to gradebook without going to your courses tab? With this shortcut, you can switch easily between your course grade books with two clicks:
  • Go to your course gradebook page
  • On the Gradebook page, click on the blue notebook at the top right corner
  • The drop-down menu will have a list of all of your current classes

This blue notebook appears on most Schoology pages and can be used to navigate between courses.

2. Co-Teachers and grading assignments

If you co-teach a course and would like both teachers to be able to grade Google Doc assignments, you'll have to do one more step outside of Schoology to make that happen. As of now, only the original creator of the assignment can grade submissions. 

This is what co-teachers will initially see if they try to grade:

In order to grade each co-teacher will need to:

  • Go to their own Google Drive folder. 
  • Search for a folder titled, "Schoology Google Drive Assignments"
  • Each co-teacher needs to share this specific folder to each other. 
  • Viola, now you can share the load. 

3. Adding a Senior Teacher or TA to your class

Many of us have senior teachers or other individuals who would benefit from viewing your course materials. Schoology has a granular method of giving specialized access to your course. For example, most teachers would want their senior teachers to be able to view course materials, but not see or enter grades, or change course materials. Here's how:
  • Click on "members" on the left-hand side of your course page
  • Click "add members" at the top and find the individual you would like to add. 
  • Once added, click on the gear box to the right of the individual and click on "make admin"
  • Then, click on the same gear box and this time click "set section-level role."
  • You have 6 options to choose from for the appropriate level of access.

Here are the 6 levels of course access you can give:

That should be plenty for now! Do you have other questions or tips that you have found to be useful? Go ahead and post them in the comment box below. 

Tuesday, August 21, 2018

FTT - Top 5 Schoology Questions Answered

August 20th: Top 5 Schoology Questions Answered

Top 5 Schoology Questions Answered

@LisaBerghoff/@MrKimDHS


Wow! What a whirlwind of activity these first few days have been. I love when you start to learn something new over the summer and then you actually start using it with students. The shift creates a clarity that is almost visible. Teachers who struggled over the summer are suddenly coming to me with a lightbulb over their heads now that they have students in their classes and can see how things work in reality. The questions and conversations have been so amazing. We are planning and learning about this new tool through the lens of- how will this best serve my students? 

That being said, there are some recurring themes with the questions that have come up and I thought it best to put a few of the frequently asked questions and tips together here.


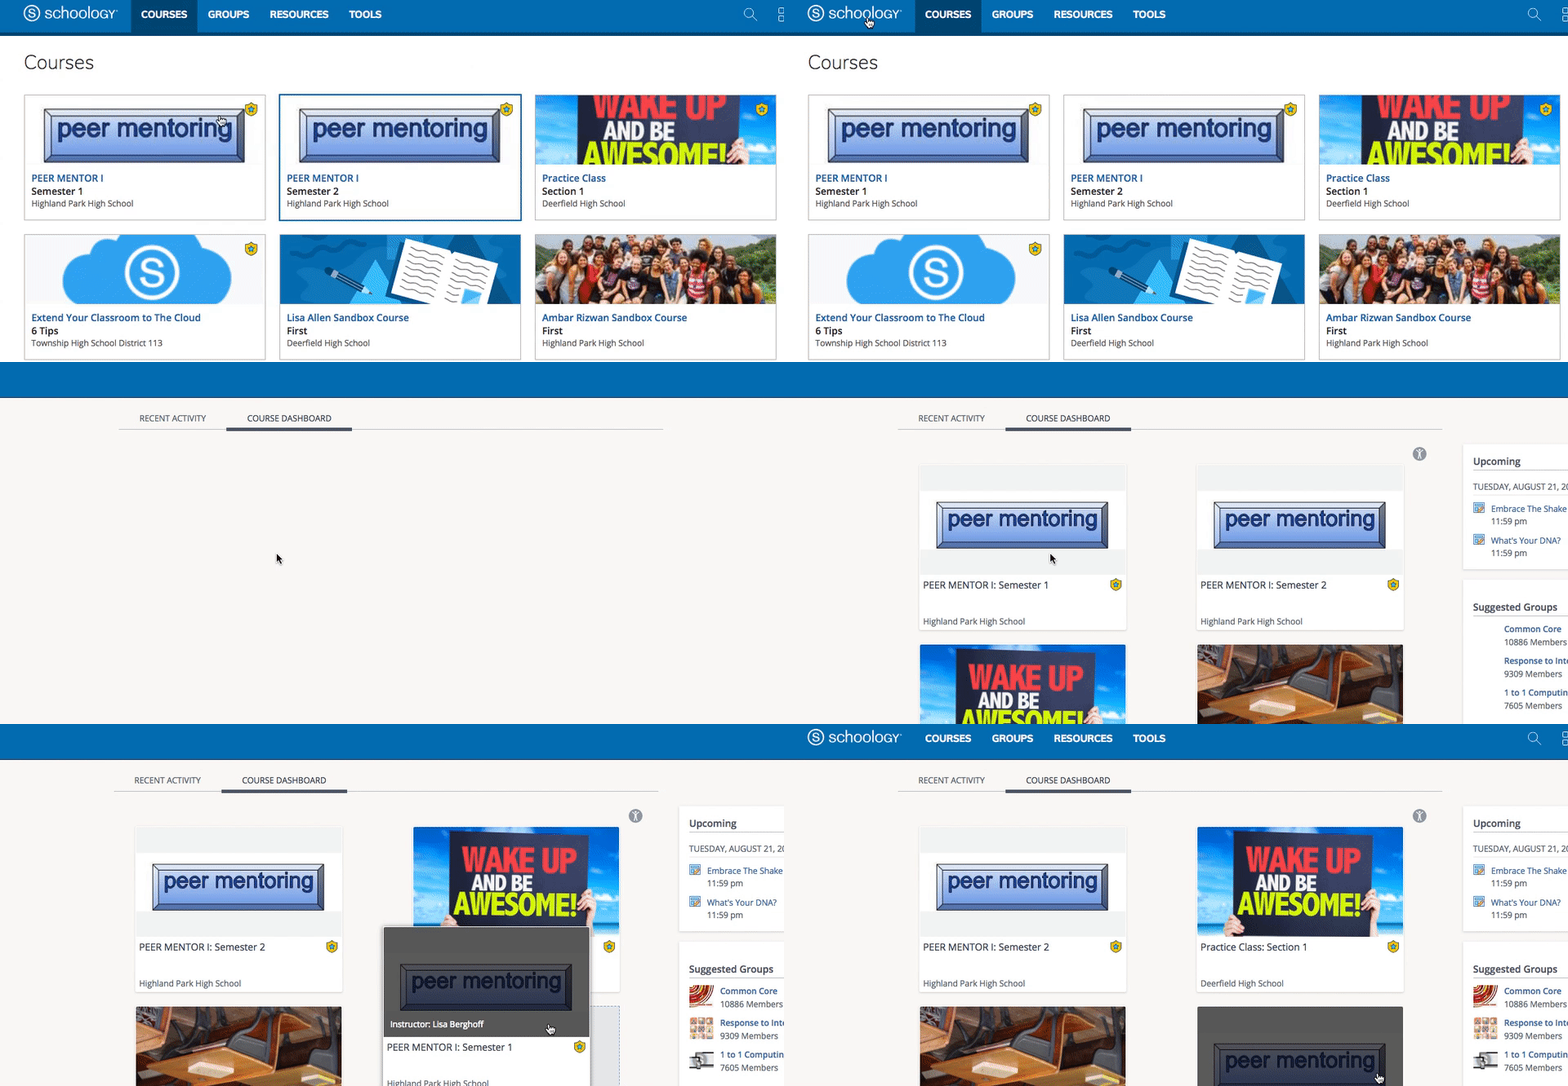
1. How can I move the course tiles so I can see all of my current classes at once?

This can be easily accomplished by following these steps:
  • Click on Schoology in the blue bar at the top of the screen
  • Click on the Course Dashboard tab
  • Click and drag your current courses to the top. The top 12 tiles are what you will see on your courses page in Schoology
Image from Gyazo


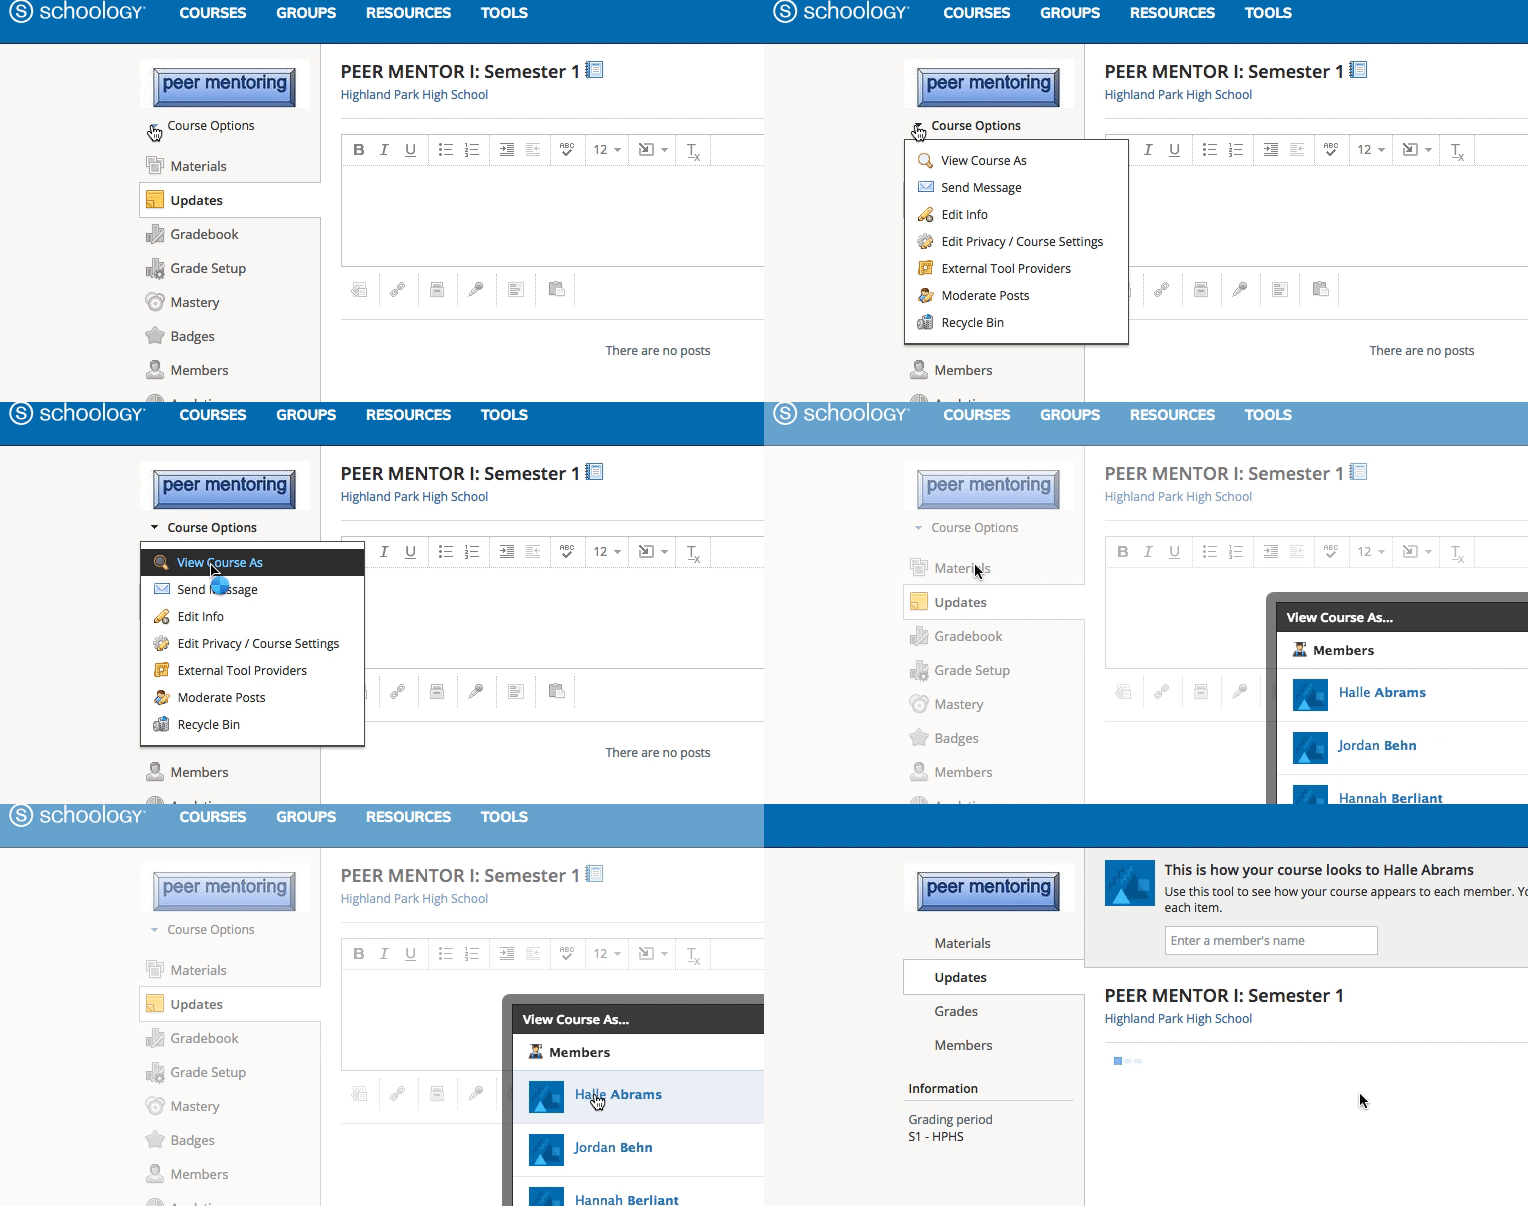
2. How can I see what my students see?

Now that school is in session you can view your course as a student.
  • Click on a course
  • Click Course Options (under your course image)
  • Click View Course As
  • Choose a student
  • Note: across the top it will say- You are now viewing this course as...
Image from Gyazo


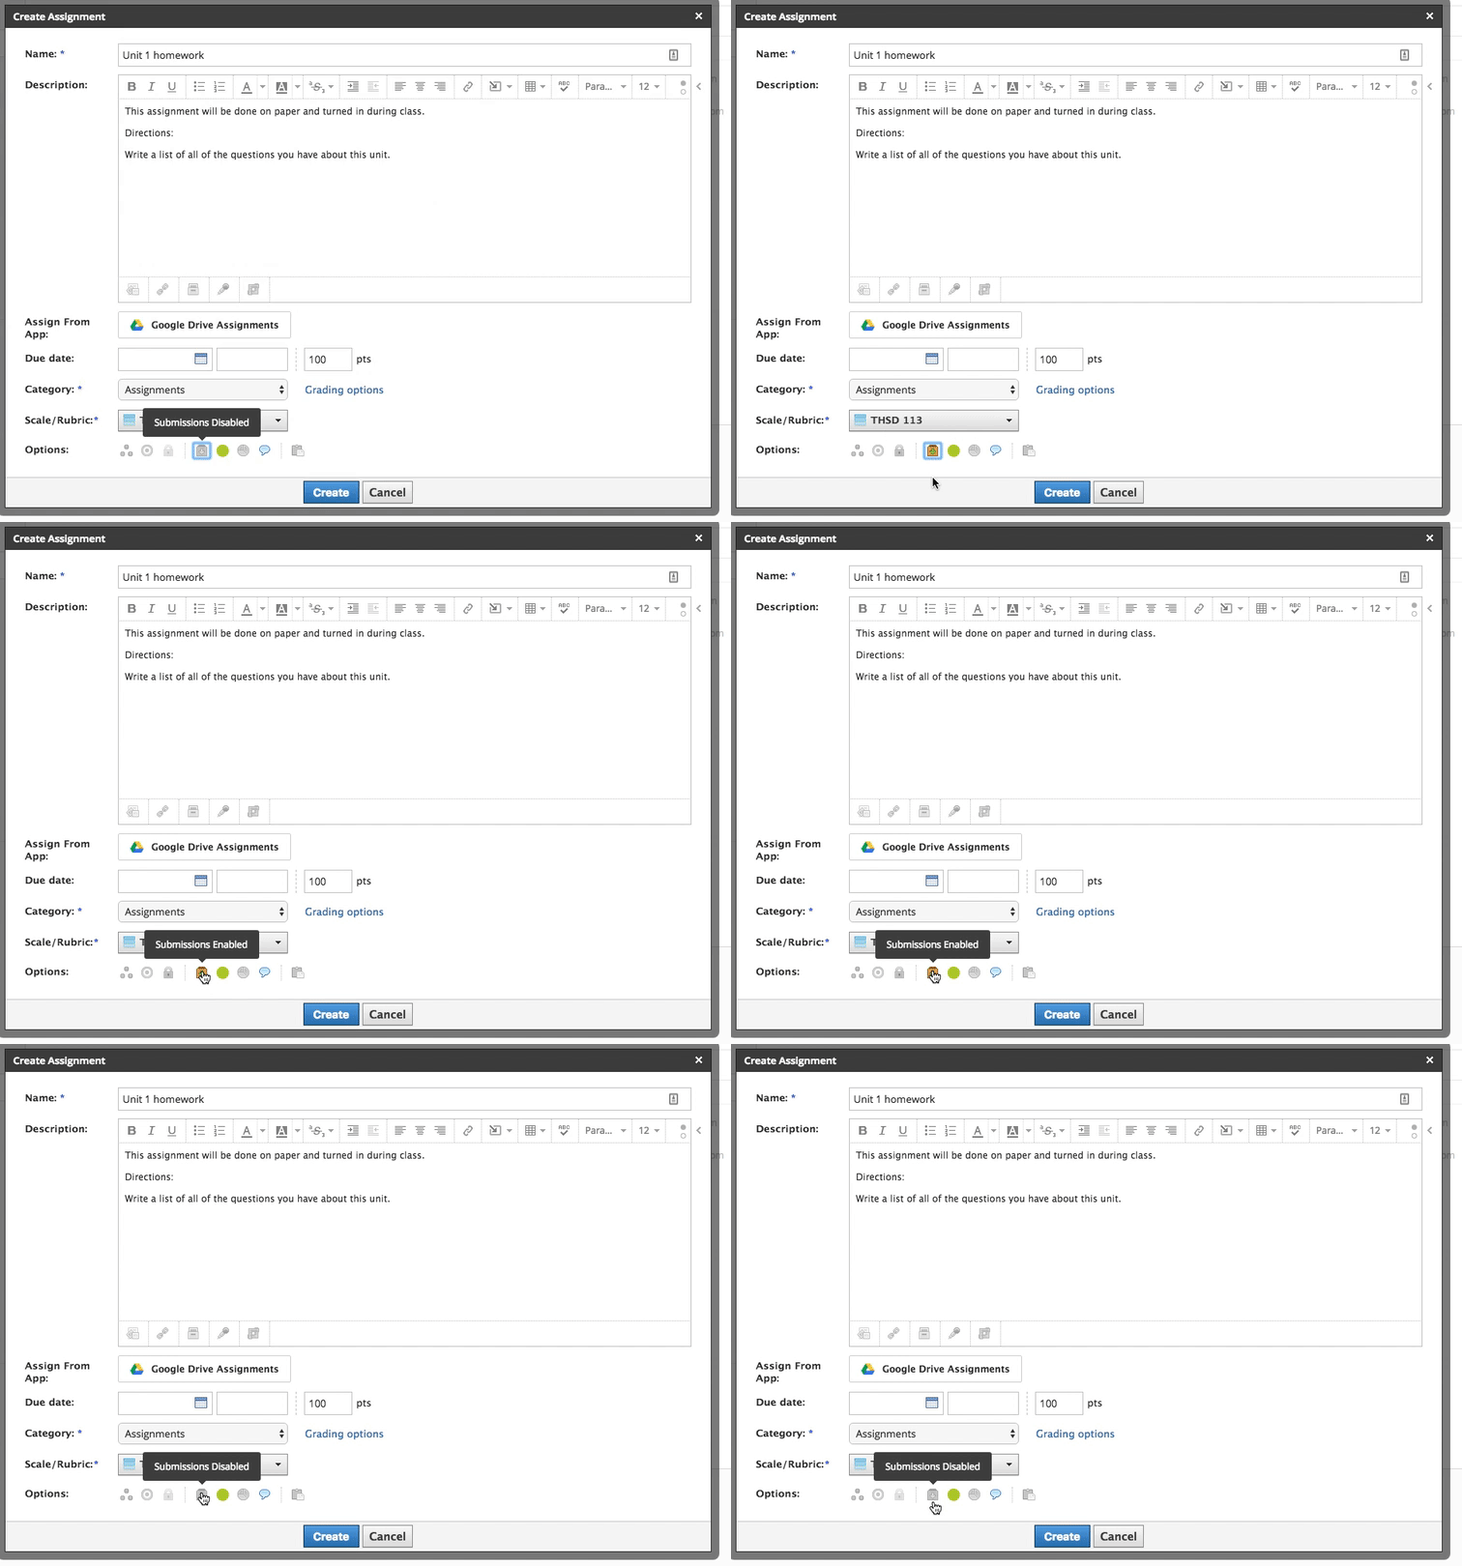
3. How do I enter grades for a paper/pencil assignment?

Not all of your assignments will be digital because we have a blended learning environment in our schools. That's great! You can add those assignments in the same way you would add digital assignments, just disable submissions.

  • Choose how you want to add the assignment, from the materials page, the gradebook, or the calendar.
  • Create your assignment. In the description, you can indicate that this is a non-digital assignment. 
  • Fill in the points, the due date and category.
  • Click the submissions icon to disable.
Image from Gyazo

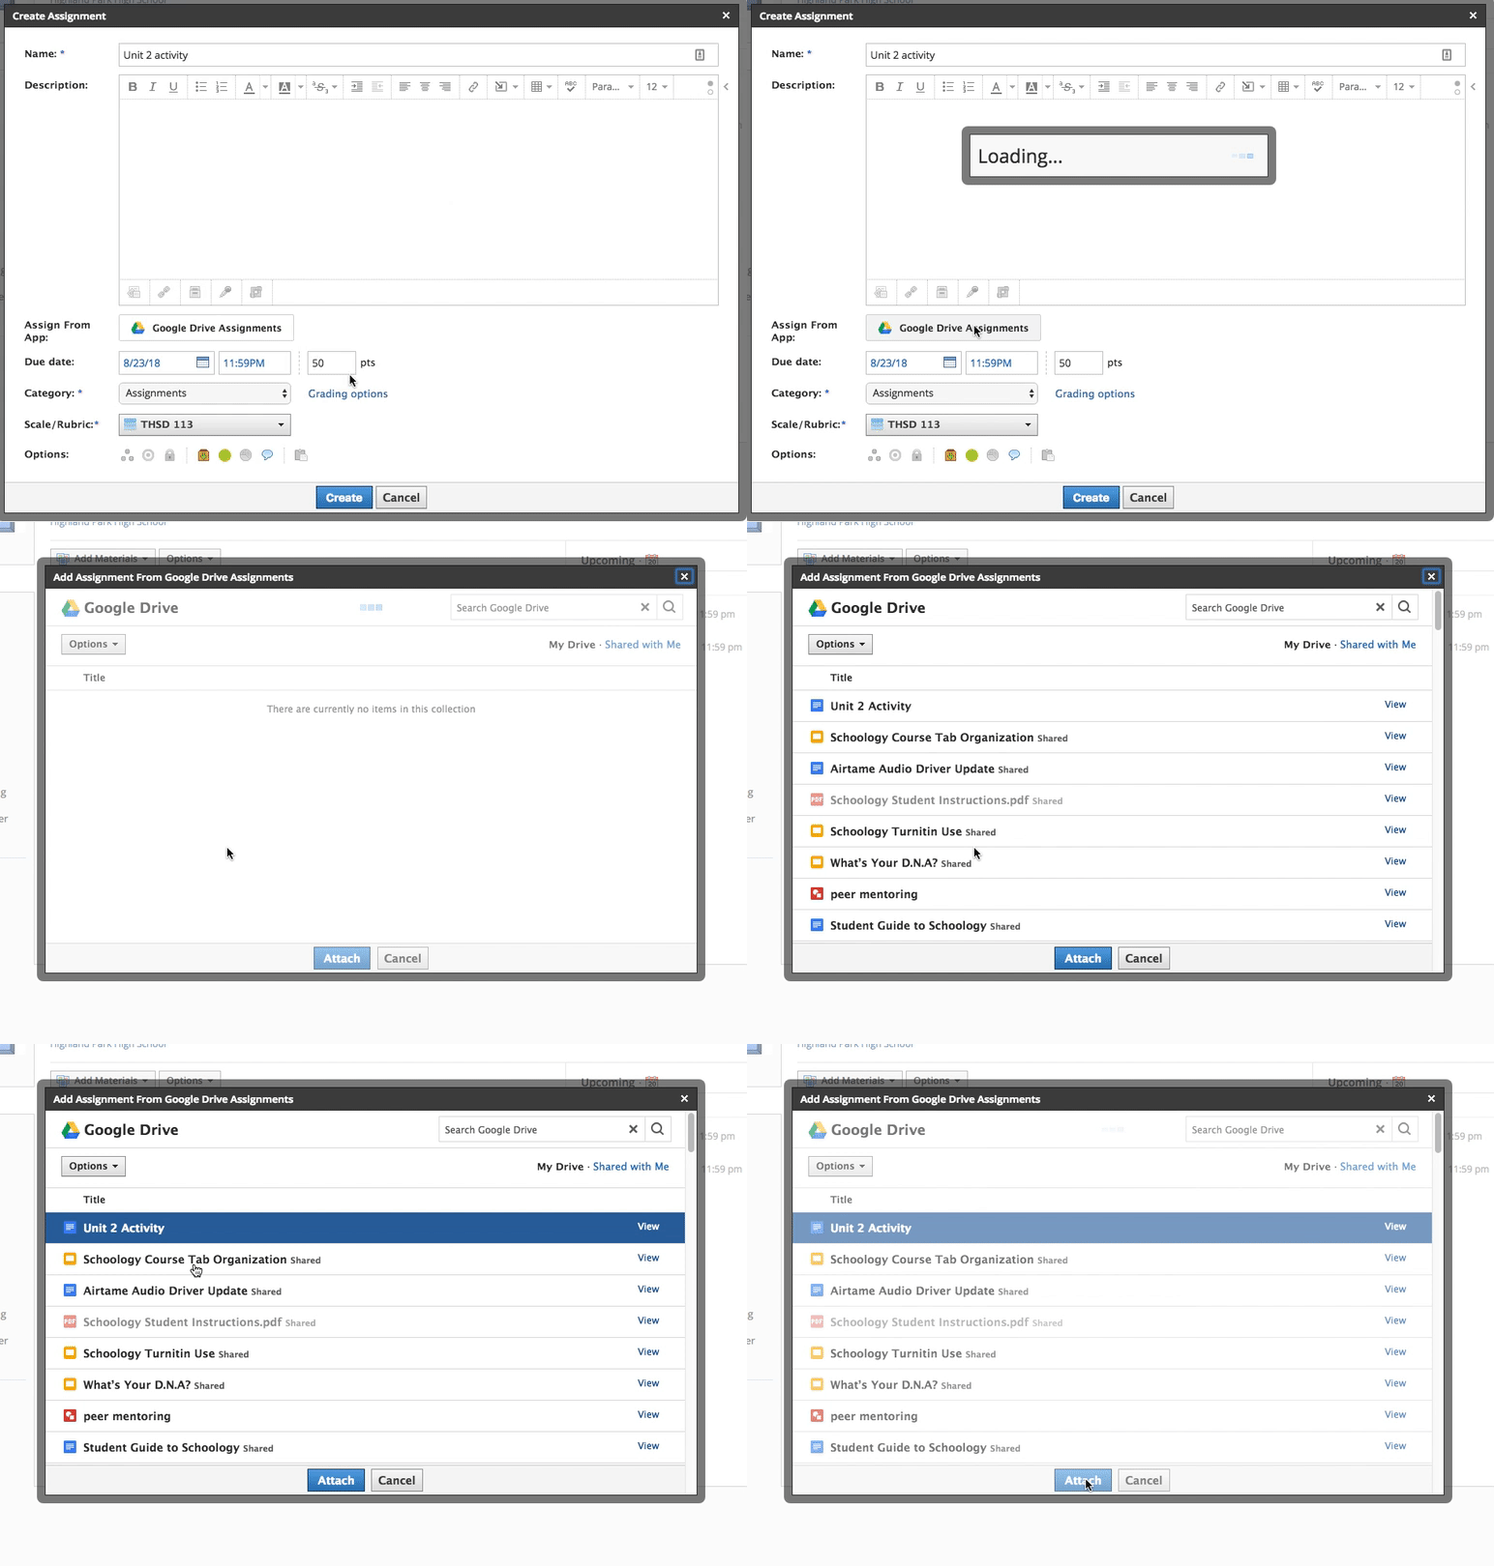
4a. How do I create an assignment and attach a Google doc so each student has their own copy?

This is where you will use the Google drive app. If you have never used it before, when you click on it you will be prompted to connect to your school account. You only need to do this once.
  • Choose how you want to add the assignment, from the materials page, the gradebook, or the calendar.
  • Create your assignment. Enter the name, description, due date, points, and category.
  • Click on Google Drive Assignments
  • Your Google Drive will pop up in a new window. Locate your document.
  • Click attach
Image from Gyazo


4b. I have something in my Google Drive that I want my students to see but it's not an assignment. How can I do that?

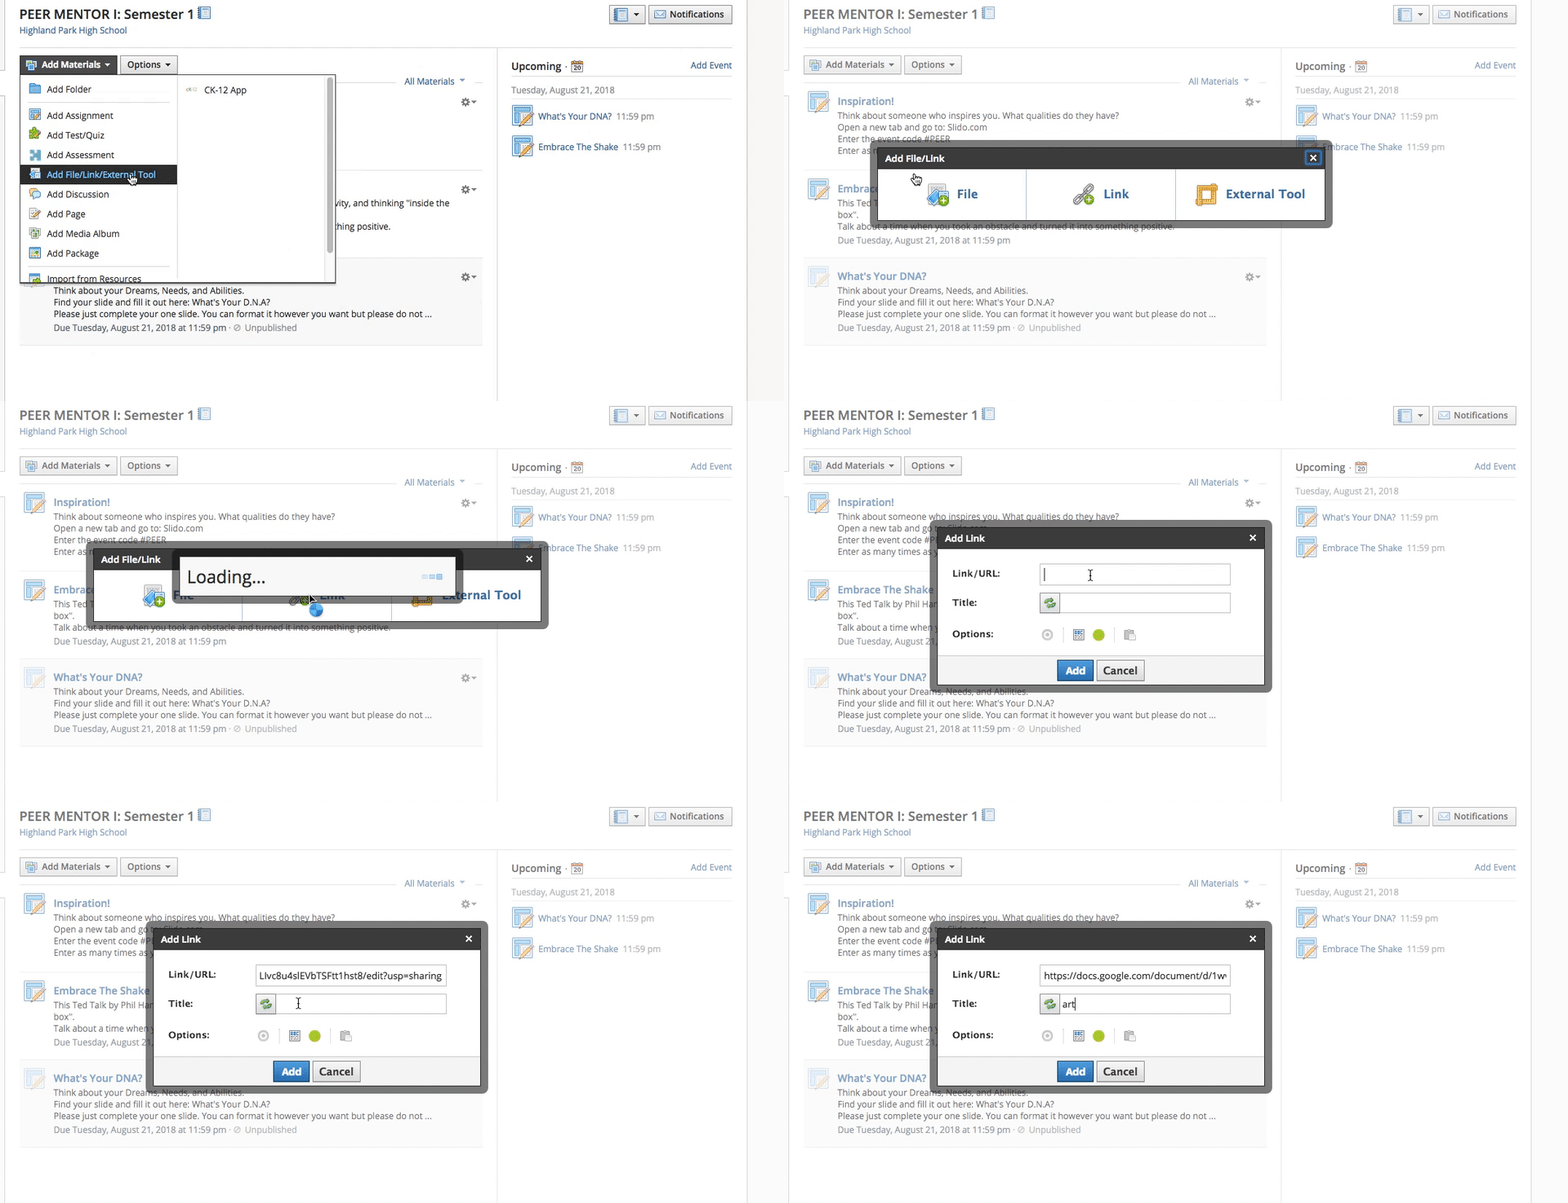
We have lots of materials that we have in our Google Drive that we want to share with our students, but we don't necessarily need them to each have their own copy and turn it in. In that instance, you will want to do the following:
  • Grab the shared link using the blue Share button on your Google doc (or slides, or sheets, etc.)
  • Go to your materials page in Schoology and click Add Materials
  • Click Add File/Link/External Tool
  • Click Link
  • Paste your shared link from your Google doc into the space that says Link/URL
  • Give it a title and click Add
Image from Gyazo


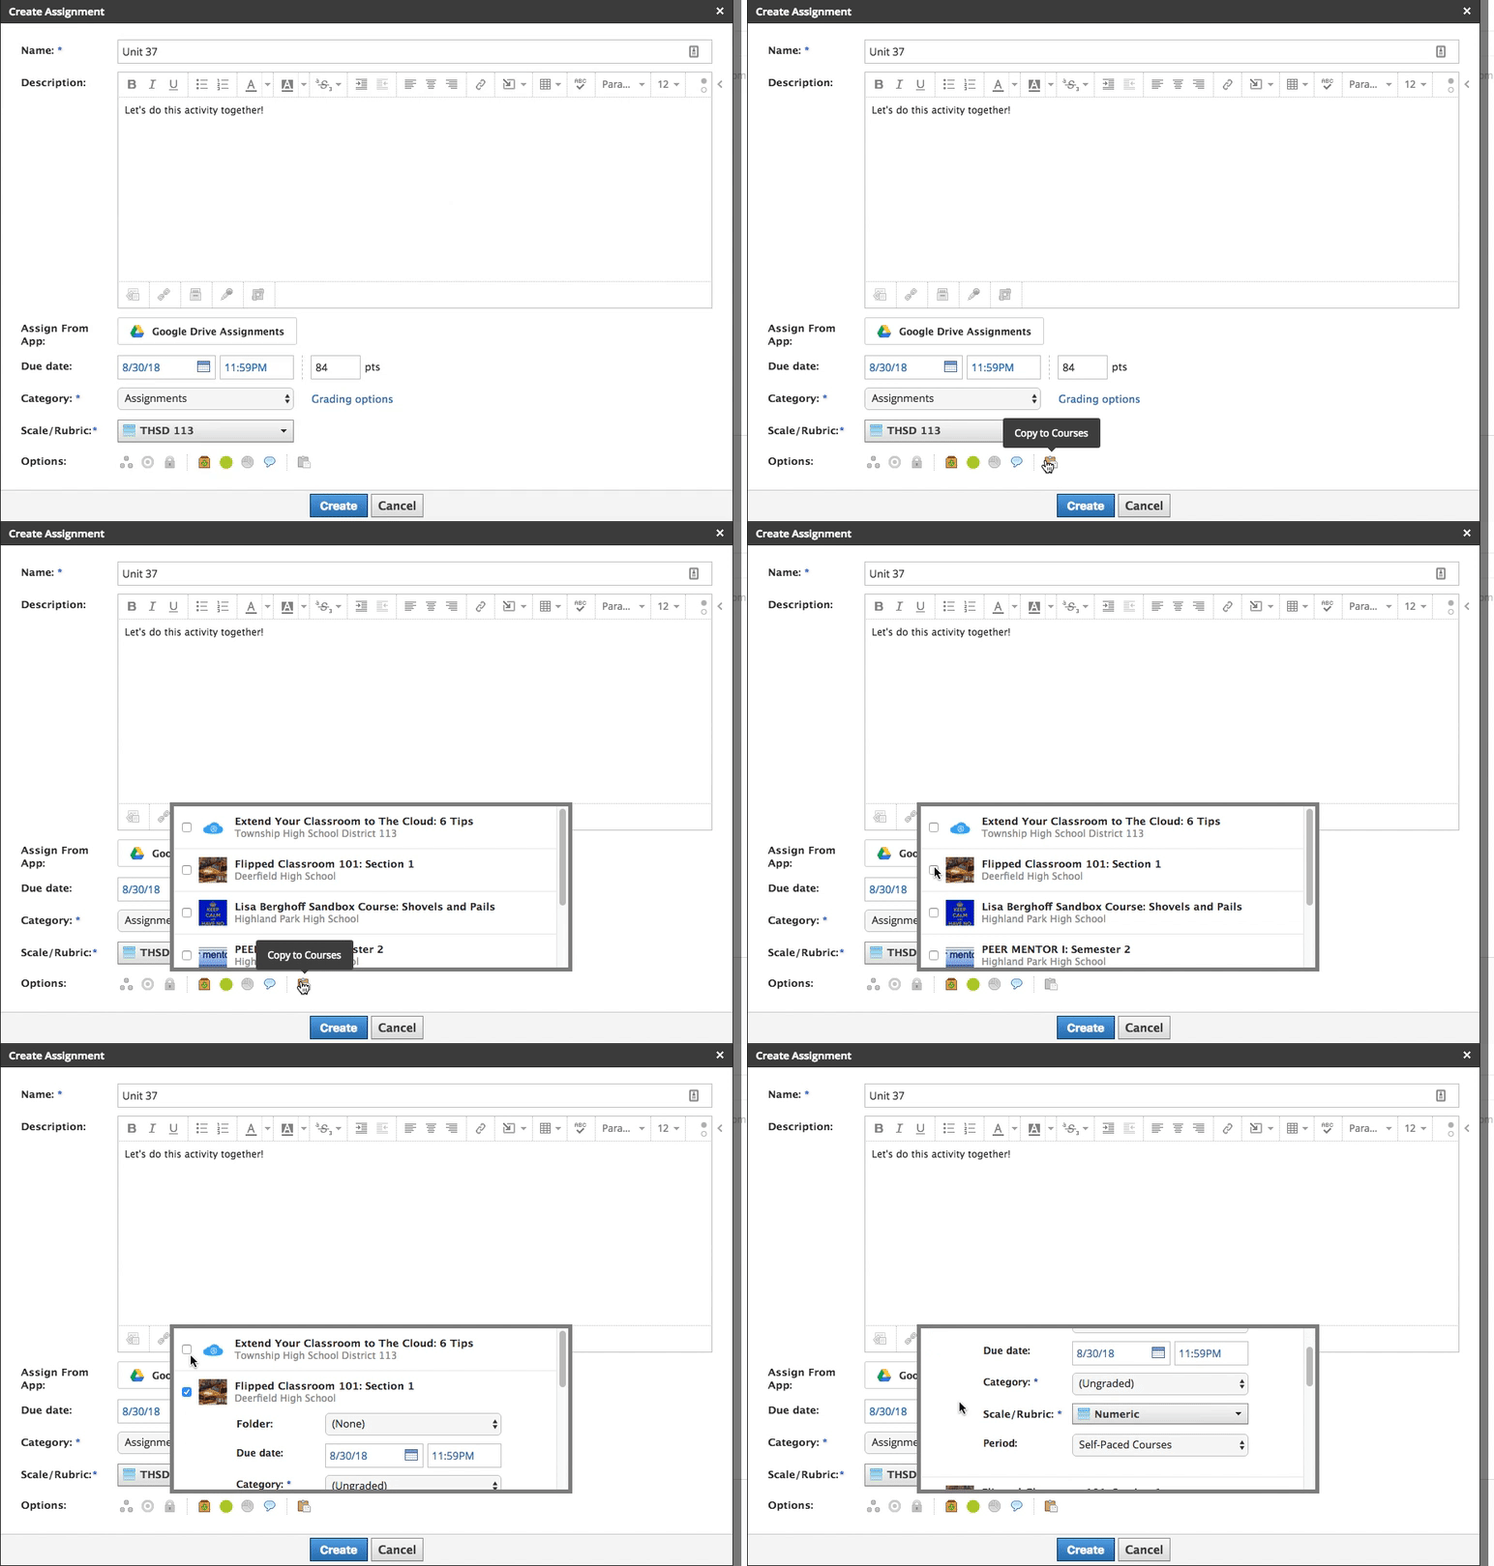
5.  How do I give this assignment to multiple classes even though they have different due dates?

One of the great features in Schoology is the ability to assign across multiple courses. However, we also know that each class moves at their own pace. In order to assign one assignment to multiple sections with different due dates, follow these steps.
  • Choose how you want to add the assignment, from the materials page, the gradebook, or the calendar.
  • Create your assignment. Enter the name, description, due date, points, and category.
  • Click on the icon for Copy To Courses
  • Choose the courses that you want to copy the assignment to and fill in the due dates.
  • Disclaimer: Assignments with Google Suite links will not copy over!


Image from Gyazo


There are lots more great tips and tricks to come. Let's start slow to go fast. For those of you who are dipping your toes in the water, I hope this helps!
Do you have other questions or some tips that you have found useful? Go ahead and put them in the comments section.


Monday, May 28, 2018

FTT - The Economics of Seinfeld

By Christophe Gevrey
It's A Blog Post
About Nothing...

@joe_edtech/@LisaBerghoff

I was recently asked why I started writing this blog (more than 7 years ago in another district). My honest answer was that I wanted a place to share some of the incredible teaching I had seen and some of the really remarkable ways colleagues were using instructional technology in their classes. Very few of the Free Tech Tools were "discovered" by me. They were being used in ways that impressed or intrigued me, and I think we should share good teaching ideas as much as we can. We are stronger when we learn together.

By the way, few of them were strictly technological solutions to teaching problems. Most of them were about using the resources around us to help us or our students think about things in ways we never had before. Knowing that this is probably the last post on this blog that I'll author, Dan Kim will partner with Lisa next year, I spent a lot of time thinking about what I should focus on here. Then it hit me like a Festivus Pole. I should focus on nothing...well, almost nothing.

Being nostalgic, I went back and had a conversation with the first teacher I ever paired with on a 1:1 project. He is an economics teacher and I asked him if there were any really interesting online tools he had used in his classes recently and he turned me on to yadayadayadaecon.com.

Economics professors from Eastern Illinois University (one of my alma maters and what many consider to be the Harvard of the Midwest) and Baker University developed economics courses based on Pop Culture and put their heads together to create a web resource for teaching economics based on TV's Seinfeld. From the website, "This site will be part of an ongoing and expanding attempt to make these sorts of popular culture teaching materials widely and conveniently available. We are doing this in the hopes that the materials hosted here, now and in the future, will be useful to economics educators."

Head to yadayadayadaecon.com and you'll come across 7 full web pages of economics lessons ranging from savings and cost-benefit analysis to variable costs and product differentiation. The TV Clips are available to the classroom thanks to criticalcommons.org, an "advocacy coalition that supports the use of media for scholarship, reasearch and teaching, providing resources, information and tools for scholars, students, educators and creators."

I'll let you grab a Twix or a Big Salad and peruse the site on your own. (By the way, the restaurant pictured above, which was called Monk's in the series, was famous before Seinfeld, the focus of a Susanne Vega song in the 1980s. There - a useless fact about nothing.)

----------------------------------------------------------------------------------------------------------------
Pop Culture can be a powerful tool to use when teaching new concepts. Critical Commons is just one of the many teaching tools for video in the classroom. If you know of other, similar sites, please post them in the comments below.

Tuesday, May 22, 2018

FTT - Schoology FAQ

Thoughts and Ideas For Ending The School(ogy) Year

4 Schoology Most FAQ

@LisaBerghoff/@Joe_EdTech


Remember when you were a kid and you thought your teachers lived at school? I can remember thinking that my teachers must be so sad when the kids leave for the summer. Really, who will fill out all of their worksheets? Now that I have a few years in on the teaching perspective I can honestly say that I think often the teachers are more anxious for summer to begin than the students. One thing that non-educators don't really understand about this time of year is that we still have one foot firmly planted in this year and another foot already planted in next year. Planning and organizing for next year has, if not already begun, is definitely on our minds and our to-do lists. 

There are many questions as we look to utilizing Schoology as our learning management system for next year. Here are four of the most frequently asked questions about closing out the school year, along with some tips and suggestions for the future.

END OF THE YEAR 4 Most FAQ WITH SCHOOLOGY

I've got my class materials organized just the way I like them in Schoology, do I need to re-do that whole process for next year? 


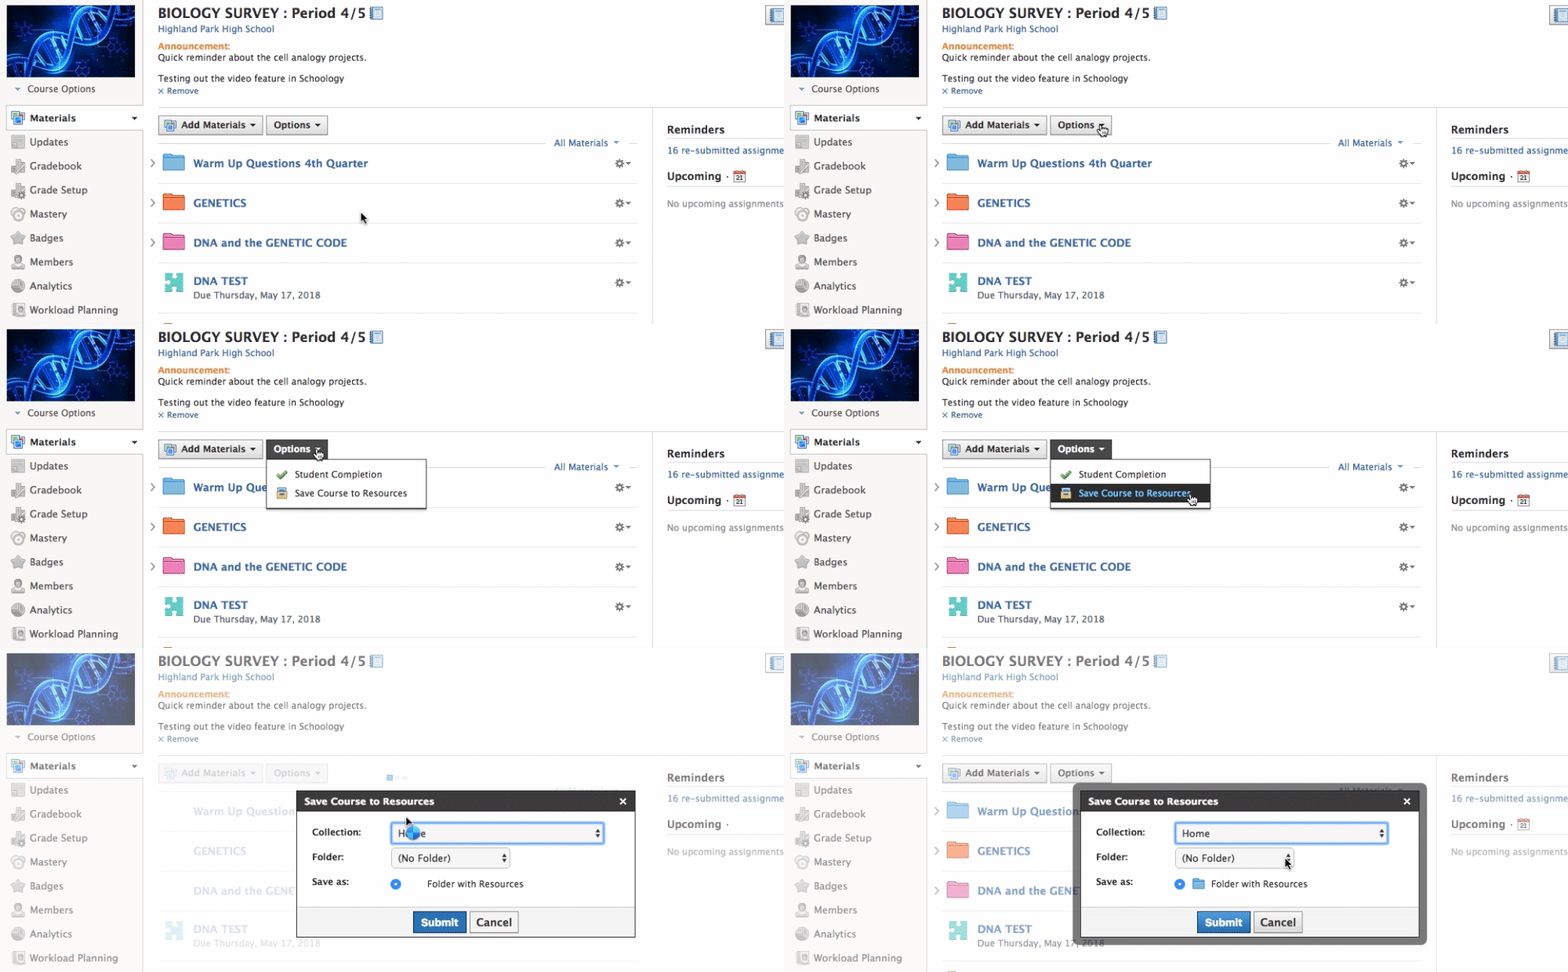
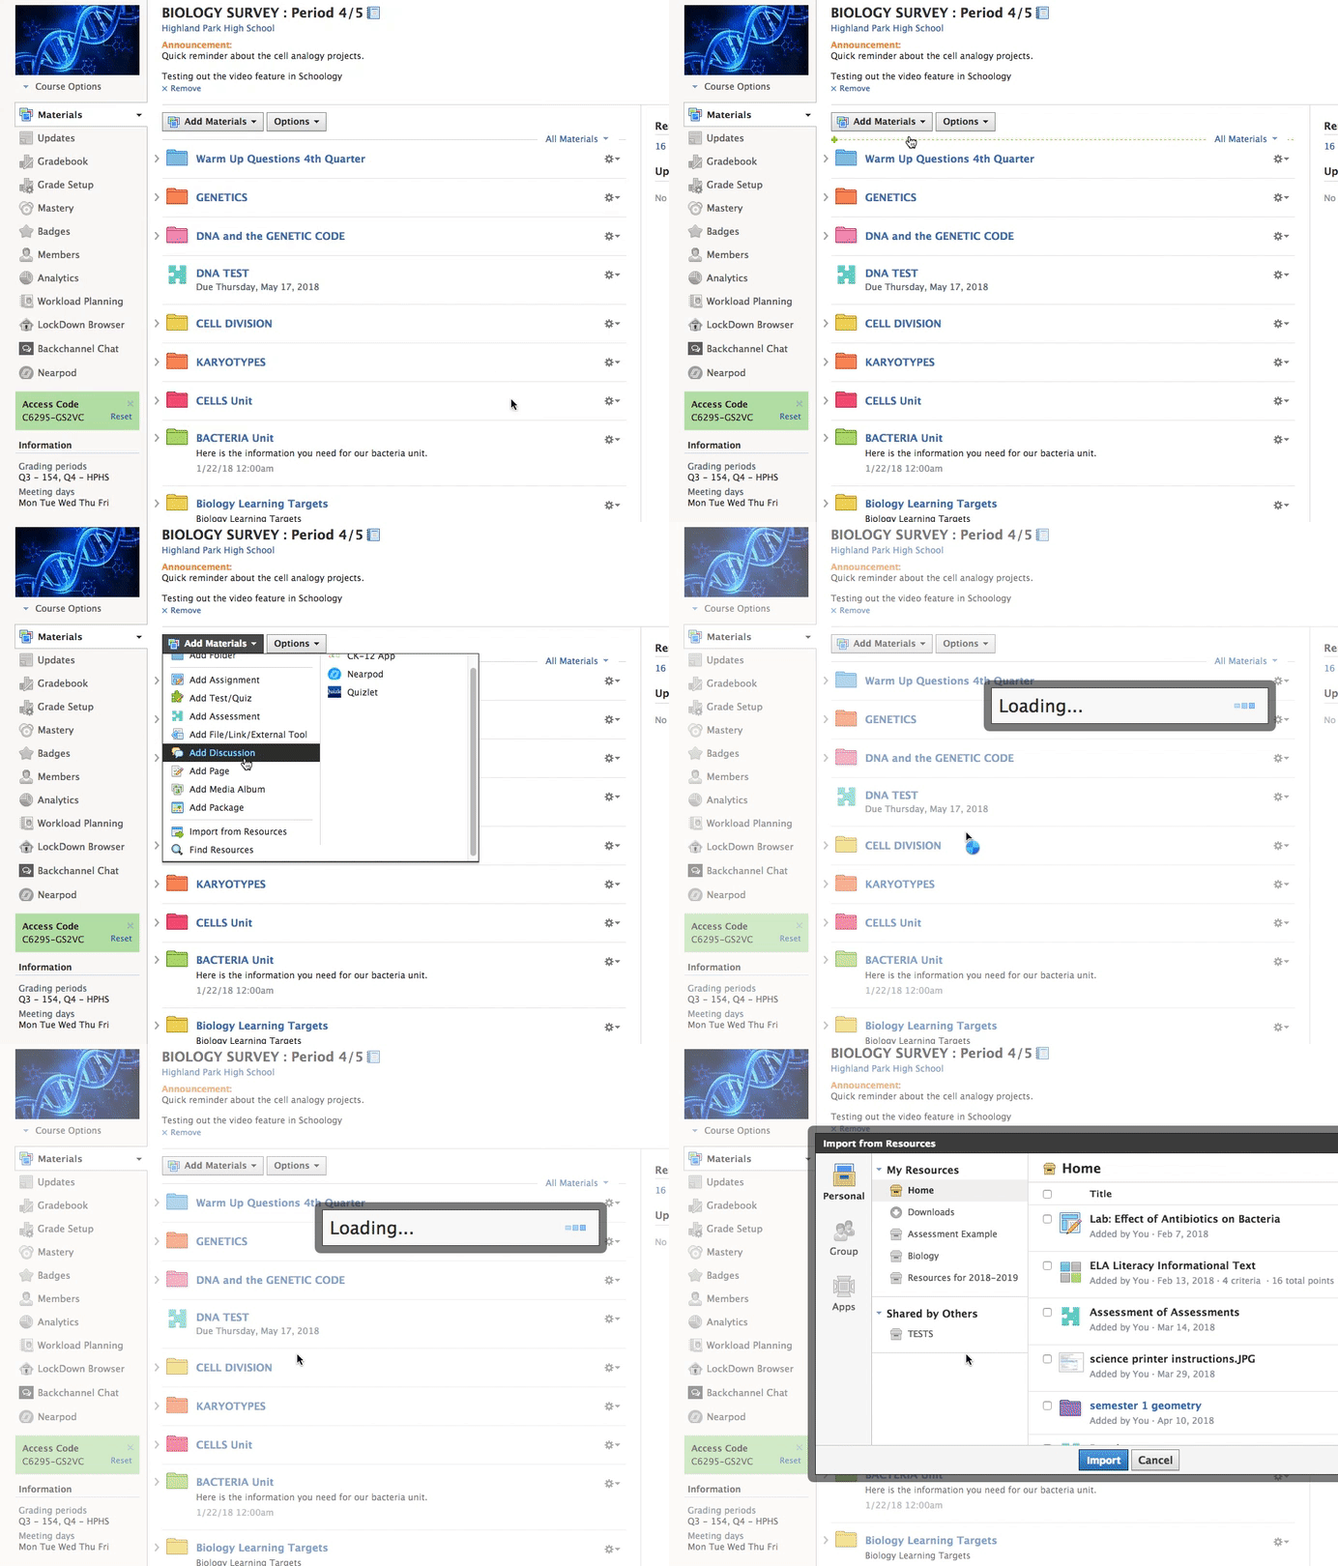
Actually, you can easily save all of your materials to your resources and copy them to your new courses in two simple steps.

Step 1: When you are in your course, click the Options button and then choose Save Course To Resources.

Step 2: When you have your new course, you will click Add Materials and then Import From Resources. 


Here's step 1: 
https://gyazo.com/9901ff31d41d13681986f0ca45dd5fd5


And here's step 2:

https://gyazo.com/d621d12931b8465ed3ccddde4655e326


What if I don't do anything? Will my old classes and materials disappear?

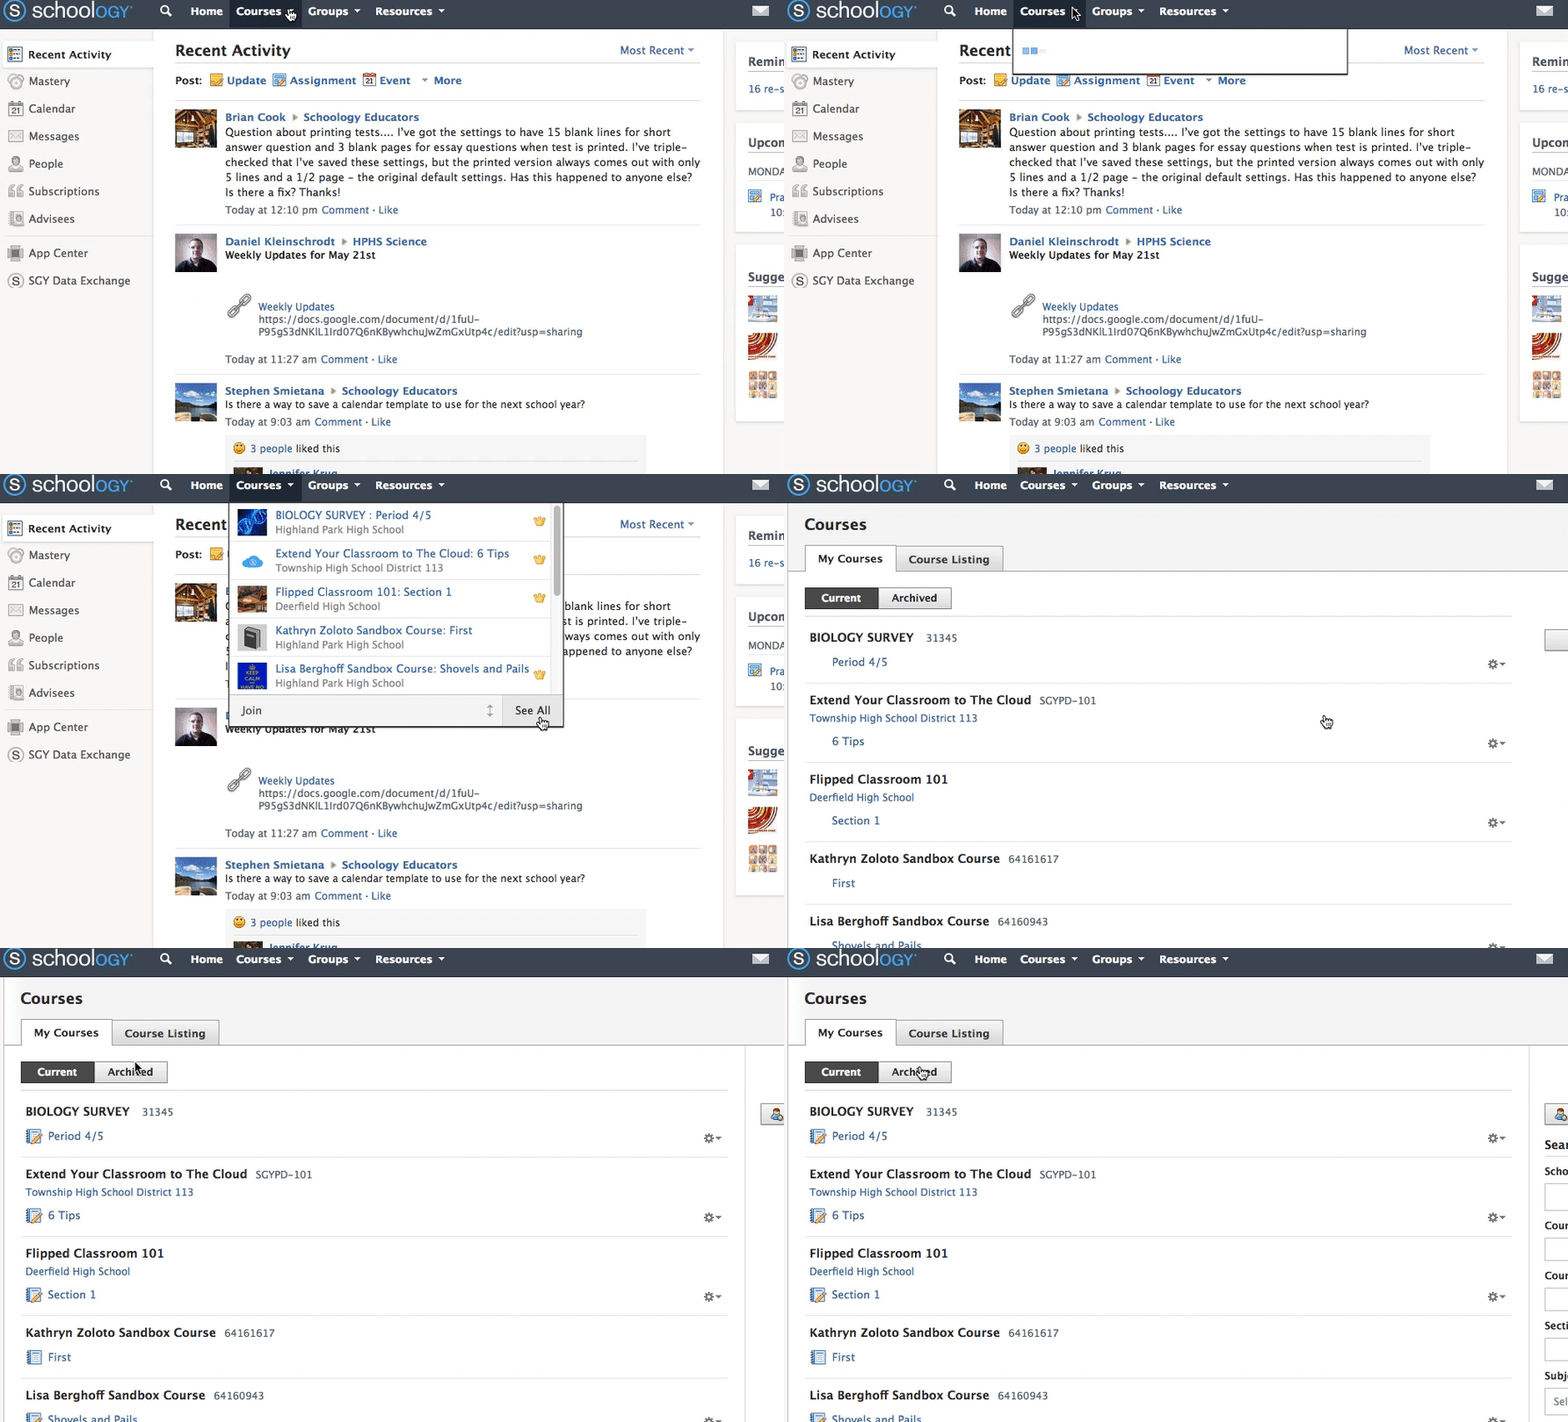
Not to worry. At the end of the grading period, all of the classes will automatically be archived. You can still access your archived courses in the future by 
1. Click on Courses in the top navigation bar.
2. Click the See All tab in the lower right-hand corner of the box. 
3. Click on the Archived tab. 

Archived classes don't go away. You can still access your materials, grade book, and members page. 


https://gyazo.com/568555d0122b558074c6b71a7d3a712e


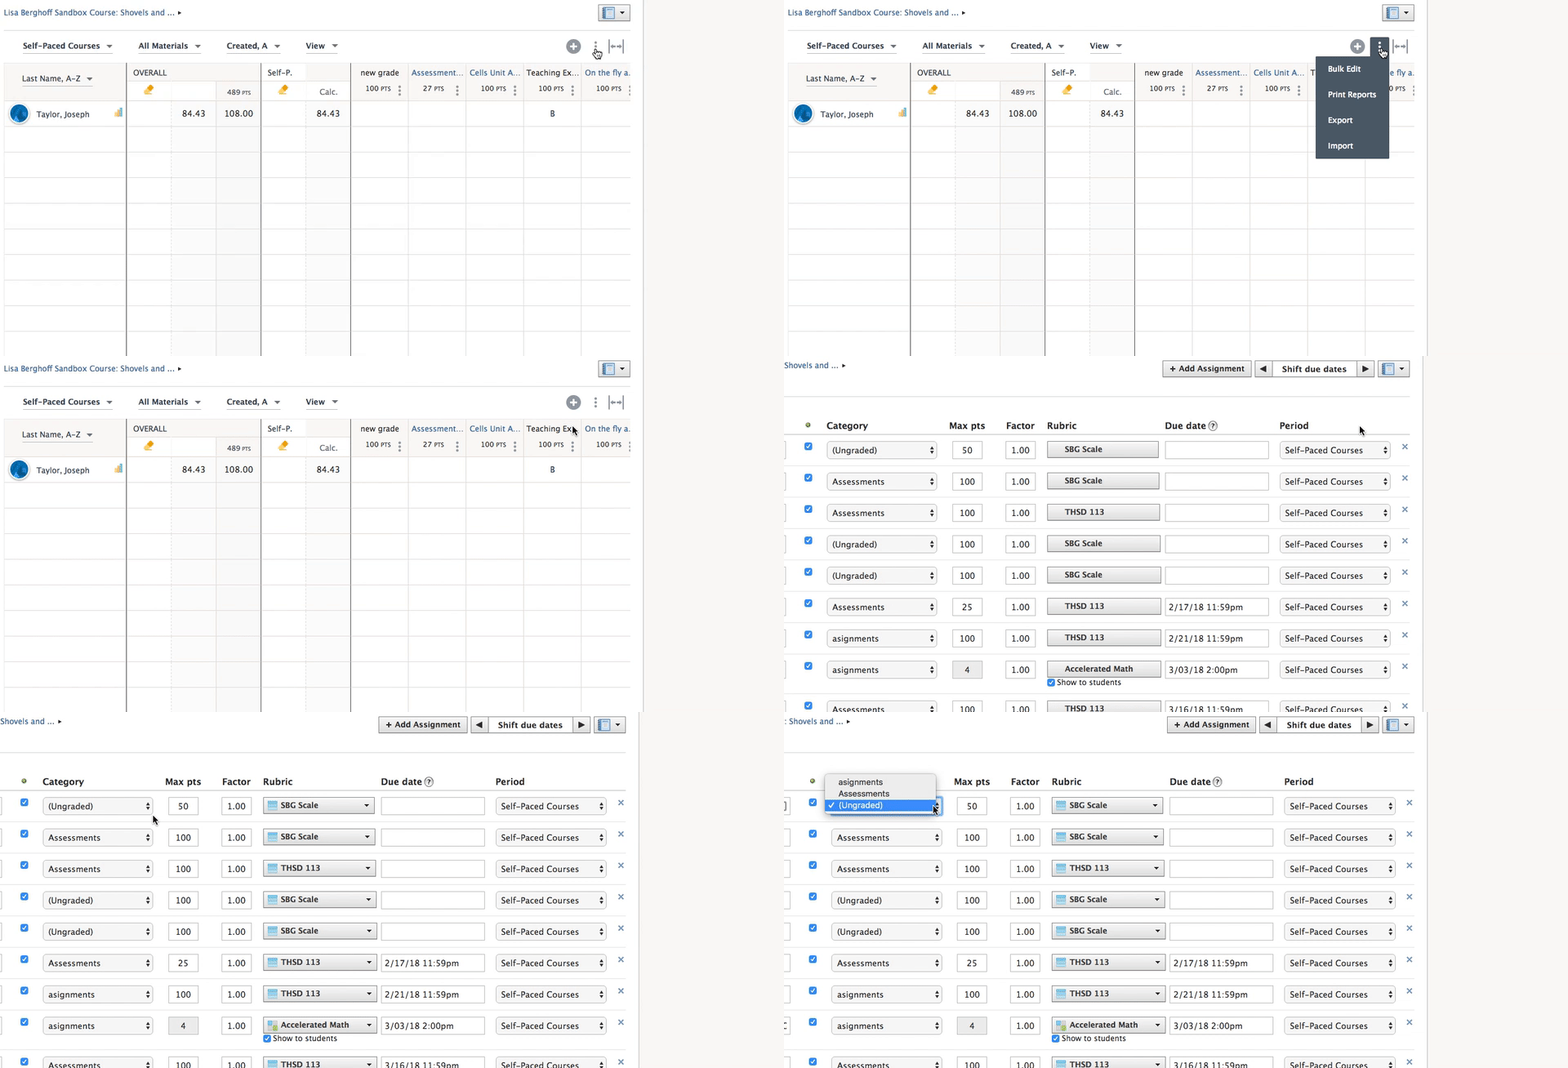
Going through my grade book is making my head spin! Is there any way to see all of the assignments and their settings at once?

This is a great question. And there is a great answer.
Yes! 
1. In your grade book, click the three vertical dots in the upper right-hand corner. 
2. Select Bulk Edit

https://gyazo.com/7b3a84876bf9457eda5b81d92de30665


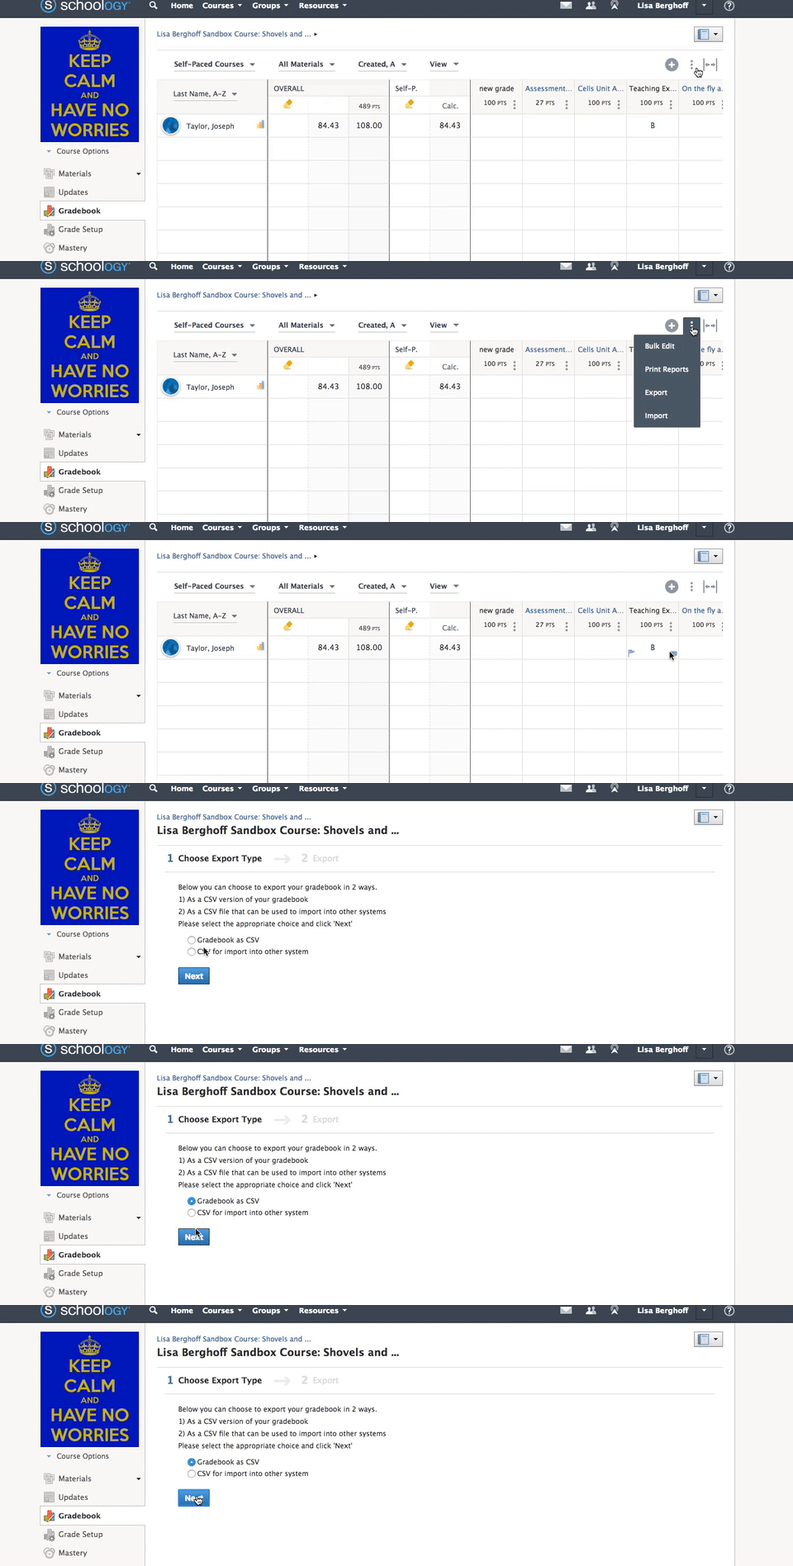
I know everything is saved and archived, but I would still like to have a hard copy of my grade book. How do I do that in Schoology?

This is definitely possible and easy to do. 
1. In your grade book, click the three vertical dots in the upper right-hand corner.
2. Click on Export
3. Export the CSV file


https://gyazo.com/5d040042a0fe7557f00f3b26ef939660


Do you have any suggestions for wrapping up the School(ogy) year? I'd love to hear them!
Post in the comments below. 


Monday, May 14, 2018

FTT - Standards Based Grading in Schoology

Standards-Based Grading in Schoology

@Joe_EdTech/@LisaBerghoff

This week's guest post is by Dan Kim. Beginning in August of 2018, Dan Kim will begin serving as Deerfield High School's Director of Instructional Technology.

Carol Dweck, the Lewis and Virginia Eaton Professor of Psychology at Stanford University, has written extensively about student mindsets in the way they value motivation, intelligence, and academic success. Dweck’s 2006 book, Mindset: The New Psychology of Success differentiates between two types of learners: those of a “fixed” and “growth” mindset. Carol Dweck’s work is often credited with partially inspiring the movement towards Standards Based Grading as an alternative to Traditional grading systems. Adherents attempt to promote the growth mindset through changing the way that they assess student work. According to Tomlinson & McTighe 2006, Standards-based grading “involves measuring students’ proficiency on well-defined course objectives.”

Here is an example of one of the standards-based grading rubrics used in the DHS English Department


So Schoology:

To set up your gradebook for Standards-based grading first click on the “Grade Setup” on the left-hand side of your course page. The first thing to do is to create a Scale. Now traditional graders will be using either the THSD 113 scale, or the THSD 113 P/F (Pass/Fail) scales. Clicking on the yellow star next to the scales will make it the default scale 


To create your own scale click:
·         Click Add and select Scale
·         Once you Add Scale it will give you the option to base it off of percentage or points.


Here is a (very simple) example scale:


Before you create and grade assignments you should change the default Gradebook Scale to the one that you've created. 


Now when you create an assignment, you can attach your newly created scale to it.


For teachers who do not grade based on numerical values, Schoology's gradebook unfortunately does not allow for Alpha characters to be entered. There is, however, a way to display only text in scores for students. 


The paradox of Standards-based grading is that there are no universal standards and procedures that teachers use. Within any department, there can be teachers who use SBG in a variety of ways. While Schoology may not have the perfect answer to accommodating all grading systems, we can be successful by making adjustments and being creative.

What are your thoughts and experiences with Standards-Based Grading? Post your ideas below. 


Monday, May 7, 2018

FTT - Gmail Update 2018

Gmail's Official Blog Photo

Gmail Gets An Upgrade!

@joe_edtech/@LisaBerghoff

It is May and even I cringed when I first heard that Gmail was getting a big facelift. I think it is natural to wonder, "Well, what favorite feature am I gonna lose now?" But my fear quickly turned to pure happiness when I saw the new update to Gmail! We didn't lose anything and they added 3 features that make Gmail much more user-friendly.

View Your Calendar Side by Side With Your Email


Actually, it's even more than just the Calendar, but that's a start. With the new Gmail upgrade, you can see your daily calendar at a glance on the right-hand side of the screen. While you are reading an email with a deadline, or a suggested meeting, you can scroll through your calendar, add items, or pop your calendar out to look at a larger selection.

Seeing my calendar on the same screen with my email would be a big enough win for me, but you actually have options. There are icons that let you choose Calendar for the side view:


Or Google Keep if you use that:

Or Tasks:


Use Smart Reply to Quickly Answer Emails

Smart Reply is a feature many of us have had on our phones for a couple of years now. Essentially, Google uses AI to suggest short answers to questions posed in your emails. In a pinch, you can just click the Smart Reply suggestion and hit send!
Image from TechWeez
Snooze Emails for Response Later

It's about time! I've been using 3rd party apps for this for a long time now. But snoozing is now native to Gmail. 
When you hover over your messages, you'll see some pop-up icons on the right-hand side of the message box. The clock icon on the far right is "Snooze." When you click it...

You can choose to hide the email until you are ready for it. Hit "Snooze" until next Monday, and the email will be hidden from your Inbox, but return next week!

When you are ready to try the new Gmail features, you can click the Settings Gear at the top of the page and select "Try the new Township High School District 113 Mail."


------------------------------------------------------------------------------------------------------------
I only covered my favorite 3 new features. There are more! If I didn't cover your favorite new feature, please tell us about it in the comment box below. We'll be sure to add it in a future FTT post.

Tuesday, May 1, 2018

FTT - Embedding Media in Schoology

Embedding Media In Schoology

@LisaBerghoff/@Joe_EdTech


As a teacher, I'm always thinking of the one or two kids in my class who are the hardest to motivate. They're the ones who ask things like "why do I need to know this?" or "when will I use this in my life?". They have a harder time engaging with the curriculum and often will look for the bare minimum requirements to get by. 

When I am planning, I am thinking of those kids. 

While I believe my content is fascinating on its own, (who doesn't love DNA?) I am realistic in knowing that not everything I teach is going to spark passion in my students. And though I am not a fan of bells and whistles just because they're loud, there is something to be said for mixing things up a little bit.

Think of your own experiences with learning. Do you always want to be lectured to? Do you always want to learn from reading and annotating text? Do you want to be staring at a screen all day?
Of course not. We know from brain research that novelty helps us learn. (http://brainworldmagazine.com/the-importance-of-novelty/)

When I am planning I am conscious of both novelty and options for students. The Universal Design for Learning guidelines  give a wonderful framework for offering options in the classroom, thereby eliminating barriers for students who may have difficulty learning. After all, no two brains are exactly alike so it makes sense that we should offer options and keep mixing it up in our classrooms.

One of the great benefits of a learning management system like Schoology is that it allows teachers to seamlessly embed media into class materials. Having those audio, video, and internet files at the ready will help our kids have some control over their own learning because they can pause, re-watch/listen, and they get to decide how many times they interact with that media.

Media can be embedded into assignments, questions in assessments, class updates, calendar events, and more. If you have a lot of media to share, consider creating a media album. Instructions are below. 

Ready to get started with embedding media into your Schoology class? 
Here's how:

Add media to an assignment
1. Open a class
2. Click Add Materials and Add Assignment
3. Click the Insert Content icon- it looks like a box with an arrow pointing into it-


4. From here you can choose content from one of the apps such as YouTube, Vimeo, or Google Drive, or you can add Image/Media files from your computer or the internet. There is no limit to the number of files you can add, but you do need to add them one at a time.


Why should you embed media instead of just posting a link? For one thing, it will look like this:


The students can open and view the media directly in the Schoology environment, there is no need to open another tab. It is a clean and uncluttered way to direct your students to the media. Think of how much instructional time gets lost when we are fumbling and trying to get our kids all on the same video. That will be a thing of the past when you embed your media.

Still reading? You must be waiting to read about media albums.

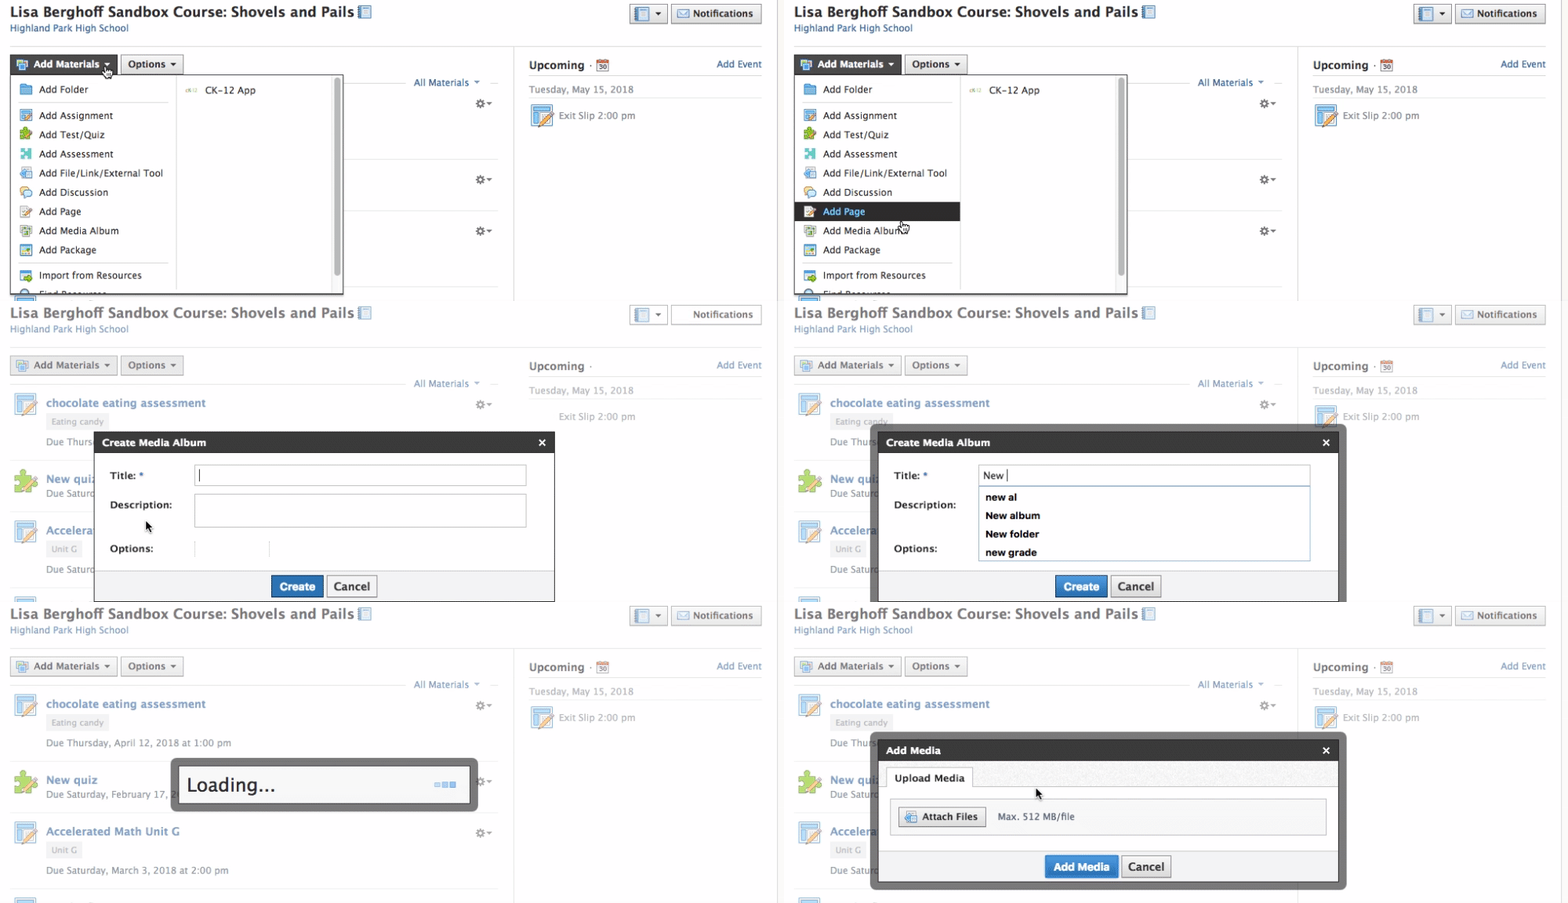
If you have many photos, videos, or audio files to share, a media album is a great way to organize in Schoology. Here is what you need to know.


https://gyazo.com/83578ca2553e17b62dbf880b738ac0a4


1. Open a course and go to Add Materials.
2. Click on Add Media Album.
3. Title your album and give a short description.
4. Click on Attach Files to upload from your computer
5. When you click the gear, you can add captions, rotate, tag people, and re-order your files.
For more information about how to create media albums, check out the Schoology support page: Click here

Please feel free to contact me or any of our early adopters for information or assistance.