Embedding Media In Schoology
@LisaBerghoff/@Joe_EdTech
As a teacher, I'm always thinking of the one or two kids in my class who are the hardest to motivate. They're the ones who ask things like "why do I need to know this?" or "when will I use this in my life?". They have a harder time engaging with the curriculum and often will look for the bare minimum requirements to get by.
When I am planning, I am thinking of those kids.
While I believe my content is fascinating on its own, (who doesn't love DNA?) I am realistic in knowing that not everything I teach is going to spark passion in my students. And though I am not a fan of bells and whistles just because they're loud, there is something to be said for mixing things up a little bit.
Think of your own experiences with learning. Do you always want to be lectured to? Do you always want to learn from reading and annotating text? Do you want to be staring at a screen all day?
Of course not. We know from brain research that novelty helps us learn. (http://brainworldmagazine.com/the-importance-of-novelty/)
When I am planning I am conscious of both novelty and options for students. The Universal Design for Learning guidelines give a wonderful framework for offering options in the classroom, thereby eliminating barriers for students who may have difficulty learning. After all, no two brains are exactly alike so it makes sense that we should offer options and keep mixing it up in our classrooms.
One of the great benefits of a learning management system like Schoology is that it allows teachers to seamlessly embed media into class materials. Having those audio, video, and internet files at the ready will help our kids have some control over their own learning because they can pause, re-watch/listen, and they get to decide how many times they interact with that media.
Media can be embedded into assignments, questions in assessments, class updates, calendar events, and more. If you have a lot of media to share, consider creating a media album. Instructions are below.
Media can be embedded into assignments, questions in assessments, class updates, calendar events, and more. If you have a lot of media to share, consider creating a media album. Instructions are below.
Ready to get started with embedding media into your Schoology class?
Here's how:
Add media to an assignment
1. Open a class
2. Click Add Materials and Add Assignment
3. Click the Insert Content icon- it looks like a box with an arrow pointing into it-


4. From here you can choose content from one of the apps such as YouTube, Vimeo, or Google Drive, or you can add Image/Media files from your computer or the internet. There is no limit to the number of files you can add, but you do need to add them one at a time.
Why should you embed media instead of just posting a link? For one thing, it will look like this:
The students can open and view the media directly in the Schoology environment, there is no need to open another tab. It is a clean and uncluttered way to direct your students to the media. Think of how much instructional time gets lost when we are fumbling and trying to get our kids all on the same video. That will be a thing of the past when you embed your media.
Still reading? You must be waiting to read about media albums.
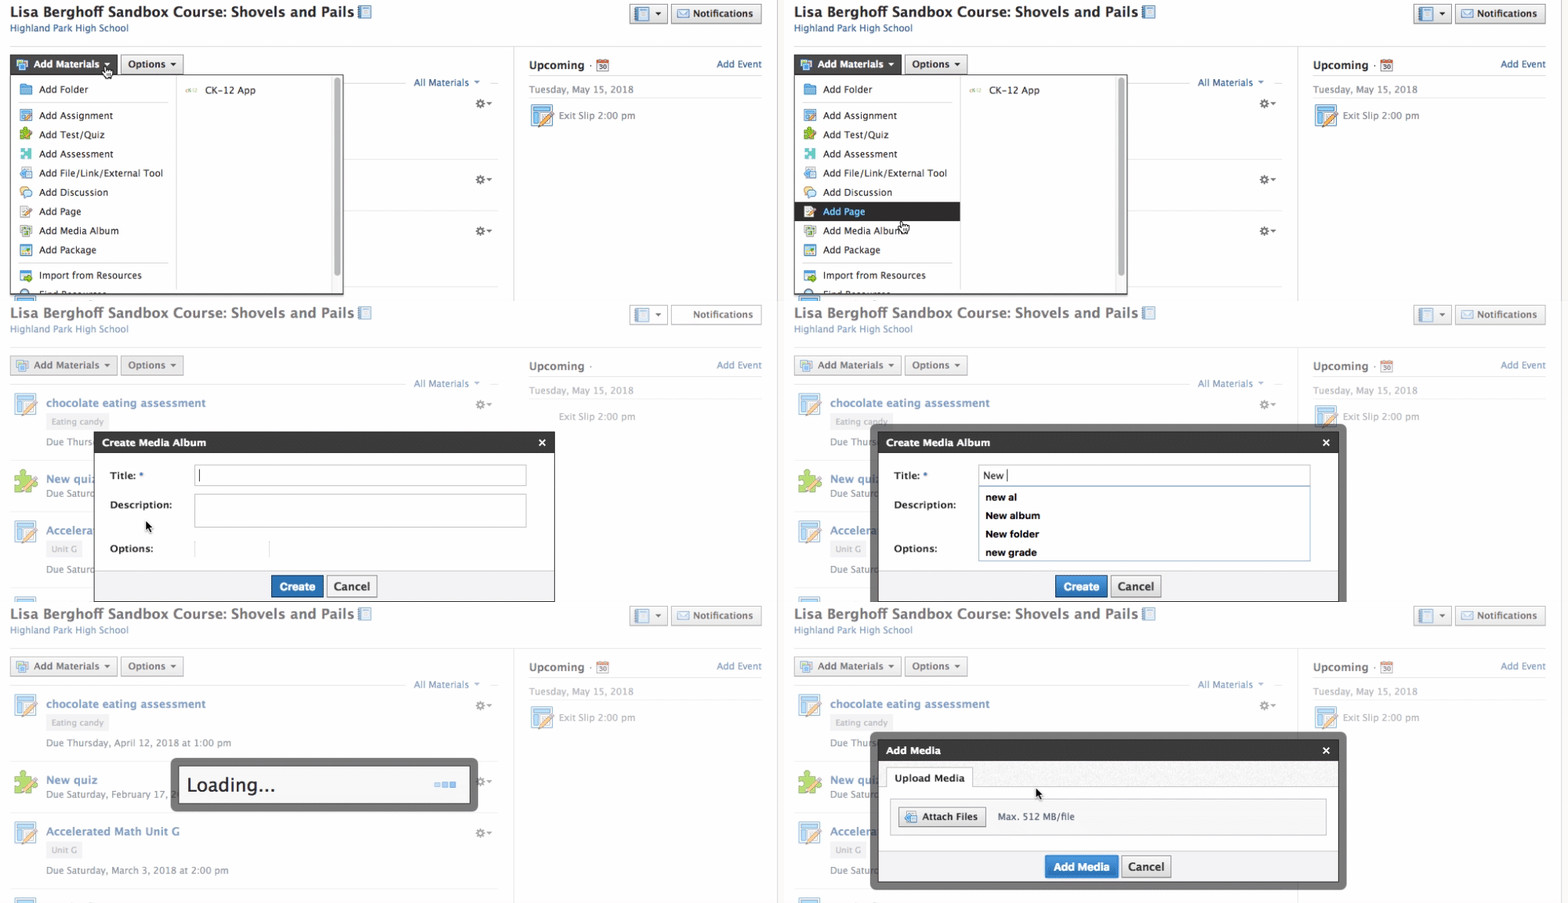
If you have many photos, videos, or audio files to share, a media album is a great way to organize in Schoology. Here is what you need to know.

1. Open a course and go to Add Materials.
2. Click on Add Media Album.
3. Title your album and give a short description.
4. Click on Attach Files to upload from your computer
5. When you click the gear, you can add captions, rotate, tag people, and re-order your files.
For more information about how to create media albums, check out the Schoology support page: Click here
Please feel free to contact me or any of our early adopters for information or assistance.


No comments:
Post a Comment