Tuesday, January 30, 2018

FTT - Schoology Gradebook

Set Up Your Gradebook In Schoology

@LisaBerghoff / @joe_edtech

One of the first things you will want to do when you access your courses in Schoology is to set up your gradebook. When you access your courses in Schoology by going to lms.dist113.org, you can select a course from the drop-down menu and then along the right side you will see where it says gradebook.


When you click on Gradebook you will see all of your students and any assignments you have put in so far. When you enter an assignment, if you check that it will be graded then it automatically goes into your Gradebook, no need to enter it.

Now that you have seen what the gradebook looks like, you will want to set it up so that it works for you.
Right below Gradebook on the right side menu it says Grade Setup. When you click on Grade Setup your screen will look something like this.


This is where you can adjust your categories, weights, quarter vs. semester grading, decide about rounding final grades, your grading columns, and settings for visibility.  You make the decisions about what this looks like for your class. Feel free to click around and see how it goes.

Do you have rubrics that you use for grading? You can add those here. Don't worry, there are lots of places where you can add your rubrics, this is just one of them. When you click Rubrics in the upper right corner and then click Add, you can create and customize your own rubrics and use them to grade right in Schoology. 

You can adjust every aspect of the rubric to make it meet your needs. When you are done, just click the Create button. 


Don't forget to click the blue button to save your changes in Gradebook Setup. 

If you are someone who likes written, step-by-step instructions. I would encourage you to check out the Schoology Help Center.  This will give you instructions along with images so you can just follow the steps.

If you like video tutorials, here's one from a tech coach at another school who shared his video with the Schoology Teachers Group. 


And if you want to learn alongside others in person, lunch and learns as well as sessions during the school day will be offered.

Of course, setting up an appointment is always an option as well.


Tuesday, January 23, 2018

FTT - Navigating Schoology's Home Page

What's In A Homepage?  

Taking A Closer Look At The Homepage In Schoology


@LisaBerghoff/@Joe_EdTech


One of the first questions people ask about our new learning management system, Schoology, is whether or not it is easy to navigate. Navigation is definitely one of those "sink or swim" categories. This is one of the biggest complaints that I hear from students about teacher websites and blogs. Sometimes it's not so easy to know where to click.  If it's not easy to use, we won't want to use it. That being said, what is intuitive to one person is not necessarily intuitive to another. In today's post, we're going to take a deep dive into the home page of Schoology. It's the first thing you'll see when you log in so let's make sure it makes sense. 

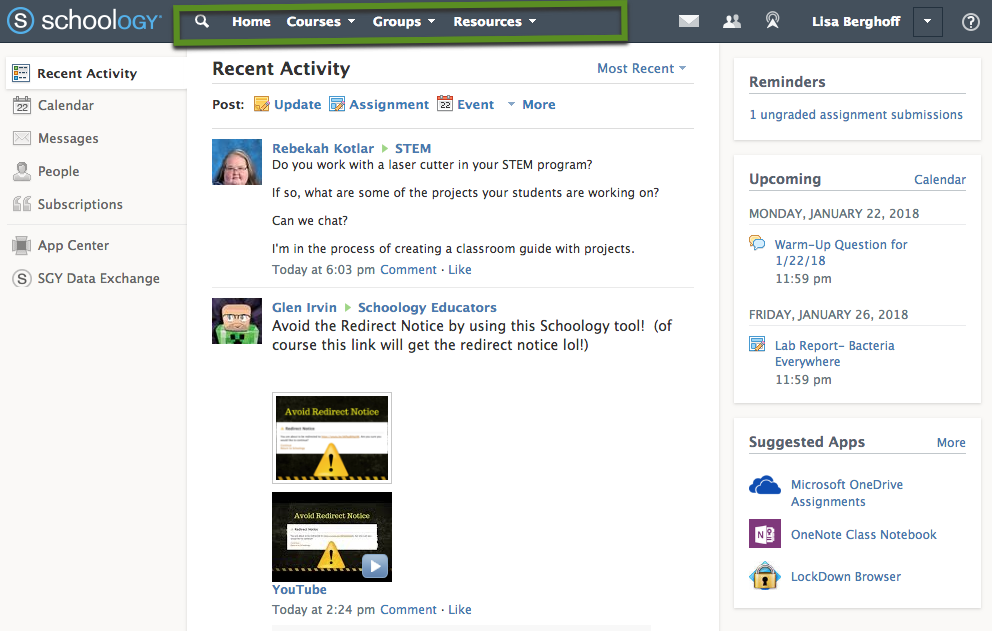
When you log in here for the first time, you will need to connect to your school account. Then, you will see the homepage. Yours won't look as messy as mine! We're going to start by looking at the top navigation bar.  I'm happy to be your tour guide as we explore the Schoology home page. Feel free to take photos on the tour. Sit back, relax, and learn...


Clicking where it says Courses will show you your list of courses. This list includes all of the courses you teach as well as the courses you are enrolled in. For those of you who have explored the self-paced course called Extend Your Classroom To The Cloud, this is where you will find it.  Click on any of your courses to open them. There you can add assignments, discussion questions, assessments, etc. 
The next tab over says Groups. This is going to be an amazing feature for extracurriculars, sports, course teams, departments, and inter-building collaboration.  If you go to Groups and click "See All", you will notice that Groups are divided into 3 categories: My Groups, School Groups, and Public Groups. My Groups will show any groups that you are currently in. School Groups are groups that are housed within our district. You can filter them by building. Public Groups are just that, groups of educators who share a common topic and want to collaborate with others. For example, I am a member of Schoology Educators and Blended Learning groups. When people post to these groups, their posts show up on the home page under "Recent Activity". You will need an access code to join groups. Finally, the third tab is called Resources. Clicking on Resources will open up 4 options. You can think of Resources as your digital filing cabinet. 
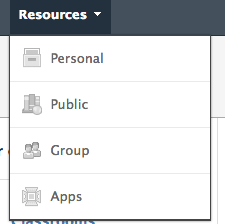
This is pretty obvious. Personal is any resource that is just for you. Maybe you created an assignment for your classes and you want to make sure to hang on to it for the future. It will save as a template so you can adjust it each time you use it. Public resources are files, videos, assignments, assessments, etc. all made by Schoology teachers who are willing to share because they want to make the world a better place. You can filter your search for public resources to find just what you need thereby negating the need to reinvent the wheel. The resources are also rated by others so you can use the Yelp/Amazon style of shopping for your course. Finally, the apps section is where you will find your resource apps. More on that to come!

Also across the top you will see icons that show messages, connections, and notifications. There is also a link to your personal profile. Anytime you get a message or someone wants to connect with you, you can access that information right here in the upper right corner. It is all in chronological order and you can click on them directly for easy access. 


Looking at the center of the screen you will see that it is divided into three sections. On the left is a navigation panel. This gives you easy access to your calendar, messages, school directory (people tab), as well as any blog subscriptions you have. 


The center of the screen shows whatever tab you chose on the left. Here, in the recent activity view, you can see that there is a way to quickly post updates, assignments, events, etc. 

On the far right is an area for reminders and upcoming events. The reminders tab shows that I have homework that was submitted and needs to be graded. Upcoming shows all of my assignments, along with due dates and calendar events. 

Go ahead and log in and take a look at your home screen. Ready for more? You can check out this article from the Schoology Help Center: Navigating Schoology

Want to join the self-paced course? Log in to Schoology here and use your school credentials to log in. Go to the Courses tab and click Join. Enter this code to enroll in the self-paced course on getting started with Schoology. 8C2DG-TV9VN

Remember, early adopters are jumping in but you can dip your toes in the water. Go ahead and log in and see what is on your homepage. Let us know if you have any questions.


Monday, January 15, 2018

FTT - Setting Up Schoology

Designing Your Class with Schoology

@Joe_EdTech / @Lisa Berghoff

It is finals week and you are busy. This blog is really about templates for setting up Schoology courses. The Free Tool is actually a blog post with 7 templates in it. Click here if you'd like to skip my inspiring prose, grab the tool, and get back to grading. Full text of inspiring prose is below.

One of the very frequently asked questions I've had over the last four years in District 113 is about organizing posts on Google Communities or Google Classroom. Not a few of my colleagues have been frustrated by my answer that, with a few minor exceptions, you can't. Posts (at least within topics) are listed by date. Classroom and Communities can still be very good tools for teachers, but I'll have to admit that I don't like the limited organization. I especially don't like the Stream in Communities. I've always thought that was hard for many students to navigate.

One of the strengths of Schoology is that you have the power to reimagine what your class looks like online. It could be a sign of a lack of imagination, but I have to admit that I'm a minimalist. My courses usually look like this:

Topics or themes are arranged in folders, and those are almost always arranged in chronological order. I tend to "hide" future topics or assignments for students, but I leave old topics up for review. I like the organization and simplicity. 

However, for those of you with more imagination than I have, Schoology offers several different design options. The other day I saw Ryan Leist's Schoology page for Freshman English Survey. It is MUCH prettier than my page:

In this case, he has folders for his syllabus and weekly agendas always available for his students. However, he only displays one unit at a time. Everything the students need for class during the unit is in that one folder. The unit has a full description and is linked to an Essential Question for learning. Important for this week, you can see that Ryan has also included a couple of links to help students get ready for finals.

The basic question is this, "When your students log in to see your class, what do you want them to see?" With Schoology, you really will be able to design your online presence to match your educational style and classroom goals.

A great place to start when designing your course is with Schoology's online Pro Tip blog. One of the most important pieces for getting started is a piece called, "7 Simple Ways to Set Up Your Courses with an LMS," by Dylan Rodgers. The blog post gives you an example of 7 different course structures and explains why you might want to use them. But more importantly, it'll link you to a free ebook that you can download with more detailed instructions and examples. 

----------------------------------------------------------------------------------------------------------------
Already set up your course and want to share your idea? Include a screenshot and a short description in the comment box below!

Tuesday, January 9, 2018

FTT - Meet Schoology

Meet Schoology!(pronounced /skoo-luh-jee/)

@LisaBerghoff/@Joe_EdTech


Are you hearing all about the new LMS? Are you still wondering what an LMS is and why we need one? Here's a 2 minute video explaining learning management systems: 


This year, our district is adopting Schoology as our LMS. What does that mean for our students? Well, it means that our learners will have one place to log in to access everything they need for all of their classes. They won't need to log in and out of sites like Quizlet, and Khan Academy, and they won't need to go to several different digital places to find their assignments and information for their classes. What does that mean for our staff? It means we all will need to learn how to access and utilize the many features Schoology has to offer. 

While I know many of you are anxious to see where to click and how to post, I want to take a moment to point out the bigger picture of what an LMS can mean for all of us in our 1:1 environment. While knowing where to click and how to post is important, let's first think about what it is that we want our students to know, understand, and do. I recently saw an article from the Washington Post that said: "The seven top characteristics of success at Google are soft skills: being a good coach; communicating and listening well; possessing insights into others (including others different values and points of view); having empathy toward and being supportive of one's colleagues; being a good critical thinker and problem solver; and being able to make connections across complex ideas." 

We know that it can be challenging to be connected in a real way when we are so often tucked away in our own spaces. One of Schoology's main features is "the ability to connect people, content, and systems." As we embark on this new journey, let's be mindful of ways that we can use this technology to connect, share, and grow together in ways we haven't been able to before. Our students need to learn how to navigate a world where soft skills and technology intersect and we can help model that for them.


Ok, now to the clicking and posting

  1. To get to our new LMS, go to http://lms.dist113.org and log on using your school email and password.
  2. Make sure you bookmark this link by clicking on the star. You can drag it directly to your bookmark bar for easy access in the future.
  3. In the menu bar, click on "courses" you will see all of your classes there!
Schoology has a self-paced guided tour that is a fantastic first step to learning about how to get started. To get the course, click "courses" and then click "join".
Enter the code: 8C2DG-TV9VN


You will see the course: "Extend Your Classroom To The Cloud: 6 Tips" in your courses menu. Go ahead and navigate to that course. You can see what it is like to be a student in an online course through Schoology. The course is broken into small videos and pieces of information. It also has links to step-by-step instructions to help get you started.

Feel free to jump in and give it a try! Even if you're not ready to be an early adopter, it can't hurt to jump in the course and start learning.

Initial sessions are being offered this week but that is only the beginning. There will be many opportunities for learning, sharing, and collaborating as we roll out Schoology.


Tuesday, January 2, 2018

FTT - Analyze My Writing

Screenshot of analyzemywriting.com
Measure Text Readability and Writing Skills with Analyze My Writing

@Joe_EdTech & @LisaBerghoff

Revised from Original Post in 2015

How complicated is the reading you are assigning this week? Do you know the readability level? If you are like me, you have a ballpark idea and use a scale of "surely they'll get this" to "we might have to talk about some of this more in depth tomorrow." However, there are some free online tools that can provide you with a little bit better information about digital texts than the aforementioned Taylor method.

Analyze My Writing is an incredibly easy to use tool with a great deal of flexibility to it. You don't even need an account to get started. Simply navigate to analyzemywriting.com, paste any text into the textbox on the page, and Analyze My Writing will give you a breakdown of the text in the following categories:
Fry Readability Graph from Analyze My Writing

  • word, sentence, and character count
  • word and sentence lengths (with graphs)
  • readability scores based on several measures
  • customizable graphs for Fry and Raygor readability measures
  • punctuation marks
  • most frequently used words (with word cloud)
  • most common word pairs
Whether you are teaching kids to be conscious, analytical readers or you are having them peer review their own writing, Analyze My Writing is an easy way to add data and depth to your discussions.

----------------------------------------------------------------------
Do you use a tool like Analyze My Writing with your students? If so, tell us about it below - along with your successes and challenges.

Tuesday, December 12, 2017

FTT - The Perfect Password

The Making Of The Perfect Password *

@LisaBerghoff/@Joe_EdTech


With the expansion of technology in every aspect of our lives, from shopping to banking, to photo sharing, it becomes more and more important to stay on top of your security game. One of the most basic things we can do to protect our digital data is to create strong passwords
We all know this but how many of us actually do it? 

There are a number of valid excuses including:
  • I can't remember a different password for everything I do online.
  • It's too hard to keep track of the requirements for different sites.
  • It is so time consuming to change my password all the time.
  • I don't think anyone would actually want to hack my information.
  • My passwords are strong enough.
As 2017 comes to a close, this is a wonderful opportunity to do some password housekeeping. 
Take a look at your existing passwords. Do you use the same password for many sites? Are your passwords predictable? Are they actual words?  These are important things to think about so you can protect your digital information. 


Let's first take a look at what constitutes a strong password. 
Strong passwords are made up of Upper and Lowercase Letters, Numbers, Special Characters, Nonsense Words, and are Lengthy. 

How are we supposed to keep track of all of that?  You can create your own algorithm, or set of rules, to create strong passwords that you will always remember and NOT need to write down. (please don't write down your passwords).


Here's how it works.

1. Start with a base word. Choose any word that you like. For example, I'm going to use the word MOIST because so many people hate that word!

2. Turn your base word into a nonsense word. I will turn moist into molisat because it has my name in the middle.

3. The site that I am logging into requires at least  8 characters in the password so I'm going to put the number 7 in front of it. I will always use one digit below the requirement. My password at this point is 7molisat.

4. Now I need to add special characters. The site that I'm logging into is a .com site. I will use $ for all .com sites. Also, it's a work related site. I'm going to add @ for everything dealing with work. I'm also going to add _ in between the characters. 

5. My final password is now 7molisat$_@

How do I know if this is a strong password? I can put it in How Secure Is My Password to test it. The site will tell you how long it will take a computer to hack your password. According to the site, it would take a computer 5 years to crack this password. I think  I can do better. By adding another 7 at the end, it now says it would take 200 years! I checked the password that I use for my online banking and it said it would take a trillion years to hack. Yes, I'm bragging because I felt pretty good about that. 

You can create an algorithm that works for you. The point is to create one and then stick to it. Make a game out of it. Once you have your algorithm down, you will never need to write down passwords. You will be able to easily create new passwords and you will know that they are strong.

If you are still struggling, you can also use tools to help you. There are lots of password generators/protectors that you can find in your app store. These apps live on your phone and can help you keep track of it all. Remember, your brain is the best app you've got and it's free!

Do you have any tricks or tips for creating strong passwords? Post them in the comments below.


*This post was inspired by a presentation given by Joe Du Fore at the #digcitchi program. 

Monday, December 4, 2017

FTT - Nearpod

Turn Any Presentation Into an Interactive Presentation with Nearpod

@Joe_EdTech/@LisaBerghoff


Originally posted for DHS in 2015 - Revised and updated for 2017!

When I was teaching full time, I would frequently use PowerPoint Slide Shows in class. The secret I never told my students is that the important things that happened in class, the real moments of cognitive engagement, had little or nothing to do with the PowerPoint Slides. Mostly I used the slides to keep myself on topic - and sometimes that worked.

In class, I really wanted the students to engage in the conversation with me. I didn't want them to just spew historical facts back at me, I wanted them to think about the situations that arose, try to understand why people acted the way they did, postulate what they might have done differently, and so on. But what I mostly saw when I used PowerPoint was a furious dash to write down every word that was printed on the slide as if it were Gospel. And why did they do that? Somewhere along the line they learned that what was important in class would be on the next exam, and everything that was on the next exam would be written on the board or included in the slide show (and yes, I'm sure that I was complicit in that at some point).

Nearpod is a Web 2.0 tool that offers us a chance to change the game a little. If you use Nearpod, and your students download the app to their Chromebooks, you can push presentations to them so that each slide appears on the screen of their device. If they are of the type that wants to write down every word, they can actually just take screenshots and go back to engaging in the discussion in class. Not only that, though, Nearpod gives you a chance to insert polls, quizzes, and other interactive slides into your presentations. With all of the power of a student response system, you can embed formative assessment into your classroom presentations and ensure some level of universal participation. You can even have students create drawings or graphs using their track pads, and share individual drawings to the entire class.

At the risk of being accused of burying the lead, though, Nearpod also serves one other purpose for your 1:1 classroom. While I am still of the mindset that the best way to make sure that your students aren't distracted by the technology is to be engaging with your teaching, teachers who are new to the 1:1 environment often cite classroom management/device management as one of their major concerns. If you use Nearpod for classroom presentations, you can easily see which students are actively engaged in your classroom activity. There is even an "attendance" button on the top left of the teacher screen that lets you see if any of your students have navigated away from your Nearpod presentation. So, while it doesn't lock your students into one screen, it gives you clear evidence of who is engaged in the lesson, and who is not.

Here is Nearpod's short explanation of how it all works:


On the upside, Nearpod continues to offer updates that make the product better and more efficient. With a free personal account, you can present PPT presentations or presentations saved to PDF. You can also share those presentations with other teachers. Additionally, the company recently rolled out a feature that allows students to see quiz and poll results whether they are seeing a teacher led classroom session or an asynchronous session. On the downside, they would really like for you to pay for a school or district license, which really means that storage is limited in the free version. But, this is a pretty decent tool to use in a 1:1 classroom no matter which device your students are using.

--------------------------------------------------------------------------------------------
Have you used Nearpod with your class? Or do you have another classroom presentation / classroom management tool that you use? Tell us about it in the comments section below.