Monday, April 23, 2018

FTT - Lockdown Browser in Schoology


Test Security & the LockDown Browser in Schoology


@joe_edtech/@LisaBerghoff

Guest Post By Howard Citron, Phsyics Teacher and Instructional Tech Coach at DHS

In the blog post below, Howard explains that using the LockDown browser feature in Schoology, you can prevent students from opening new tabs or windows on their Chromebooks and enhance your online test security.

Assignments, discussions and grade books, OH MY! As I venture down the yellow brick road and continue meeting all of these fascinating Schoology features, I’ve decided to start giving assessments through Schoology. My favorite part assessments in Schoology? The LockDown Browser, of course!

Have you wondered, how too can I use Schoology to give assessments without my students being able to access the internet for answers? That is the question we are here to answer.

We present to you the “LockDown Browser” embedded within Schoology! The LockDown Browser allows for you to create and give your students digital assessments with varying question types without the students being able to access the internet. This is a similar feature to using Hapara to lock out student browsing capabilities or the “Click to test” function through Mastery Manager without students having to log out of their Chromebooks.

First, you’ll want to activate the LockDown Browser in the lefthand side of your Schoology “Courses” page


Once the LockDown Browser has been activated FOR EACH CLASS, you have the ability to add it to any of your Schoology given assessments. Students will only have the ability to access webpages that you allow during assessments when LockDown is active.

To create an assessment using the LockDown Browser you will create an assessment (Test/Quiz) via “Gradebook” or “Add Materials.”

Upon creation of the assessment, you may set it up to either make the grades available without a key, with a key or not make the grades available once they have submitted the assessment.


Once you have created an assessment (Test/Quiz) within Schoology, you will have the following options presented to you for that assessment:
  1. Allowing the students into the exam only 
  2. Allowing the students into specified web sites 
  3. Allow iPad assessments 
  4. Allowing calculator function 
  5. Enable Printing
When the students log-in to the take the Schoology created assessment, they will be prompted to enter the LockDown Browser.

The LockDown Browser is an excellent tool that allows our students to enter into a testing mode without logging out of their system and provides the instructor the piece of mind to know that their students cannot access the internet while being assessed.

The accompanying data collection is also an incredible benefit of Schoology that we will discuss in a future blog.

Tuesday, April 17, 2018

FTT - Resources in Schoology

Adding And Accessing Resources In Schoology

@LisaBerghoff/@Joe_EdTech


One question that comes up frequently when introducing teachers to Schoology is whether or not their materials will disappear after the school year has ended. Teachers eager to get started also want to know that the materials they create today will be there for them in August. 


The good news is that Resources is cloud based storage within the Schoology environment.  Not sure what cloud computing is? Watch this 2 1/2 minute video to learn more. 


Understanding Resources  

Welcome to the resources tab! This is one of the most important features for organizing your materials within the Schoology environment. As you become more familiar and comfortable with Schoology, you will most likely be creating assignments and activities within Schoology. The resource center is where you can access your personal resource library, a public, world-wide library, as well as groups of resources housed in groups, the school, or the district. 

You access the resource center by either clicking on the resources tab on the top navigation bar on the home screen or, if you are in a group, it will also be located on the left navigation bar. 


My Resources is your digital filing cabinet where you can save all of your courses and materials. You can also create materials within the My Resources section. Anything you save in this section can be copied and transferred to any course. Once it is copied, you can adapt it to fit the needs of that specific class and it will not change the original copy. In other words, what you have in My Resources is used like a template. 

A Collection is like a container for courses, files, folders, and resources that you may want to use in Schoology. Think of it as a master folder that can be used for organization. You can create a collection for an entire course, a semester, or an entire year. 

The Home Collection is automatically created for you. Everything that you create and save  in the Schoology resource center will be added to your Home Collection. If you want to share resources with others, you can create other collections. 


Want to add a collection?  Here are the steps:
1. Click on the Resources tab on the top navigation bar.
2. Go to Personal 
3. Click on the icon that looks like a filing cabinet with a little green plus sign, that is the Add Collection icon.
4. Give your new collection a title
5. Click Create to finish
There is a little triangle next to the Add Collection icon that allows you to reorder, import, or export resources. You can also rename and delete collections.  As you can see from the screenshot, I moved the Resources for 2018-2019 collection to the top of this list.

Learning Objectives Collection allows you to generate custom learning objectives and share them with members of your group. You may want to set up a course team group and share learning objectives so everyone has them available. In Schoology, you can align assignments and assessments to your learning objectives. You can also create custom rubrics that connect to your objectives.
More information about learning objectives can be found on the Schoology Support Page. 


Downloads is another collection that is automatically created for you. This is where you will find any resources that you downloaded from Public Resources. By clicking on the gear next to the resource, you can add it to a course, copy it to another collection, move it to another collection, or delete it altogether.

Public Resources from the resources center is where educators from all over the world have made their materials available for free. There is a lot there so to make it easier, you can filter and search by resource type, grade level, subject, file format, or rating.
The Public Resources tab within Personal Resources shows everything that you have added to personal resources. If you are glad that others have shared, please consider sharing your materials as well. Together, we are much better than in isolation.

Group Resources will show everything that is shared within a particular group. You may belong to course team, department, building level, district level, and/or public groups. They will all show up in this tab. Again, these resources can be copied to another collection, or added to a course by clicking on the little gear to the right of the resource. 


Resource Apps is the last tab you will see as you go down the left navigation within resources. This allows you to integrate third-party content such as Google Drive, YouTube, or DropBox,  directly into Schoology without needing to open additional tabs. If it's your first time adding apps, you will click Install Apps. Choose which apps you want to install and click Install. 

Adding materials in Resources is very similar to adding to a course. Just click on the Add resources icon and choose the resource you want to add.

Templates can be added to any course or course folder. Once added, you can adjust the material without any impact on your template. You can  also adjust the template without any impact on your material. 

Since Resources saves as templates, it works differently from GoogleDocs, which sync and update live. Therefore, they serve two different purposes. Go ahead and start playing around with Resources. This is a great place to start as you think about preparing for next year, especially while we're still in school.

Have questions or want some help working with Resources? Contact your instructional technology supports in your school today.

Tuesday, April 10, 2018

FTT - Schoology Workload Planning

The Power of Knowing - Workload Planning in Schoology

@joe_edtech/@LisaBerghoff

While we may be starting slowly with Schoology next year, it is important to know that when we are ultimately all in and using it to the fullest, there are some really amazing things we can do with an all-school LMS. One of the coolest features in Schoology is called "Workload Planning," and it can tell you when your students have major assignments or tests in their other classes.

In your course, one of the options along the left side of the page is the "Workload Planning" button:

When you open Workload Planning, you can see a weekly calendar (for any week of the semester) with a snapshot of how many major assignments your students have due in other classes for that week. 

Using the drop-down at the top of the page, you can filter your results for the number of assignments due per day. So, if you are planning a due date for a major project of your own, you can take a quick glance at the students in your class and schedule your due dates with their other classes and projects in mind.

Workload Planning will allow you to see an aggregate total for your class, or let you look at individual student schedules. If you click on the information in the calendar displayed, you can actually see what classes the projects are and for which classes.

Here's a short video on Workload Planning via Digital Learning Specialist Paul Beckerman:


Have a fantastic start to 4th Quarter!

Tuesday, March 27, 2018

FTT - CK-12 & Schoology

High Quality Content + Latest Technologies =


@LisaBerghoff/@Joe_EdTech

This is the time of year when we have one foot in this school year and  another foot in next year. It seems crazy to people who are not in education, but a lot of moving pieces have to be put together in order for a school to be prepared for a wide range of learners, passions, abilities, needs, and requirements. One piece that always leaves me scratching my head is textbook selection. 

First of all, teachers are never one hundred percent satisfied with their textbooks. My class this year doesn't even use one because our curriculum has shifted so much. We do our best to find one that is satisfactory but we end up searching for, creating, adapting, sharing, and adding extra bits and pieces to make up for what our textbooks are lacking. 

As I see it, there are three fundamental problems with textbooks as they are today.

1. To begin, textbooks are easily outdated. The information changes faster than the books can be published. Now that we, and our students, have the internet at our fingertips, we expect current information presented in a way that is easy to find, like a Google search.

2. Next, textbooks are a one-way learning tool. They are not interactive unless the teacher creates interactive lessons to accompany the text. Sometimes this happens, and sometimes kids are told to read chapter 9.

3. Finally, textbooks are very expensive. Since our students purchase their own books, we know exactly how much they are spending. They show up to the first day of class with the sales sticker still on it. The are afraid to highlight or make notes in their books because it will decrease the resale value. In addition, the exorbitant cost of textbooks becomes an issue for our students who struggle financially. Their families are faced with difficult decisions because the cost of textbooks is so high.

As a special educator, I am very interested in anything that can help level the playing field and make it easier for teachers to differentiate. There is no reason why any student should be denied high quality content presented to them in a way that helps them learn best. 


When I was first introduced to CK-12, I assumed that like many free education technology tools, there would be strings attached. I thought that I would need to pay for "full access" or that the content would be watered down or only appropriate for lower levels. I was pleasantly surprised to learn that the CK-12 Foundation is in it for all the right reasons, to bring fantastic content to students and teachers in a way that can be easily accessed and used. This is not a curriculum that requires training and has to be followed in a specific way. CK-12 leaves it up to teachers to decide how best to utilize their content. A quick look at CK-12 will show you that there are many possibilities for teaching the same concept and they are always evolving. The latest updates include simulations, videos, interactive practice, as well as text. The flexibility of CK-12 makes it easy for teachers to find and use blended learning tools. 

Since we are in the process of rolling out Schoology as our LMS, I am also excited to point out that we have the CK-12 app for Schoology. The app makes it possible to search in CK-12 and assign seamlessly through Schoology. From your courses, if you click Add Materials, you should see the CK-12 app on the right. If you don't just go to the app center and add it.


When you click on the app you can search by concept. I did a search for cellular active transport and quickly got 4 ready to use resources, a reading, a simulation, practice problems, and a real-world connection text. I can click and add any or all of these to my classes as assignments. 


It is so rare these days that something actually does exactly what it says it will do. CK-12 is the real deal and it is completely free. Our students already have the devices, we can make our content even more accessible by utilizing CK-12 as part of our blended learning model.

Want to see a demonstration? Stop by a lunch and learn or make an appointment. 
Have you already given CK-12 a try? Let us know how it went for you.

Tuesday, March 20, 2018

FTT - Adding Syllabus and Course Policies to Schoology

Adding Class Policies and A Syllabus To Your Schoology Courses

@LisaBerghoff/@Joe_EdTech


One of the reasons to use a learning management system is to avoid confusion and frustration for students who may struggle with where to find important information for your class. Back when I was in school, we were handed a piece of paper on the first day of class. It had all of the information about how to contact the teacher as well as course policies and an outline of units to be covered. Sometimes that paper ended up in a folder, sometimes it got crumpled in the bottom of my backpack. One thing that is 100% certain is that after the first day of school I definitely never looked at it again.

Now that our course policy and syllabus information is digital, we know it won't get lost in a backpack, but just because it is digital does not mean that it is easily accessible. With Schoology, there is an obvious spot to park these important documents and students and parents will be able to find them without an issue. 

This will be one of the first things you will want to do when you are up and running with Schoology in the fall. Here are step-by-step instructions along with some options.

Add your policies page and syllabus directly to your course.

1. Go to lms.dist113.org to open Schoology

2. Navigate to Courses and select a course

3. Click Add Materials

4. Click Add File/Link/External Tool

5. Give it a title and add the link to your document. 


If you don't have a link or a file to upload, another option is to create a new page. 
Follow the first three steps from above then do the following.

4. Click Add Page

5. Title your page and then you can add your information right there. 


Ok! Now it's your turn. Remember, you are always welcome to come to lunch and learn sessions, make an appointment, or talk to an early adopter for help.
You can do it!


Tuesday, March 13, 2018

FTT - Assessments in Schoology

picture

Assessments in Schoology
@Lisa_Berghoff/@joe_edtech


As educators, we are constantly assessing our students. In the 22 years that I have been in district 113, the word assessment has come up so many times and in so many settings that it is evident that it is critical to what we do. We need to be doing ongoing assessments to adjust our teaching, to determine how and when to differentiate for our students, to help give feedback and communicate how our students are progressing. To many, the word assessment means “test” and sometimes that is true. It is a tool that has to do with how we evaluate our students’ learning and alter our teaching.
As I continue to work with teachers in each subject area, I can see that teachers give assessments in so many different forms, shapes, and sizes. Fortunately, Schoology can handle the wide variety of options and has robust tools to suit many different needs. Here are the basic steps to get you started.

Start off in your course, sandbox course, or resources. If you are going to use the assessment right away, go ahead and start in your current course. Click Add Materials and then go to Add Assessment.


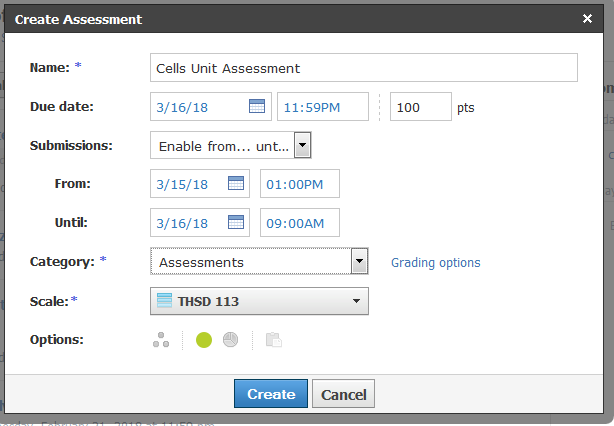
A box will pop up prompting you to name the assessment and set some parameters, such as when it will be available to students, points, category, etc. Here is one that I am currently creating for Biology Survey.


After you click the blue Create button, you will be on the Set Up page. This is where you can enter instructions that the students will see. You also have many settings to choose from including if you want there to be a time limit, if you want students to be able to go back and edit their answers before submitting, and if you want questions to be randomly ordered.

Then, click Questions to begin writing assessment questions. You have the typical options such as multiple choice, true/false, and fill in the blank; but you also have some interesting choices like label an image, drag and drop, and highlight hotspot.

As you create questions, you will also enter the correct answer and give certain parameters at the question level. For example, you can have the options in a multiple choice question shuffle for each student. When you are done with the question, you can click Preview Question to see how it will look to your students.  When you have it looking the way you want, click the blue save button.

To see an overview of all of the assessment question types, check out the Schoology Support Page here.

Once you publish to your students, you will be able to see all of the data right there on the same screen by clicking Student Attempts. No need to enter grades into the Schoology gradebook or calendar, when you publish to your students it will show up there automatically.

Have you experimented with assessments in Schoology?
Come and join a pd session or a lunch and learn and share what you have done!

Tuesday, March 6, 2018

FTT - Schoology at Your Own Pace

Adding Assignments / Sandbox Course
Enter Sandbox:

Practice With Schoology At Your Own Pace


Teachers are busy people with a lot on their plates. Those of us in Instructional Technology know that and it is important to us that you all have time to get ready for the Schoology adoption at your own pace. Some teachers will have more time in the summer. Some will want to use breaks. Some are ready to get going right now. Wherever you are on the timeline, you don't have to wait for our help to start learning Schoology. There are a lot of resources available to you right now. You can find them anywhere in Schoology's Help Center, or you can simply search for a topic in Google. You'll very likely find other teachers who have had the same questions you have.

If you have done nothing at all with Schoology so far, you can get started with a few of the basics whenever you want. First, you can log into our District 113 Schoology account at any time. Simply go to lms.dist113.org and log in with your Gmail credentials.

Once you are in Schoology, you will see a tab labeled Courses:

All of your courses from this year have been created in Schoology. However, if you aren't ready to start building in your current classes, you can build in your Sandbox:

One of the courses already created for you is called "Sandbox Course." There are no students associated with it. It is 100% playground area. You can practice with any of the tools we have in our Schoology Suite, and, one of the things we'll show you at the end of the year is how to take everything you've uploaded this year and repurpose it for the Fall.

If you are struggling with the concept of how to get started on Schoology, you might try the YouTube Video below called "First Steps with Schoology." It is actually indexed so you can watch any of the topics in isolation. The video covers the 5 main steps to begin with Schoology:

1. Set up your first course 2:45 2. Organize and Share Materials 19:00 3. Create Interactive Activities 34:45 4. Schedule Work in the Calendar 52:45 5. Track Work in the Gradebook 57:00


If you'd prefer to learn by doing, you can complete the Schoology PD Course called "Extend Your Classroom to the Cloud." If it isn't in your Course drop down already, you can search for it in courses. In total, although you can decide how much time to dedicate to the course, it takes about two hours to complete the self-paced course.

And of course, you can contact Lisa or myself at anytime for a little help getting starting.