Wednesday, April 24, 2019

FTT - Schedule Email in Gmail

Schedule Send For Gmail Is Here!

@LisaBerghoff/@MrKimDHS

There has been a phenomena on YouTube for some time that I never understood. It's known as "unboxing". In case you don't know what I'm talking about here's the gist, you watch a video of someone opening a box that contains a new product. That's it. They spend some time talking about it at first, slowly building anticipation and then they close up on their hands opening the box as they are describing the box. You watch them take everything out of the box. 

People watch these videos. I never really understood why. 

Until now.

Well, not really but here's the connection. About a month ago, Google announced among other new features the ability to schedule gmail messages to be sent at a later date and time. This feature has been long needed, anticipated, and talked about. As Google rolled out this feature, those who received it first have been posting their own videos and gifs showing how it works. 
I will admit, I watched them.

But the wait is over! YOU now have the ability to compose a message and determine a date and time in the future to have that message automatically sent without the need for you to click send.

Here's how it works:

1. Open gmail and click compose
2. Enter the recipient in the To field, a subject, and the text of your message.
3. Click on the small triangle to the right of the Send button and click Schedule Send.
You will see several automatically created options. If you don't like those, you can click Pick A Date And Time and enter when you want your message to be sent. 
4. Click Schedule Send and walk away with the knowledge that your message will be sent when you wanted it to be sent. 


Why Would I Want To Use This?

There are many reasons why you would want to send an email at a time other than when you are composing it.  First, if you're like me, you forget things. My brain simply doesn't always have the bandwidth to remember everything that needs to get done. To-Do lists are great but sometimes I'm getting to my list at a time other than when a time-sensitive message should go out. Now, I can compose my message when I'm able to cross that item off my list and not when it needs to be sent. 

For example, think about messages to students. A message sent from a teacher to a student at 9:30 at night, when the teacher is working, lesson planning, grading etc., may imply to the student that a response is expected right away. You can avoid the awkward subtext of inappropriate timing by writing that email at 9:30pm but scheduling it to be sent the following morning during school hours. 

Often, email communication occurs between parents and teachers. Sometimes I don't want the parents of my students to know that I'm up at all hours of the night working. I have had some people comment on the odd times that my emails were delivered. I can't help it if I can't sleep and just need to get some things done so I can quiet my brain! Now, I can still write those emails but I can schedule them to be sent the following morning.

I like to send reminders prior to certain events or meetings. The event is set so I can easily predict when I want the reminder email to go out. Now, I can schedule those reminders without needing to set a reminder for myself to send them out!

What are some other uses for scheduling gmail?
Post in the comments below. 

Wednesday, April 17, 2019

FTT - Backchannels

Yo Teach! 

Backchannel Like You Mean It

@LisaBerghoff/@TheMrKim


After reading Most Likely To Succeed (Preparing Our Kids For The Innovation Era) a few years ago, I have a new understanding of our education system and how we got here. Once you see it, you can't unsee it. For example, the way classrooms are set up, the sequence of curricular options, even how our hallways are organized all come from an earlier era when compliance, quiet, and rote memory were priorities. Teachers wanted students to sit quietly in their seats, in rows, and absorb the information given to them so students could repeat it back on tests. There was no room for creative thinking, or critical problem solving, or collaboration. 

Today, I am amazed with our students as I walk through the halls of our schools. I love to listen in, look around, and ask kids what they are working on. 99% of the time, they are totally on  task. It may look like organized chaos, but our students are learning in new ways and  no longer expected to sit and be lectured to. 

If only there was a way for our students to have a structured conversation or ask questions without disrupting the flow of class. If only there was a way for shy students, or students lacking confidence, to get in on the class discussion without putting them in anxiety provoking positions. If only there was a way for our students who struggle with impulse control, who need to get their questions and comments out now, could do it without social embarrassment. If only a teacher could follow the discussion going on among most students, as opposed to just those few who raise their hands.

If Only...

For those of you scratching your heads right now, I'm about to introduce you (or re-introduce you) to the concept of a backchannel. There was a previous post on backchannels in February 2016 that includes a list of ways to use backchannels in the classroom as well as a guide to student backchanneling.  As our seasons change, so does technology and the 2 backchannel sites mentioned in that post are no longer in operation. I have 2 more new ones for you to try and if you weren't sold on it the first time around, I thought this would be a wonderful time to reintroduce the concept. 

A Backchannel is an alternate route for communication in your classroom. The  first time I experienced a backchannel I was at a conference. I was sitting in a very long session that was really quite good but I just couldn't stay focused. I started to think about opening my email when I saw the backchannel link posted on the presenter's slides and I decided to check it out. I was amazed to find that many other participants in the room were also on the backchannel. As I started to feel bad for the presenter I started to read the posts and saw that nearly all of the comments were on topic (it was baseball season so there might have been some score sharing). Participants were posting suggestions, ideas, questions, thoughts, and more. The presenter even had someone designated to monitor the backchannel and several times paused to respond to a question that was widely asked.

I have seen this happen in classrooms as well. From "fishbowl" conversations to group check-ins, to crowd-sourcing feedback, there is definitely a place for the backchannel in school. 

Another wonderful thing about backchannels is they are incredibly quick and easy to set up. Here are two that are currently on my list:


Yo Teach! 

This backchannel site is free, simple to use, and has some nice interactive features, including the ability to draw. In Yo Teach, you can set a password so only your students can enter. You can  also  set your "room" so that it is not searchable. All you have to do is click "make room", give it a name, and set the password. Then your students can enter using using a pin or the built in QR code. Students enter their name and the password and then they are in. 
Here is a 1 minute video showing how to get started on  their new interface.


Backchannel Chat

This backchannel is designed for teachers so it has a few more bells and whistles and allows teachers to do more moderating.  Backchannel chat has a few pricing options with the free version allowing for 30 concurrent students and a "fair use" policy on the number of rooms. In other words, if you go overboard they are going to politely ask you to pay. You can  also access a web transcript of your chat. The site also allows for embedding YouTube videos and Flickr images. Backchannel chat is also simple to set up and allow your students to access. All they need to do is type and hit send. You have the ability to remove any comments or give students view only access. 
Are  you using backchannels in your classes? Post in the comments below and tell us what you are using and how. Want some help or to see some examples? Let us know!

Monday, April 8, 2019

FTT - Video Conferencing via Google Meet (Hangouts)


Google Meet (Hangouts)

@TheMrKim/@LisaBerghoff

Considering the impressive list of things I miss about the '90s, I feel oddly nostalgic about online AOL chatrooms. I can still hear that weird, metallic sound of my 56k dialup modem connecting me to the early proto-form of the internet and chatting with all of my Counterstrike buddies. Anyway... the future is here and that future is Video Conferencing. With Facetime, SnapChat, and Instagram vying for digital turf, students are becoming more and more comfortable with online video communications. How can we build upon that comfort in our classes? Google Meet, the new face of Hangouts, can be a place where we can give instruction, and collaborate in real time. OK, so when would we use it?

Guest Speakers

Last year Hilary Quagliana invited the former US Ambassador to Sweden to her AP Government class, and through Hangouts, the ambassador was able to speak, show a slide deck and YouTube video, and have a Q&A. Your school's tech department is more than happy to help by supporting your event with speakers/mics/etc.

Snowmaggedon and the Polar Vortex

While I'm not saying we need to subject our students to a full day's worth of instruction by porting it online, we could meet our students online to field questions or verbally explain instructions. It was hard to offer this suggestion 5 years ago because not every student had access to the internet or a computer. Smartphones today have seemingly solved the issue of access. 

Review Sessions/Student Collaboration

Back when I was at an iPad district, I used an app called Talkboard to hold evening study sessions for students who couldn't meet after school due to sports or activities. I thoroughly enjoyed reviewing with students from the comfort of my own room (although I didn't have a wife, a baby, or two dogs then). Your students could also hold meets to collaborate on projects. 

So how does it work?

  • First, go to meet.google.com where you'll be greeted by a very simplistic menu with two options. You can either start a brand new meeting or join one using a code.

  • By starting a meeting you will be given the options to mute your mic and turn off your camera (you can switch these anytime). You are also given the "joining info" so others can join your meeting.


There are three ways for someone to join your meeting. 

  • First, you can either copy the meeting URL, or give them the "Meeting Code" which is the string of letters at the end of the URL. In this case, it would be "oeo-muco-cfe." (hyphens aren't needed when typing your code)

  • Second, individuals can call in through their cellphones by dialing the number, and entering the given PIN number (callers won't have the video option). 

  • The last option requires the meeting to be scheduled via Google Calendar. Participants can join directly from their Calendar invite. 


During the Video Conference

Once you begin the meeting there are a few things to keep in mind

  • You can easily mute your volume, as well as turn off your camera at the bottom of your video.

  • You can also mute the volume of one of your participants by toggling their mic button at the top right corner.

  • There is also an in-conference chat window.


Presenting Powerpoint/Slides or YouTube videos

Another cool option is to present a slide deck to everyone in your video conference and run through the slides in real time. Just click on the "present now" button and you will be given two options:
  • Your Entire Screen: your video will mirror whatever is on your screen. You can do Powerpoints, Word Docs, or any other program.
  • A Window: gives you the option to show a window for your browser. 
  • You can stop sharing anytime by clicking on the "You are Presenting" button.


Why should the corporate world have all the fun? There is plenty of educational utility in Video Conferencing! Still need help? Watch this video for more information

Monday, April 1, 2019

FTT - Take A Virtual Field Trip With 360Cities!

Take A Virtual Field Trip With 360Cities!

@LisaBerghoff/@MrKimDHS


I was once at a workshop where the leader asked us to think about the ultimate learning experience. It was one of those moonshot thinking activities where money, time, and the other usual barriers were supposed to be removed and we were just supposed to think about what would be best for my students. I instantly wrote down that we would take a field trip almost every day. I thought about how much I have learned from traveling and how many of my students are visual thinkers and if they could just be there, they would learn so much more than just hearing me tell about it.

That was a fun exercise but not really steeped in reality. Many of our students are fortunate enough to get to travel, and we do live near one of the greatest cities in the world, but we still spend much of our time just talking about amazing places and things without getting to experience them. This is where the world of VR and 360 images comes in.

While some think that virtual reality is a fad, I'm here to say let's ride this wave and hope that it sticks because we have 360 images from all over the world that are at our fingertips for free. You may think that you need fancy VR goggles to experience 360 images and those goggles certainly enhance the experience but they are not completely necessary.

When I first discovered 360Cities, it was based on a recommendation from National Geographic. I figured if they approved this site, it has to be good. I decided to check it out and it did not disappoint.
There are so many practical uses for 360 images in the classroom and 360Cities is an incredible source for 360/VR content for educational use.  According to the 360Cities website, it is the largest collection of stunning, high resolution, interactive panoramic photos and 360 videos created by a network of thousands of the first panorama photographers and videographers from around the world. 


Step 1: Go to 360Cities and create a free account.

Step 2: Explore and find content.

There are 5 ways to find the panoramas you are looking for.
1. Search. You can enter many different parameters in the search bar. For instance, you can search for specific words, or search by people.
2. Map. Take a look at the 360 map and click on an image thumbnail to open the panorama.
3. Use the categories that are created, such as "editor's picks:
4. Gigapixels. They even have the world's largest panoramic photos!
5. License and download images.

Step 3: Share

Once you find the images that you will use, you can grab the sharing link so your students can experience it for themselves.

Once you see the level of engagement in your classroom, you will want your students to create their own 360 images. Interested? Contact me for more information. 


Are you using VR images in your class? Post in the comments below to let us know what you're doing!


Wednesday, March 20, 2019

FTT - Turnitin and Schoology 2.0

Turnitin and Schoology 2.0

@LisaBerghoff @Themrkim


So what's new for our favorite originality checker within Schoology? A new look at how to create and assign Turnitin assignments that's actually been there the whole time. While the standard instructions ask users to create a Turnitin assignment as a standalone external tool, some creative users have been incorporating it into a Schoology assignment with all of the perks of using an assignment. 

OK so what does that mean? Most teachers have been used to creating assignments by adding an "External Tool" through the "Add Materials" option below

While this option is still viable and can be a simple way of creating a Turnitin assignment, there are a few weaknesses:
  • External Tools cannot be graded as a final exam
  • You can't change the grading factor. 
Alternatively, you CAN set a Turnitin assignment as a final exam, and you CAN change the grading factory by creating an assignment through Schoology and merely attaching Turnitin as an External Tool. 

  • First go to "Add Materials" and click on "Assignments"
  • Build your assignment like any other by giving it a name, description, and even a link.
  • Click on the External Tool icon under Description.
  • This window should look familiar. Change the "Tool Provider" from "Automatic, based on URL" to "Turnitin"


  • Now you should be able to weigh it as a final, and change the factor by clicking on "Grading options"


  • In order to finalize the process, click on the assignment you created to manage the Turnitin settings.


This new option of creating Turnitin assignments on Schoology will give us more flexibility when it comes to assigning and assessing papers and projects. Questions? Feel free to contact us!


Tuesday, March 5, 2019

FTT - Make Materials More Accessible!

Make Materials More Accessible!

@LisaBerghoff


I have recently discovered that I really enjoy doing jigsaw puzzles. There is something about taking all of those little tiny pieces and making them fit together to form a picture that I just love. I recently completed a puzzle that was missing 3 pieces. It was so frustrating and made completing the puzzle a lot less satisfying. I could still see the picture and I knew that I put in the same amount of time and effort, it's not like those last few pieces would have taken long to put in, but I felt like I was not getting the full experience and the picture never really looked right with those holes. 

It must feel similarly for our students who, for a variety of reasons, need text read aloud to them but the text is not in a form that makes it easy for them to use the tools necessary to make that happen. We have students who are fully capable of doing the work, but there are many steps that get in the way before they can even consider sitting down to complete the task.

The good news is, we have the capability to make things just a little bit easier for them!

First of all, our copy machines in the copy rooms of our schools have  Optical Character Recognition (also called OCR) capabilities that allow a teacher to scan a document and make it accessible, meaning that it can be read to the student using text to speech by Read&Write.

Read&Write might sound familiar to you because it has been highlighted in a previous blog post and many of our students use it. 

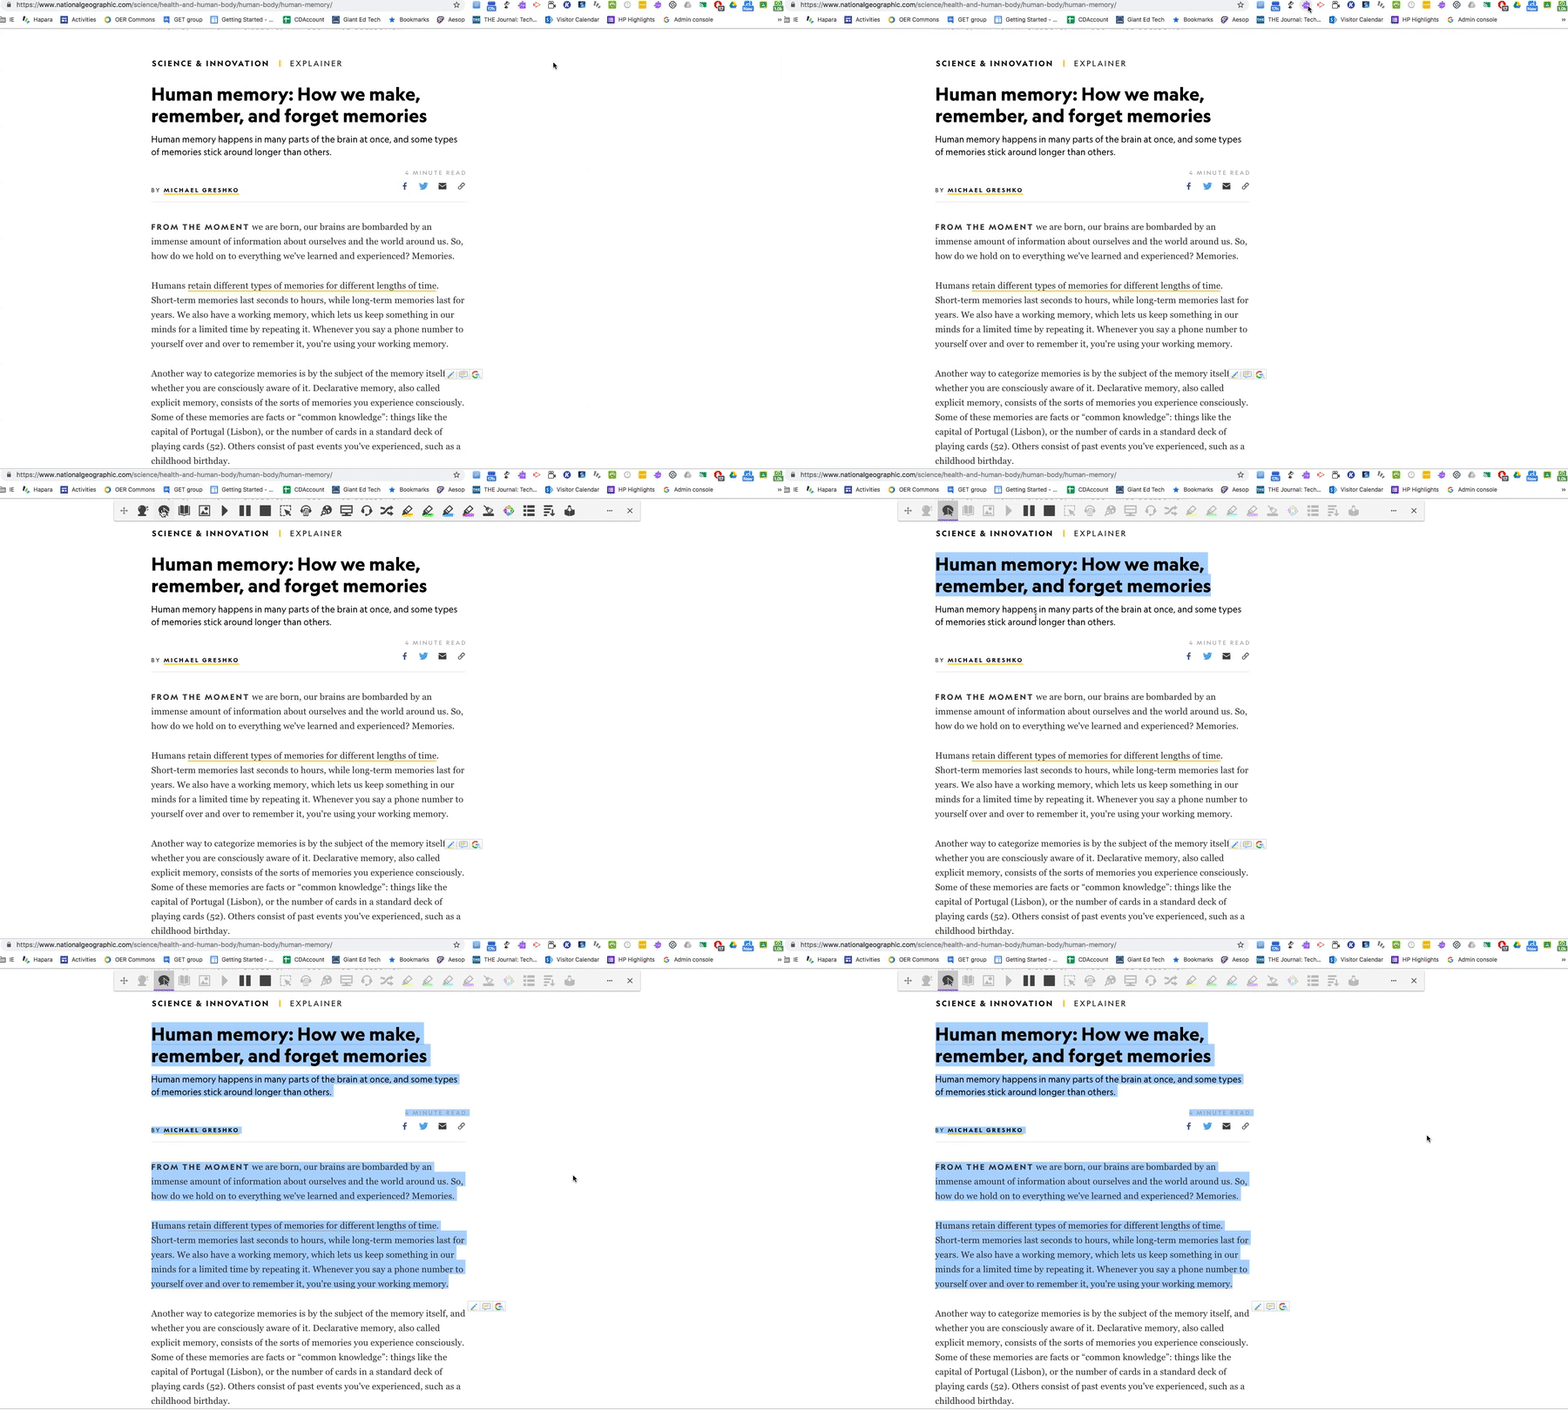
Read&Write for Google Chrome is an extension. That means is works while you are working online and can help make things better for you while you are working in Google docs, looking at a website like National Geographic, or reading an article online. It shows up as a little purple puzzle piece next to the box where the website url can be found. (fun fact, that's called the omnibox!) If you want to use it, you just click the little puzzle piece and the tool opens up for you.   The free version offers text to speech, hover speech, pdf reader, single word translator, and the ability to practice reading aloud. Along with supports in French, Portuguese, Spanish, and Dutch. 

There is a free 30 day trial for students and teachers can get the paid version for free forever!  We do have a limited number of licenses for students who have a diagnosed need for this support.  The paid version has extensive (over 80) tools that help with both reading and writing. I highly encourage you to check it out. Just go to: texthelp.com/en-gb/products/read-write/free-for-teachers/ after installing the extension from the Chrome web store.


Image from Gyazo


The beauty of Read&Write is that THE KIDS CAN DO IT THEMSELVES!

(yes, I'm actually yelling)


But wait, didn't you remember hearing something about our copy machines?


Here is where you come in. One of the barriers to students using this tool is that when text is scanned, it doesn't always have OCR capabilities turned on. Basically, this means that the computer just interprets the scan as an image and not as text. But you can choose the OCR option instead of "standard" for scanning and this helps fill in the pieces for our students. That's it. It is that simple. You can remove a huge barrier by pressing one button. Scanning your paper materials helps make everything more accessible for your students who struggle, and may even be helpful for those who don't. If you were showing a video in class and there was a glare for some students, you would turn out the lights so it would be easier to see, right?

Help your students get the whole picture without missing pieces.
Want some help getting started? Feel free to contact me.


Monday, December 17, 2018

FTT - uBlock Origin

Decommercializing the Web for the Classroom (and Maybe Home, Too)

@joe_edtech/@LisaBerghoff

Today's FTT is a throwback to my first contribution to this blog as a guest contributor in 2016. How things have changed! 

I had always considered myself to be a price-savvy, prudent consumer who wasn't susceptible to the same greasy advertisement schemes, ploys, and tactics that suckered the rest of society.

And then I began shopping for an engagement ring.

One of the best and worst parts of planning a proposal is the immense pressure of creating that perfect moment of astonishment and surprise.The mental gymnastics involved in somehow discretely acquiring a person's ring size, or moving the little ring box from its original hiding place in the bathroom closet, into a much safer, much smellier left tennis shoe in the middle of the night, speaks volumes of the necessity for discretion.

You could then imagine my horror when after a few nights of researching engagement rings online, my browsers were now full of engagement ring related ads and pop-ups basically screaming at my girlfriend that things were about to get real.

Now if you've done any amount of online shopping, you will either find it creepy or helpful that firms will often keep tabs on your search history to populate relevant ads on your websites. Led by internet giants like Google and Facebook, ads have become more and more sophisticated and pronounced.

IMBD Site WITH Ads
This is where a neat, light-weight Chrome Extension called uBlock Origin comes in. uBlock Origin will filter and block the majority of ads that you see and experience on the web. Without going too deep into the ethics of ad blocking, it is safe to say that ads are detrimental to the classroom environment.

IMBD Site WITHOUT Ads - uBlock Origin
Ever try to show a YouTube video in class that was preceded by an inappropriate, awkward, and unskippable commercial? Or see a popular website taken over by large, obnoxious advertisements? uBlock Origin can help.

Perks of uBlock Origin:

  • Websites will load faster
  • Mobile users won't have to waste data on bandwidth-hogging commercials or advertisements. 
  • Filters advertisements that contain viruses, malware, and phishing messages.
  • Block all ads on YouTube


Once installed, users will not have to do anything to enjoy the benefits of uBlock Origin. It's a simple plug-and-play extension that works so well that at times I forget it’s even installed!

Now there are a few things to consider once the extension is installed. Some websites have caught on to ad-blocking, and will not allow users access to their sites until the ad-block is disabled. Users can simply pause uBlock Origin by clicking on the giant power button on the menu on the top right corner of your browser.


Are ads disrupting your online educational experience? Feel free to post comments below!
--------------------------------------------------------------------------------------------------------
Gotta free tech tool you'd like to share? Contact Lisa or Joe to be a guest blogger!