Monday, August 27, 2018

FTT - Schoology Shortcuts and Tips

 August 27th: Schoology Shortcuts and Tips

Schoology Shortcuts and Tips

@LisaBerghoff/@MrKimDHS

Piggybacking off of last week's post on frequently asked questions, this week's post will include a few important tips and tricks you can easily employ to make your Schoology integration that much better! Last week was a busy week, and through your shared experiences with Schoology, we found a few things you should know...


1. Navigating between gradebooks (and courses)

Did you know there's a way to go from gradebook to gradebook without going to your courses tab? With this shortcut, you can switch easily between your course grade books with two clicks:
  • Go to your course gradebook page
  • On the Gradebook page, click on the blue notebook at the top right corner
  • The drop-down menu will have a list of all of your current classes

This blue notebook appears on most Schoology pages and can be used to navigate between courses.

2. Co-Teachers and grading assignments

If you co-teach a course and would like both teachers to be able to grade Google Doc assignments, you'll have to do one more step outside of Schoology to make that happen. As of now, only the original creator of the assignment can grade submissions. 

This is what co-teachers will initially see if they try to grade:

In order to grade each co-teacher will need to:

  • Go to their own Google Drive folder. 
  • Search for a folder titled, "Schoology Google Drive Assignments"
  • Each co-teacher needs to share this specific folder to each other. 
  • Viola, now you can share the load. 

3. Adding a Senior Teacher or TA to your class

Many of us have senior teachers or other individuals who would benefit from viewing your course materials. Schoology has a granular method of giving specialized access to your course. For example, most teachers would want their senior teachers to be able to view course materials, but not see or enter grades, or change course materials. Here's how:
  • Click on "members" on the left-hand side of your course page
  • Click "add members" at the top and find the individual you would like to add. 
  • Once added, click on the gear box to the right of the individual and click on "make admin"
  • Then, click on the same gear box and this time click "set section-level role."
  • You have 6 options to choose from for the appropriate level of access.

Here are the 6 levels of course access you can give:

That should be plenty for now! Do you have other questions or tips that you have found to be useful? Go ahead and post them in the comment box below. 

Tuesday, August 21, 2018

FTT - Top 5 Schoology Questions Answered

August 20th: Top 5 Schoology Questions Answered

Top 5 Schoology Questions Answered

@LisaBerghoff/@MrKimDHS


Wow! What a whirlwind of activity these first few days have been. I love when you start to learn something new over the summer and then you actually start using it with students. The shift creates a clarity that is almost visible. Teachers who struggled over the summer are suddenly coming to me with a lightbulb over their heads now that they have students in their classes and can see how things work in reality. The questions and conversations have been so amazing. We are planning and learning about this new tool through the lens of- how will this best serve my students? 

That being said, there are some recurring themes with the questions that have come up and I thought it best to put a few of the frequently asked questions and tips together here.


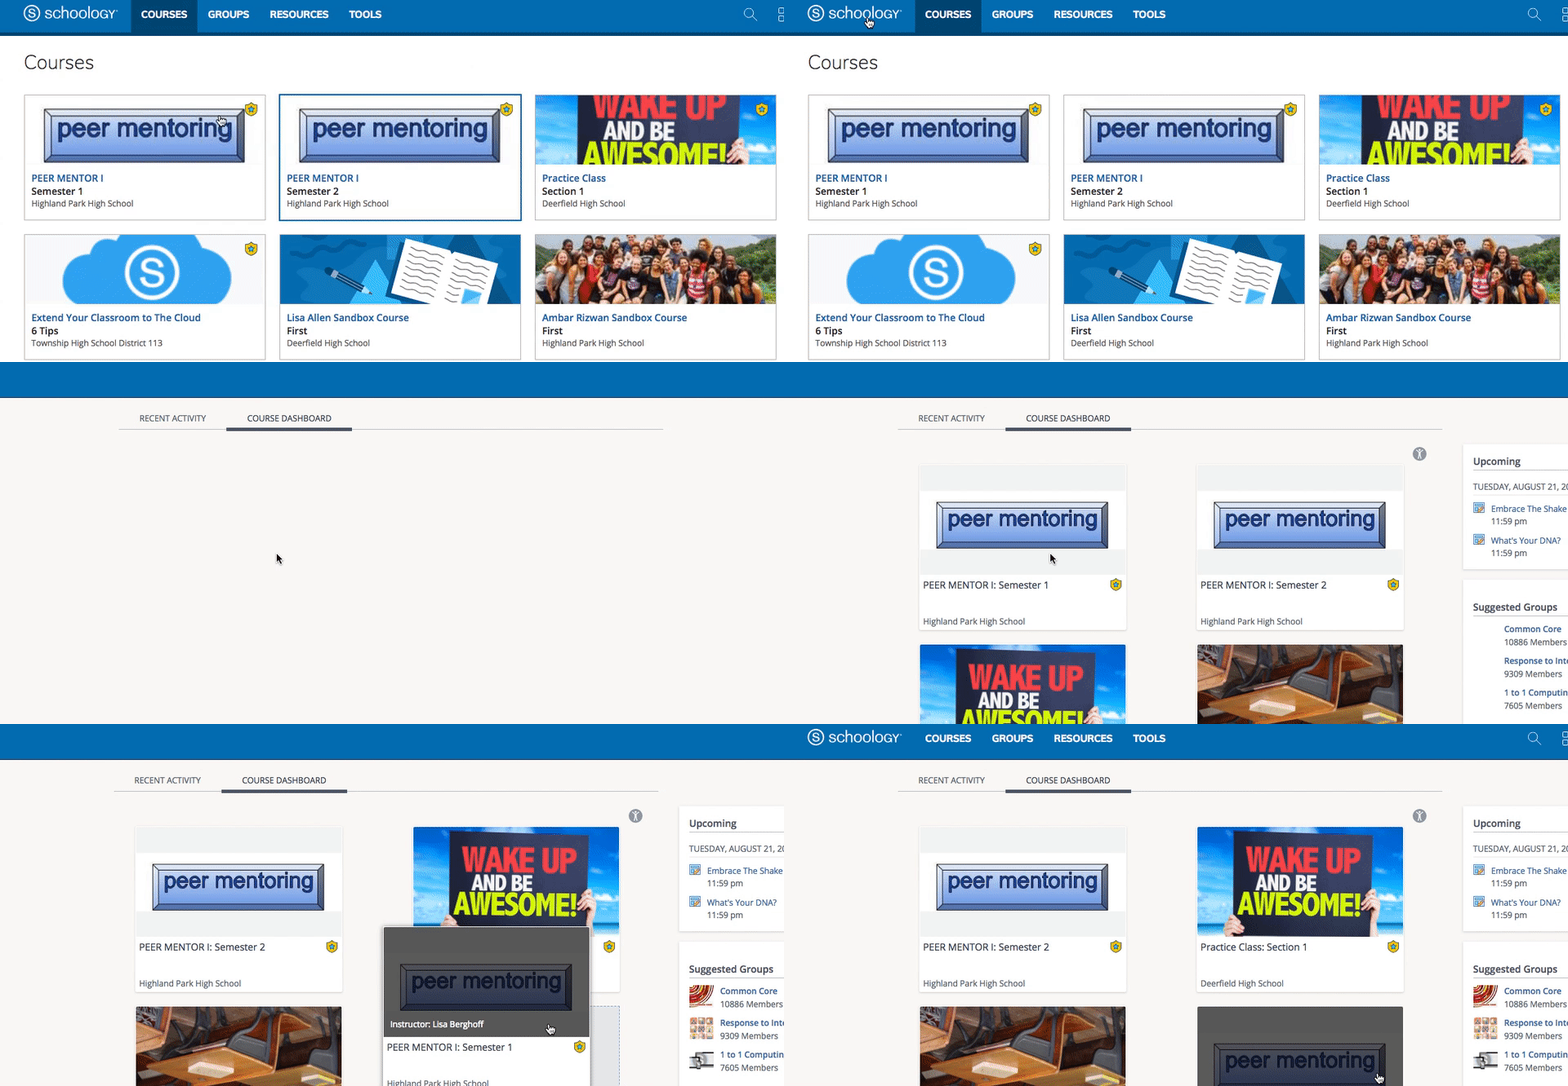
1. How can I move the course tiles so I can see all of my current classes at once?

This can be easily accomplished by following these steps:
  • Click on Schoology in the blue bar at the top of the screen
  • Click on the Course Dashboard tab
  • Click and drag your current courses to the top. The top 12 tiles are what you will see on your courses page in Schoology
Image from Gyazo


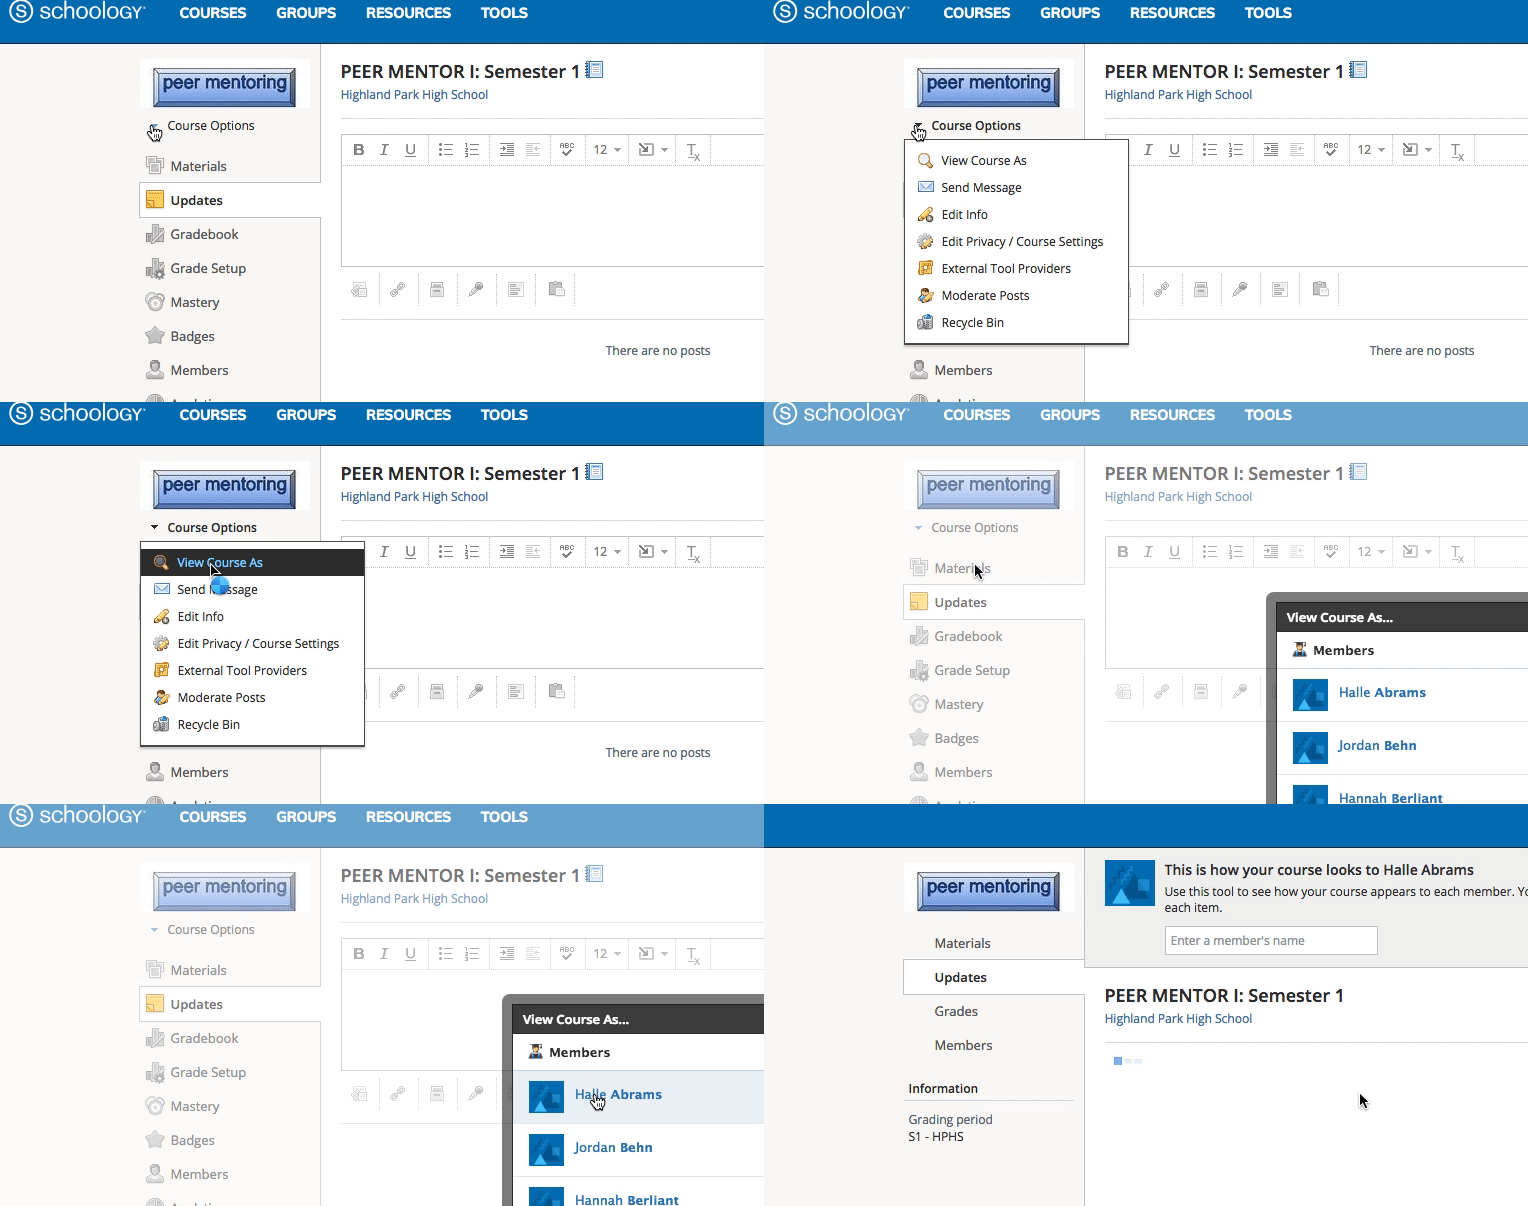
2. How can I see what my students see?

Now that school is in session you can view your course as a student.
  • Click on a course
  • Click Course Options (under your course image)
  • Click View Course As
  • Choose a student
  • Note: across the top it will say- You are now viewing this course as...
Image from Gyazo


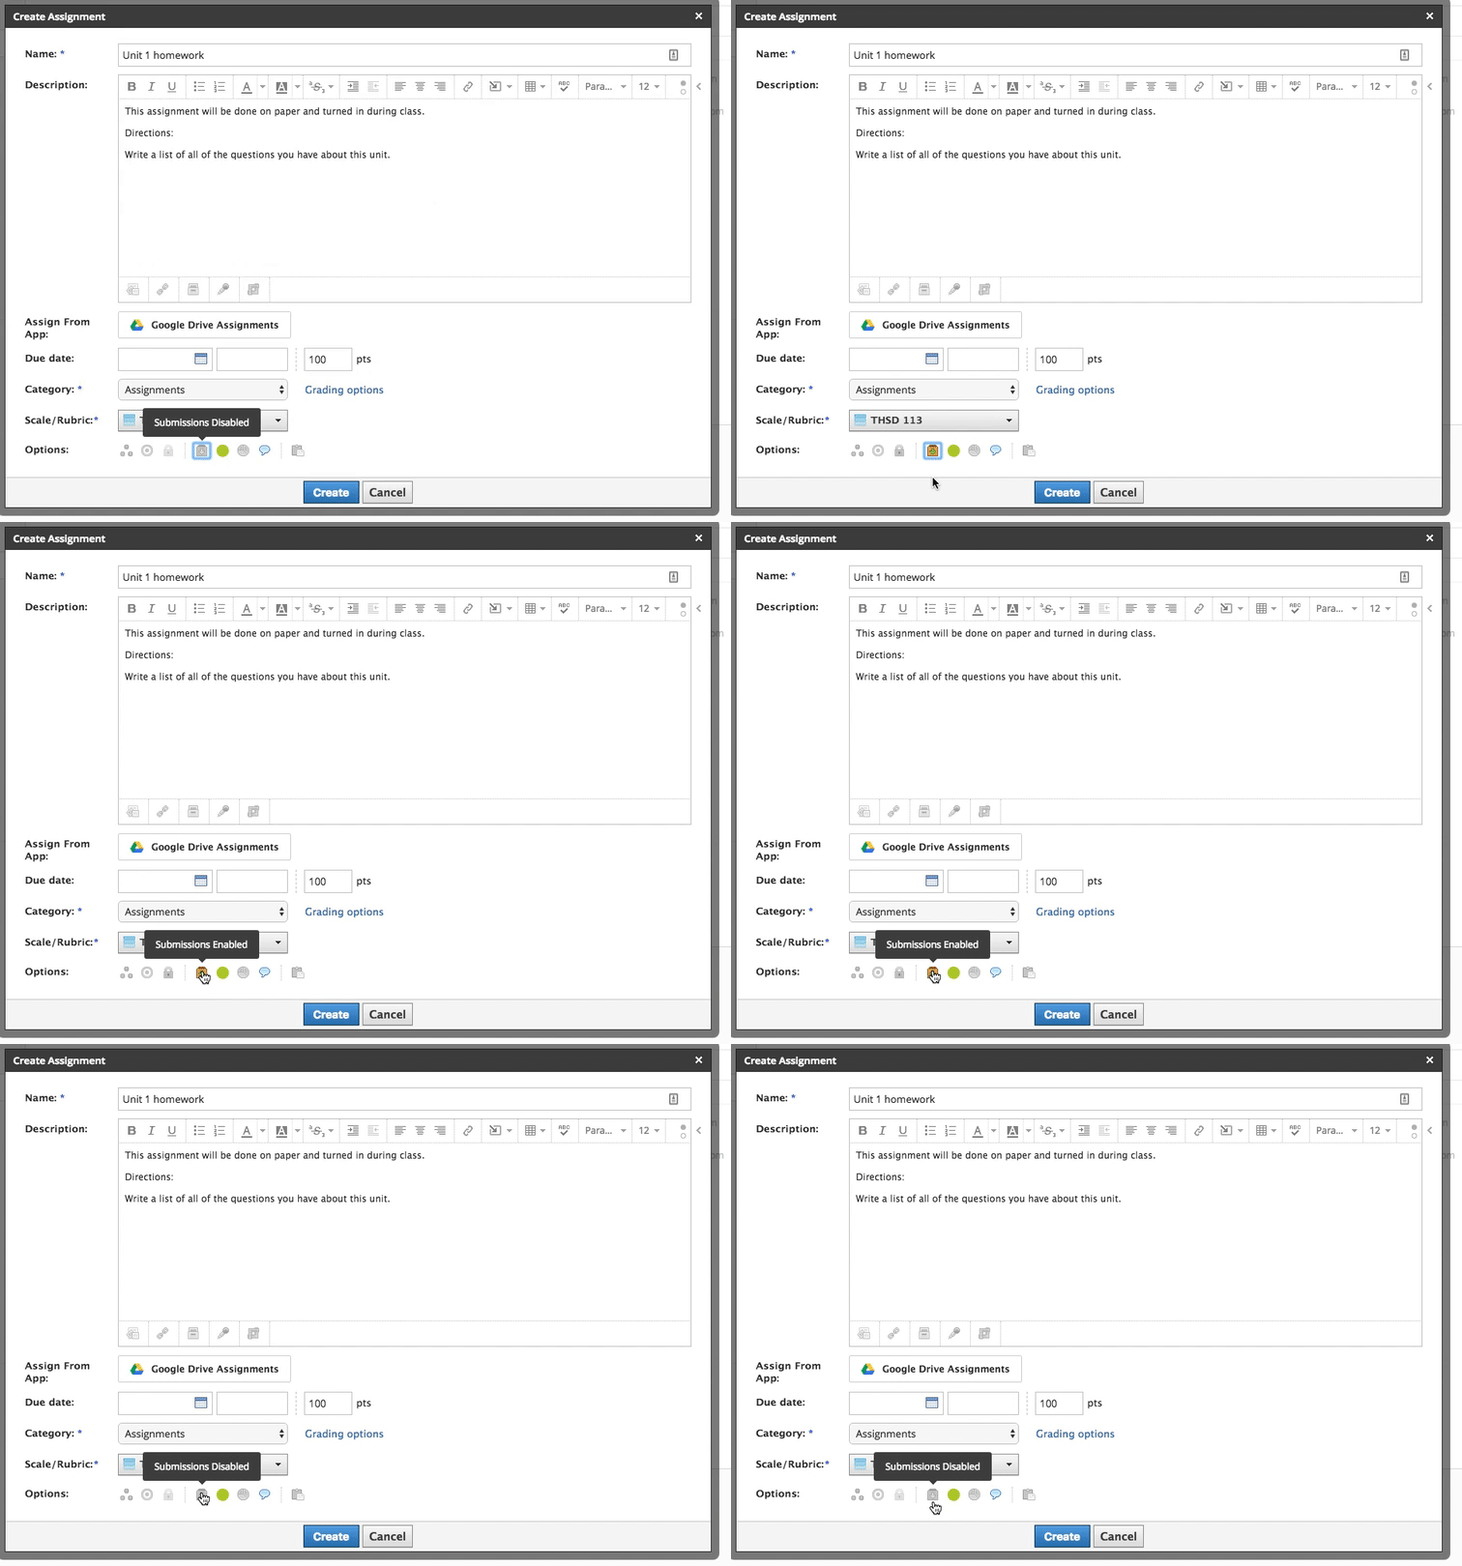
3. How do I enter grades for a paper/pencil assignment?

Not all of your assignments will be digital because we have a blended learning environment in our schools. That's great! You can add those assignments in the same way you would add digital assignments, just disable submissions.

  • Choose how you want to add the assignment, from the materials page, the gradebook, or the calendar.
  • Create your assignment. In the description, you can indicate that this is a non-digital assignment. 
  • Fill in the points, the due date and category.
  • Click the submissions icon to disable.
Image from Gyazo

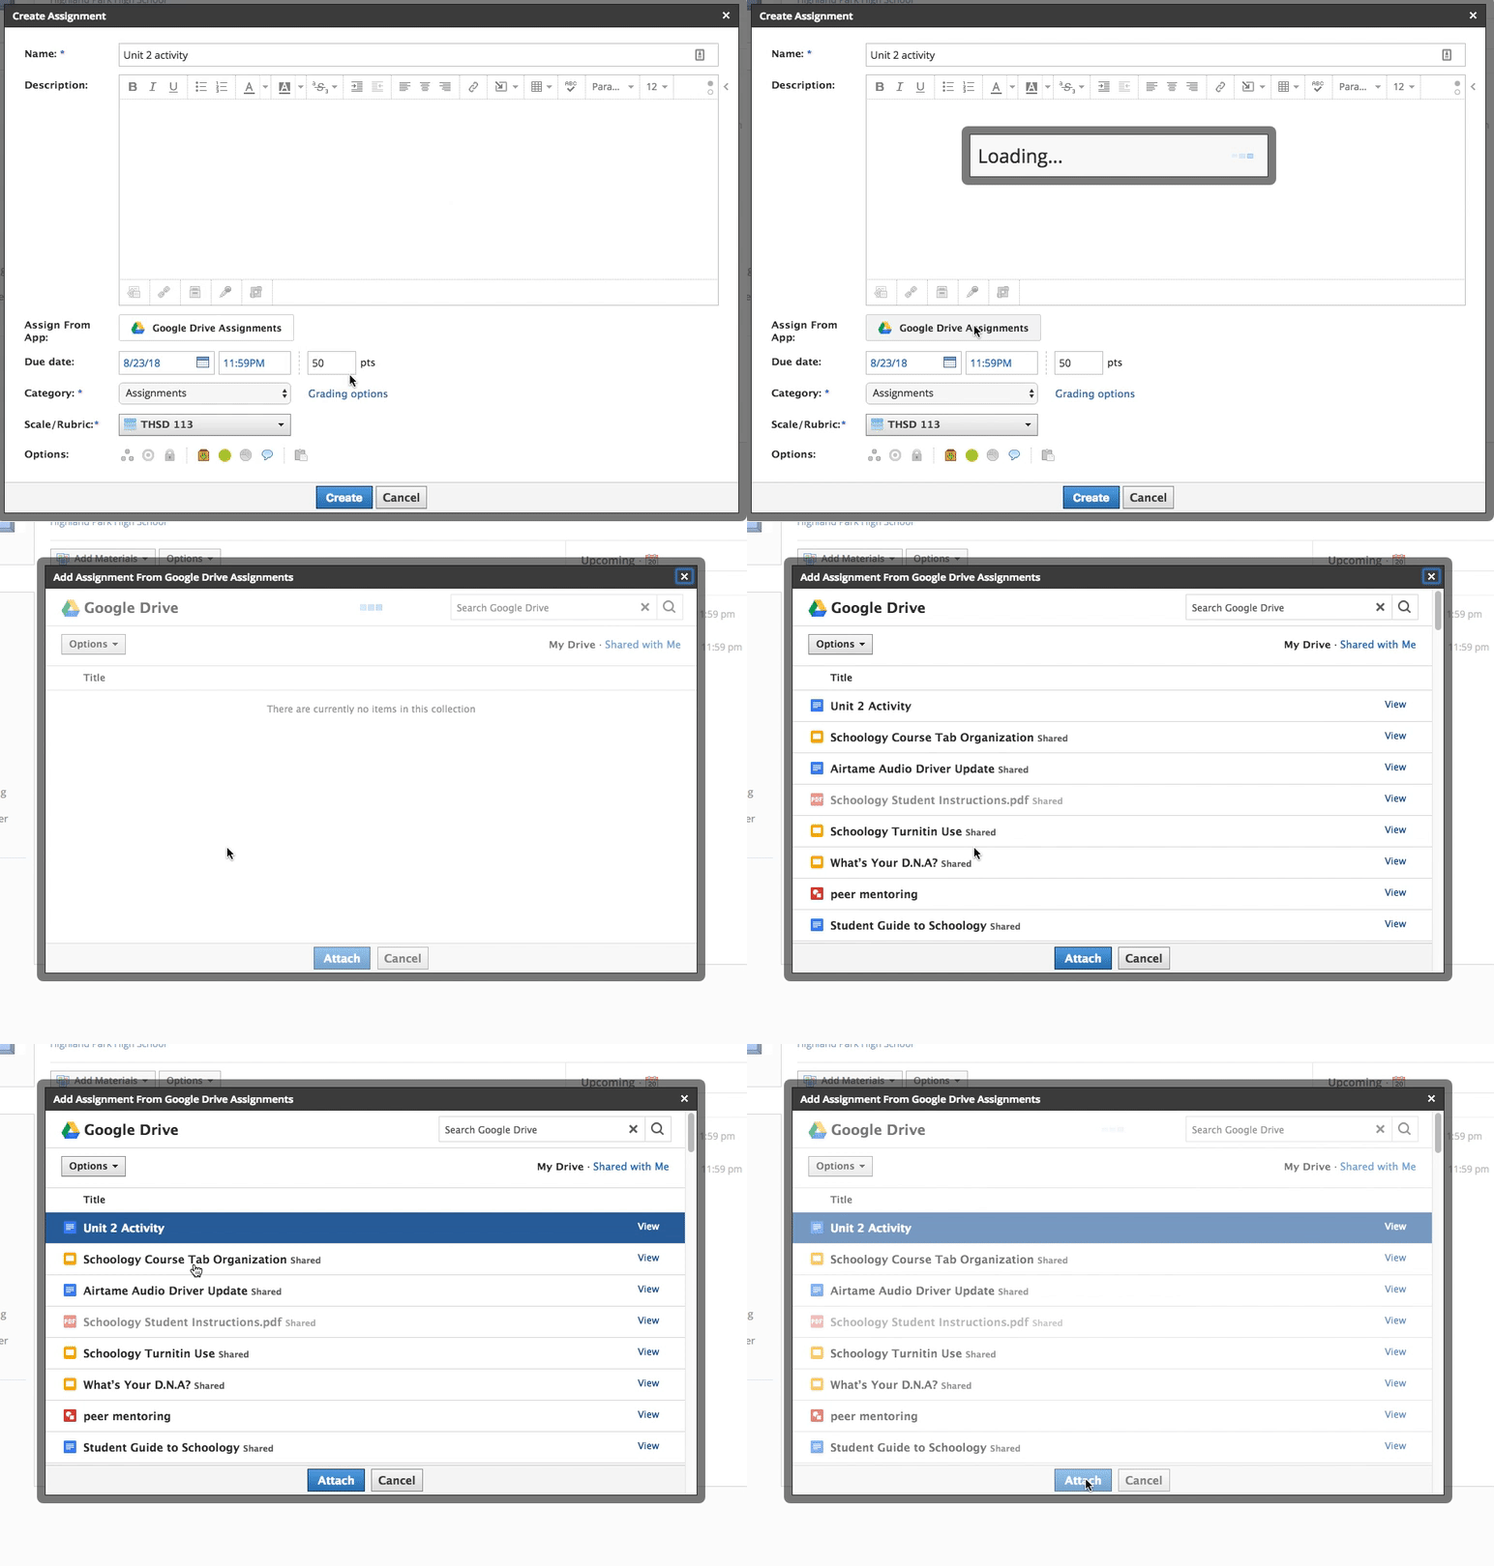
4a. How do I create an assignment and attach a Google doc so each student has their own copy?

This is where you will use the Google drive app. If you have never used it before, when you click on it you will be prompted to connect to your school account. You only need to do this once.
  • Choose how you want to add the assignment, from the materials page, the gradebook, or the calendar.
  • Create your assignment. Enter the name, description, due date, points, and category.
  • Click on Google Drive Assignments
  • Your Google Drive will pop up in a new window. Locate your document.
  • Click attach
Image from Gyazo


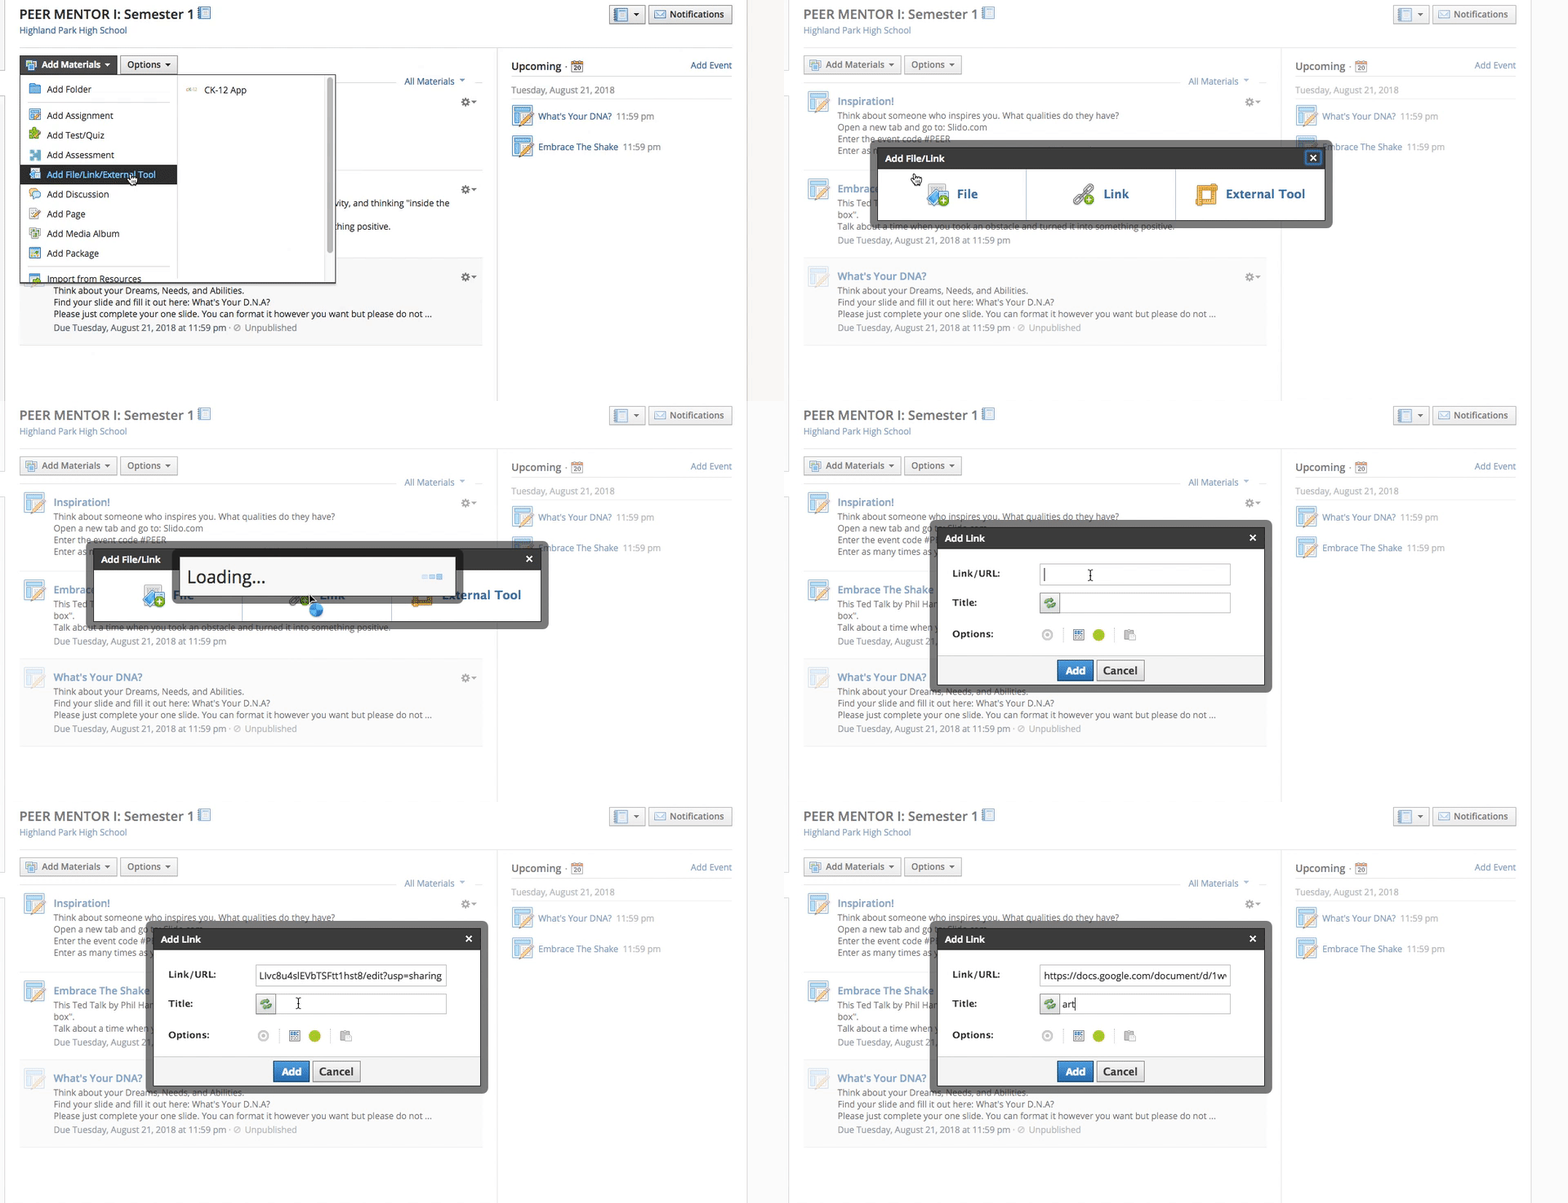
4b. I have something in my Google Drive that I want my students to see but it's not an assignment. How can I do that?

We have lots of materials that we have in our Google Drive that we want to share with our students, but we don't necessarily need them to each have their own copy and turn it in. In that instance, you will want to do the following:
  • Grab the shared link using the blue Share button on your Google doc (or slides, or sheets, etc.)
  • Go to your materials page in Schoology and click Add Materials
  • Click Add File/Link/External Tool
  • Click Link
  • Paste your shared link from your Google doc into the space that says Link/URL
  • Give it a title and click Add
Image from Gyazo


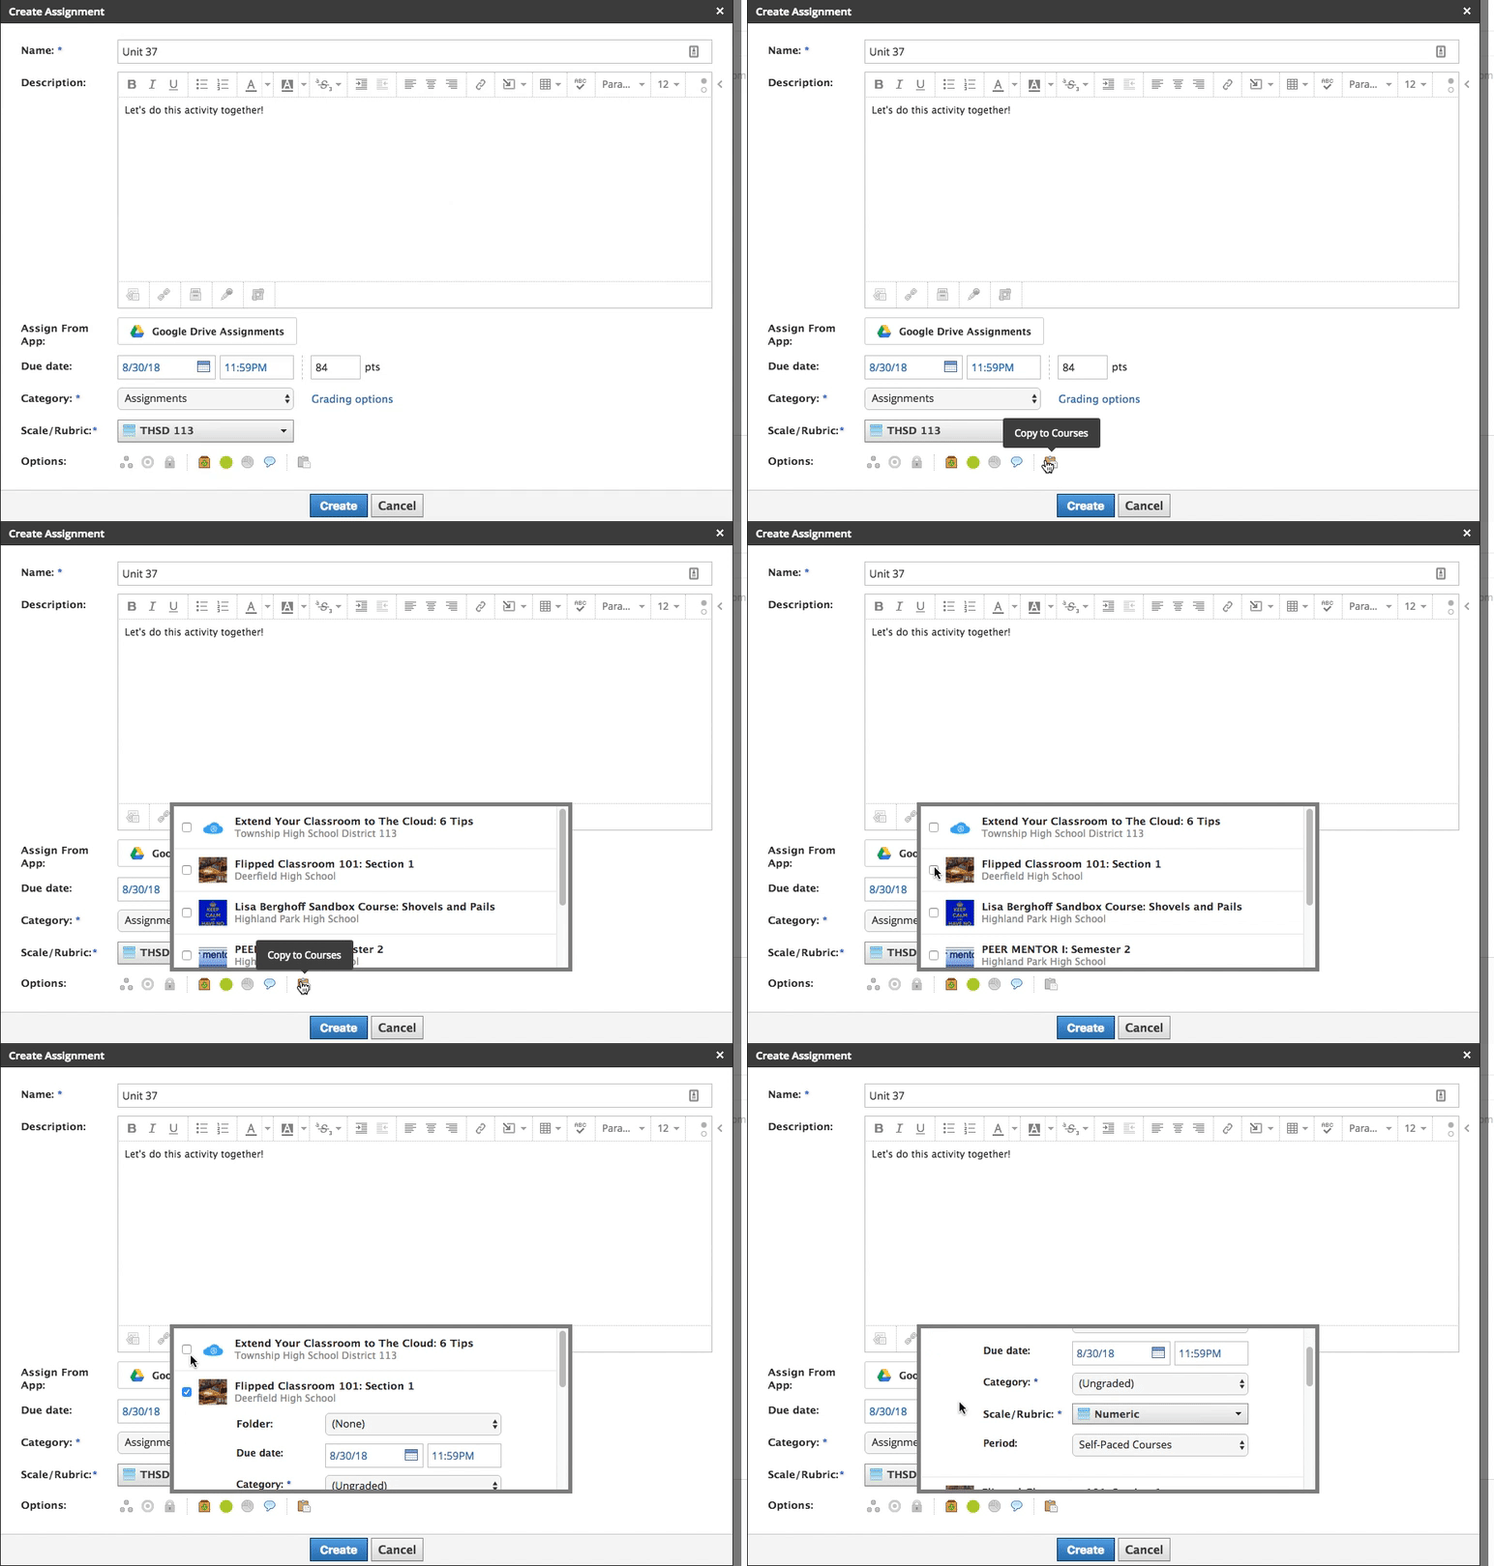
5.  How do I give this assignment to multiple classes even though they have different due dates?

One of the great features in Schoology is the ability to assign across multiple courses. However, we also know that each class moves at their own pace. In order to assign one assignment to multiple sections with different due dates, follow these steps.
  • Choose how you want to add the assignment, from the materials page, the gradebook, or the calendar.
  • Create your assignment. Enter the name, description, due date, points, and category.
  • Click on the icon for Copy To Courses
  • Choose the courses that you want to copy the assignment to and fill in the due dates.
  • Disclaimer: Assignments with Google Suite links will not copy over!


Image from Gyazo


There are lots more great tips and tricks to come. Let's start slow to go fast. For those of you who are dipping your toes in the water, I hope this helps!
Do you have other questions or some tips that you have found useful? Go ahead and put them in the comments section.