Monday, October 19, 2020

FTT - Google Chat in Gmail


Google Chat in Gmail
@LisaBerghoff/@MrKimDHS


Don't you just love emails? The way your phone or laptop gently lets you know at any time of the day (or night) that someone, somewhere out there needs your attention? We can thank the late Ray Tomlinson, the creator of the email, for fundamentally changing the way we communicate forever. Last year about 4 billion users sent just about 290 billion emails a day, every day, and that number is expected to skyrocket in our new WFH environment. 

To be frank, being greeted by 50 emails first thing in the morning can be a tough way to start the day. Quick little questions you'd ask your colleague across the department office are now replaced by emails that always seem to be prefaced with, "sorry to bother you" or "sorry for another email but..." Wouldn't it be nice to reduce the number of emails we send and receive? Enter: Google Chat

Now I'm not saying Google Chat is THAT much better than emails, but it is a lot less formal and a lot easier to have a quick back and forth without having to send and wait for emails. It can also be easier to type questions on your computer instead of typing text messages on your phone. In that way, it makes me nostalgic for my AOL chatroom shenanigans back when dialup was cool, and my AIM screen name was Kramitys (don't ask). OK let's cut right to it, how to set up and go?

Setting it up in your Gmail Page

If the Google Chat option isn't already enabled in your Gmail (it would appear on the left hand side of your Gmail page), you can set it up by following these instructions:
  • First, click on the Settings button in the top right-hand corner and then click  "See all settings."


  • Then click on "Chat and Meet" on the top and all you have to do is click "Google Chat" and then hit "Save Changes."


  • Now you should see the Chat boxes on the left side of your screen:

OK - it's enabled, now what?

Now just click on the plus button to the right of the "Chat" label and type in the name of the person you want to chat. Everyone within the District system will show up (even students). Now you can have quick, synchronous, and ongoing chats with people without having to keep sending them email after email for every exchange. A chatbox will appear on the bottom of your screen
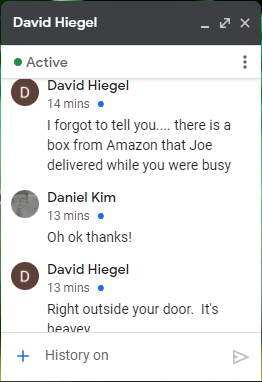

Happy Chatting! 


Monday, October 12, 2020

FTT - Flippity

Bring Back The Fun! 5 (or more) Incredible Ways To Use Flippity With Students


@LisaBerghoff/@MrKimDHS


    When I first started teaching I thought there had to be a certain level of seriousness in my classroom. If a colleague walked by and it looked like we were having too much fun I felt like I needed to explain. I have always been a fan of playing games to learn, even with high school students and yes, even with adults. That was many years ago. We now have loads of neuroscience research that tells us that fun and joy in learning is actually important for information transmission and storage in the brain. Think about your own experiences with learning something new. What do you remember? My most vivid learning memories are with teachers who were creative and allowed play to intermingle with learning. When you are able to laugh and experience joy, there is a certain comfort level that reduces stress and actually makes it easier to learn.

    While the tone you set in your class and the classroom norms that are created are ultimately up to you and your students, there are some fun tools that you can use to help. Flippity is definitely at the top of the list.  I knew that I had written about Flippity before but was surprised to find it back in 2017 and not sooner so this is a great time to re-introduce you to this very versatile tool.

    At its core, Flippity is a tool that takes information from a Google spreadsheet and turns it into something you and your students can interact with. For example, if you have a vocabulary list of terms and definitions in a Google sheet, it can turn that into a set of online flashcards.  The website is not flashy and each item has a demo, a set of step-by-step instructions, and a template for you to copy and use. Even if you are familiar with Flippity, they have added some new and exciting items. Now, there is even a tab where you can create these activities without a spreadsheet, which is perfect for those of us who are spreadsheet-phobic. Take a look at all of the activities you can instantly create and use!


My Ten Favorite Flippity Activities (In No Particular Order)

1. Quiz Show

This is just like Jeopardy and you get to be Alex Trebek!
 Sometimes a little friendly competition can help mix things up in your learning space. All you need are the categories and the questions with answers. Put kids on teams and have them rotate through who will be the spokesperson. They can set up a google doc to use as a backchannel for discussion. Did they get it right? The bell will ding and assign them points. Did they get it wrong? There is a buzzer for that. 


2. Self-Assessment Quiz

    We want our students to be thinking about their learning. I think that is why so many of us are drawn to the idea of standards-based grading. We want those measurements to make sense and paint a picture that shows where a student currently is in terms of their skills. We also want them to be able to accurately assess themselves and understand their progress. The Flippity self assessment quiz is new and it's a pretty slick way to ask the students some questions that will then give them a read out that explains where they are at. The demo tool was a Lord Of The Rings character quiz. Here's how I faired, apparently I am 50% of the way to being a hobbit. You can edit and add your own list of skills and learning objectives and determine the measurements that would be helpful to explain the picture of the students' learning. You then add your questions for the students to complete. At the end, you will get a link to share so they can do it themselves.


3. Scavenger Hunt

If you have ever used Breakout Edu then you know how engaging, exciting, and fun a breakout box/scavenger hunt-type activity can be. You also know that they can be cumbersome to create, though well worth the effort! Stay tuned, if you haven't heard of Breakout Edu that will be an upcoming post. The Flippity Scavenger Hunt is brilliant and can be tailored to any content level. The idea is simple, you need to unlock the locks to get to the end. Game on!  The demo has 8 locks, you can set up as many as you want.  Here is what it looks like.


4. Virtual Board Game!  

Board games are fun and there are so many different ways to take advantage of this online version. The hard part has already been done for you. There is a die to roll and on each space there is a piece of information, telling the player what to do. The game is set up to be played on one device by screen sharing so one person moves the pieces for everyone. This demo is set up for math and uses desmos, youtube, and equatio. This is a great game for incorporating multiple tools. 


5. Flippity Manipulatives- aka click and drag cards

I am including this one by popular demand. It seems so simple but it has been a little hard to find. Many teachers are looking for ways to make click and drag cards that students can manipulate. This is a wonderful way for students to show their understanding, to categorize items, or to put items in a specific order for study. You can use media on these cards as well.


There are a total of 25 tools that you can create with a spreadsheet. Several are featured specifically for virtual learning configurations and there are 11 that you can create without a spreadsheet. I would love to hear how you are using Flippity!

Monday, October 5, 2020

FTT - Wheel Decide

"Wheel Decide"
Random Selection Tool
@MrKimDHS/@LisaBerghoff

Guest post written by @JoeTaylorDHS


It's a little known fact that when I used to write this blog every week, I would frequently run the content past my daughter. I'd have her try the tech tool, or comment on the writing, or at least tell me if she'd be interested in using the tool. Well, she was home this weekend and I was talking to her about how many challenges there were with remote learning. I talked a little bit about using tools like Forms or Socrative for Formative Assessment, and the importance of finding ways to gather information about really knowing who "got it" in class today. As I was talking, she yawned, turned in her chair a little, and opened TikTok.

I was about to get mad but then I thought, everything is a little heavy right now and maybe we just need something a little fun and silly. So, rather than talk about all of the heavy stuff, I want to introduce you to a simple to use online tool called "Wheel Decide." It mimics the spinning wheel on "Wheel of Fortune" and you can use it to make decisions on topics to discuss or randomly select students to respond in class. I made one to use in BAM:


To use Wheel Decide, just navigate to https://wheeldecide.com/. There will be a default wheel there for fun, but if you scroll down the page a little, you can modify the wheel to meet your needs.


If, for instance, you want your students' names to appear on the wheel, you can just type their names in each line. If you have their names in a spreadsheet, you can copy and past all of the names by using the "Paste List" feature on the Wheel Builder. Once your list is correct, click Apply Wheel Changes and you are ready to spin the wheel.

The website suggested several wheels that you could build for group decision making, like choosing the place for dinner, the TV show to watch, or family vacation spot. There are some "dynamic" wheels to choose, like "Restaurants Near Me" that depend on location services on your computer or phone, but I haven't tried them to see whether or not they work.

To be fair, "Wheel Decide" wasn't made for education. So, most of the pre-created wheels you can choose probably don't fit in a classroom. And, it is a FREE Tech Tool, so the quality is what it is. There might be a lag, and sometimes it will land on the same selection twice, but it could be a fun way to get kids to engage in your class. I mean, it's no TikTok, but it's cute.


Monday, September 21, 2020

FTT - Clickable Announcement Banners In Schoology

\

Up Your Schoology Game With Clickable Announcement Banners

@LisaBerghoff/@MrKimDHS


     If you have been on the internet looking at anything classroom related, you can't really ignore all of the "virtual classrooms" that teachers have created and posted on their learning management systems. I have looked at these and thought they were cute for elementary teachers but did not really see the relevance for high school students. We're serious, right? Anything cute, eye-catching, or flashy would be beneath us. Well, I am happy to say that I have come around and here's three reasons why.

1. Nothing is more important than communication.

    If you can't get your instructions, resources, schedules, information, and assignments to your students in a way that is organized and easy, you have lost them. These clickable banners are a great way to give clear guidance to your students. It's like hanging a huge neon sign that says CLICK HERE so they can't miss it.

2. We want our classrooms to look and feel different in person, the same goes in a remote setting.

    You would dress up your classroom, wouldn't you? You probably would not do a full on pinterest-worthy 2nd grade style situation but you would put thought provoking posters on the wall, or something so it doesn't look like 4 blank walls. It's ok to put your personality into your remote learning classroom page.

3. It's ok to model creativity. Actually, some would argue it is critical.

    Since Sir Ken Robinson's passing, I have watched his Ted Talk multiple times. I have seen it many times before but I am finding his message particularly poignant these days. And while a cute virtual classroom is far from what he is talking about when he discusses creativity in education, I do think we as adults could do a better job of modeling what it's like to think outside the box, dream a little, and make something fun. Have a student who is interested in art? Ask them to create a banner for you!


HOW DO I DO IT?

I definitely went down a YouTube rabbit hole watching videos on how to make these. There are several different methods. Here's what I found to be easiest.

Step 1: Create in Google Drawings

Go to your Google drive and click New, then More, then choose Google Drawings.

Step 2: Create Your Banner

Before you do anything, click the blue share button and make sure to set your drawing so that anyone on the internet can view. Also, it helps if you give your drawing a title. 

This is where the fun comes in! There are lots of examples you can look at. Use the Insert Image tool to search the web for copyright-friendly images you can use to create your room. Bitmoji is a favorite here but you can add anything you want.  This is where you will also add any links to your images if you want students to be able to click on them. You can even have it take students to another section of your Schoology course. 

Step 3: Go To Schoology Updates

You can do this in updates and click on the bell to make it an announcement that shows up at the top of your course OR you can create a page on your materials page and have it show up inline. It all depends on how you want to use it. I did mine as an announcement so it lives at the top of my course whenever anyone goes there. That is the way I am going to instruct you now. If you want to see more or have any questions, please feel free to reach out and ask!


Step 4: Click The Resources Icon and Choose Google Drive Resource App

When you click the Google Drive Resource App you will see your drawing. Click the box and then click import embed.


Step 5: Post

You can click the bell to post it as an announcement. That means that it will stay at the top of your Schoology course even if your students are no longer on the updates page. If they navigate to the materials page, the clickable banner will still be there! 

Also important to note, anything that you change on your Google drawing will sync and update on your Schoology course.


This is a great "hack" for getting around just posting text in updates.
Want to learn more? Reach out and set up a time to meet.


Monday, September 14, 2020

FTT - Zoom Zoom


Zoom Zoom

@LisaBerghoff/@MrKimDHS


Great, we missed the boat again. Just like Apple stock in the 80s and Bitcoin in 2018, hindsight is expensive. Who would've thought pre-Covid that Zoom stock was about to make an 800% jump in valuation in the next 6 months? If only we could go back and whisper to our past selves to stock up on toilet paper and to invest in Zoom...

Anyway - Zoom is here to stay so let's take a look at a few ways we can maximize our educational utility.

ScreenCasting

While Screencastify is still our go-to tech tool for screencasting, you can easily cast through Zoom by sharing your screen to an empty room while recording. Merely share your screen and have your browser ready, hit "record" on Zoom and viola. Note though that you wouldn't have access to ScreenCastify's editing software. I would suggest cloud recording on Zoom. It's simple and your videos will automatically be converted to MP4 for viewing. You can download it from the website if you need to edit it, or push it to Youtube. So what does the recording process look like?

Recording - Pretty simple through the Cloud

Through our district license, we have the option to record our Zoom sessions via the cloud. This way, your video is converted and prepared for viewing automatically through Zoom, and you will receive an email once it's ready to be viewed. The email will typically have two links, one for you the host and one for your viewers. 

Host Link

The first link will bring you to the Recording page where you can change some preferences before you disseminate your video. You're definitely going to want to click the "Copy Shareable Link" button to send the video to your students.


Click on "Share" on the top right corner and you'll see some very important preferences like having a passcode or adding expiration dates. It's probably best practice to limit viewing privileges to "Authenticated Users" only (District users) and to set up a passcode. Once you're ready, you can either send the link to your students via Gmail, or merely post it to your Schoology Page. 

DIY Document Camera and ScreenMirroring


Smarter people than I have come up with a pretty simple hack to present hand-written work through Zoom in the form of a Pocket Doc Cam. It just uses any ol' mirror to reflect the area over your keyboard for a makeshift document camera. If you have access to a 3D printer, I'd suggest using these STL files to start (MB for MacBook, CTL for Chromebooks, and Dell). You can get really cheap 2-inch mirror tiles at Amazon to fit these files.

Or if you have an old makeup mirror, you can get creative with some duct tape or string to rig it over your laptop camera. But if you're looking for more of a professional option, click here for IPEVO's Mirror Cam (Although as of 9/14 it's on backorder). 

iPhone/iPad and Doc Cameras

While not technically a "free" tech option, if you have access to an iPad, you can probably find solid utility using an iPad for screen sharing your written annotations, formulas, graphs, etc. With the combination of any stylus and a drawing app, you can easily share your iPad for your students' viewing pleasures. 

First I would suggest using the ShowMe interactive whiteboard app. It's simple, easy to use, and free. Then you can follow these instructions to screen mirror your iPad.

Lot's of creative ways to utilize Zoom. While I never got rich off of Zoom stock, I'll take being able to see and interact with my students and colleagues. Got more Zoom tips? Let us know below!


Monday, September 7, 2020

FTT - EdTech AppSmashing!

#BetterTogether- 3 Great EdTech Tool Mash-Ups For Learning (remote or otherwise)

@LisaBerghoff/@MrKimDHS


Peanut butter and jelly, coffee and donuts, popcorn and movies, biscuits and gravy, you get the idea. These are all things that on their own are fantastic but together, they are amazing. The same is true for many of our tech tools. On their own they are useful and effective but put some of the together and they can be transformative. Affectionately known in the edtech world as "app smashing", the idea of using multiple digital tools together in order to create a completely reimagined learning experience for students. Here are some ideas. I hope they inspire you to think differently about how these tools can be used. 

1. Peardeck and Tour Creator

So, you probably already know that Peardeck is an add-on for Google slides that embeds interactive elements and encourages student participation. Did you know that one of the element options in Peardeck is to add a website as an interactive slide?  Google has a tool called Tour Creator that lets you and your students create 360 degree tours either by using a 360 degree camera OR Google Streetview. There are also many fantastic images on the internet that are available for your use. You can add tour creator as a website in Peardeck. That way, when students open your slides presentation in Peardeck, they can view 360 degree images within the peardeck environment. 
There is a great Pear Share session by Stacy Young who explains how she uses these two tools to create virtual field trips. Check it out here.

2. Screencastify and Jamboard

Many teachers have been looking for a way to record lessons and show their screens. However, they do not just want to record their static screens. They want to show some activity in order to engage their students. That's where Jamboard comes in. It is a free app that acts like an interactive whiteboard. 
So, you can use Screencastify to record while using Jamboard to help make meaning for your students.
Want to learn more about using Jamboard? Watch the video below. Once you have your Jamboard game solid, you can click the Screencastify extension and start recording AMAZING videos for your students.


3. Flipgrid and Canva For Podcasting


So many teachers have discovered Flipgrid as an incredible tool for short videos posted by students. Another way Flipgrid can be used is for podcasting. Instead of showing students on video, they can create a graphic and save it as a sticker in Flipgrid. They would show their "sticker" on their screens while they are recording their podcast. That way, listeners are looking at the logo the students created in Canva while listening to the podcast they created in Flipgrid.

What are some other edtech mash-ups that you are using in your classes? Are you looking for new capabilities to keep learning fresh? Go ahead and share in the comments below and let's get the ideas flowing!


Monday, August 31, 2020

FTT - ScreenCastify


Save Video Calls For Interaction! Screencastify Yourself For Instruction

@LisaBerghoff/@MrKimDHS


I first posted about Screencastify in May of 2016 and most recently in November of 2019.  More and more staff members have been looking for ways to record what is on their screens. Teachers running review sessions, counselors giving presentations, club sponsors sharing information, and students going beyond powerpoint presentations, have all been looking for the "best" solution for screen recording (also referred to as screen casting).  Who knew that just 9 months later creating videos would be so critical to our teaching toolbox? 

Video call fatigue is a real thing. It is unnatural to stare at someone's face the entire time you are having a conversation. Picking up social cues takes extra energy. And, let's be honest, we're all trying to do too many things at once. In order to minimize the fatigue that comes with video call interaction, screencasting is a fantastic way to provide your students with information in a manner that lets them be in charge. Did they miss what you said? No problem! They can replay the recording as many times as they want. 

However, just having the information on video does NOT make it amazing. Here, check out Principles To Improve The Effectiveness Of Instructional Videos. 

There are several fantastic tools out there that will enable you to record what is on your screen, or record from your webcam, or both. 

We actually have a district premium license for Screencastify and I believe it is the simplest to use. 

First of all, it is a Chrome extension. That means there is nothing to download and it will automatically save your recordings to your Google drive.  Showing a demonstration of how to navigate your Schoology page? Screencastify will highlight your mouse clicks and there is also a pen drawing tool to point out important information on a doc or slides. The value of video is indisputable. We are learning more and more from videos. Plus, there are times when students are absent, or just need a chance to hear and see the information again.

The biggest question is always, How do I share it? The good news is that Screencastify autosaves to your Google drive. All you need to do is share the link. You can also upload to YouTube or download as an MP4, Gif, or MP3.

Here's how it works:

1. You already have the screencastify chrome extension! No need to download, upload, or go to any websites.
2. Ready to record? I suggest writing a script and practicing a few times but if you say you're ready I will believe you. Just click on the Screencastify extension icon in the upper right corner to start using Screencastify.

3. Choose : Browser Tab, Desktop, or Webcam Only to determine what will actually record. 
Make sure your microphone has access (you will need to click allow the first time through) and choose Embed Webcam if you want your face to show in a little box on the screen. Sometimes it's nice to see your face when you are talking:)

4. Click the Blue Record button. It will give you a three second countdown. Need more time? You can adjust to a five or ten second countdown by clicking on the 3 lines. Your drawing tools will automatically appear while you are recording. 

5. Click again to stop recording and wait for your video to automatically load and the Google drive link to appear. If you don't love your recording you can delete it and rerecord OR you can edit it in the Screencastify editor.

That's it! You can do this! 
As always, let us know if you want some help with your videos or navigating Screencastify.