Monday, February 26, 2018

FTT - Entering Grades into Schoology

Entering Grades in Schoology

@joe_edtech/@LisaBerghoff

GUEST POST BY HOWARD CITRON - DHS Instructional Tech Coach


One of the most important aspects of Schoology for us teachers is that it allows us to keep our grade book in the same place that we will house our entire set of classes and curriculum. The idea of students having a one-stop-shop for all of their classes was unquestionably the biggest draw towards a Learning Management System, such as Schoology, but lest we not forget the teacher. While we understand the learning curve that goes into understanding a new program, the long-term efficiency benefit should be recognized during this learning period.

The hardest part of this entire process is the creating of the assignment, which you, of course, have already learned how to do in the link above. Once you have created the assignment, you go ahead and just enter the grade into the empty grade box. This part is just like entering grades in Infinite Campus, except now you won’t have to go to a different website to enter grades.

Where this process can really make lives easier is through the process of students internally submitting assignments within Schoology. For those LMS/Google Classroom vets, it is this process that will lighten your load and allow you to provide more effective feedback in a much more efficient manner. Within each grade box, there are a number of icons that you can use to simply the process of entering grades using Schoology. The icons we will see in each grade box are the “submitted” icon, “comments” icon and “exceptions” icon. Let’s discuss each below:


Oh, were you also wondering, “how am I going to enter things that are excused, incomplete or missing?!”

Schoology has you covered there as well:


“Wait, what if I want to enter completion grades for everyone on an assignment?” Schoology has that covered as well. Not to mention, it has the ability to mark all empty grade boxes as excused, incomplete or missing. The last thing to take note of in our miscellaneous section below is the “View Statistics” function. This is an impressive feature that really allows you to dig deep into how well your students did on an assignment.


Personally, my favorite parts are the ability to annotate on a document that has been submitted through Schoology, as well as give me the opportunity to do this with my computer or with my mobile device. The Schoology app allows for almost all of the functionality of the website. I can be at my child’s baseball/soccer/basketball/hockey game, and I can get all the grading done I would’ve gotten done but without the stack of papers and pen. Whether it be on my phone, tablet or computer, the consistent functionality between devices is refreshing and feels like the future has finally arrived.

Good luck Schoologying this week! We hope you’ve found this tutorial “Coology!”

Monday, February 19, 2018

FTT - Schoology Announcements & Updates

Class Announcements and Course & Group Messages in Schoology

@joe_edtech/@LisaBerghoff


One of the questions we always have to deal with at the beginning of the year is, "What's the best way to create an email list for my students?" Well, next year when we all use Schoology, we won't need to ask that question anymore. Messaging your entire class is built into to program itself. 

Schoology provides two different levels of classroom messaging. First, "Class Announcements" are important enough to appear on the student home page in the "Recent Activity Stream" and on every page of the course. Course and Group Updates appear in both the "Recent Activity Stream" and on the "Update" page of your course, or home page of your group.

Let's start with Updates. They are simple. Simply navigate to your course, click on the Update link, and post a message:

The Update will appear at the top of the list of classroom or group updates. It will also appear on the student home page. If you've joined any groups or have been a part of any classes, you also know that you will also receive new updates in your email. (Yes, text message and social media updates are available as well.)

If you want to raise the stakes on a classroom update, you can make it a Class Announcement. That marks the message as important and makes it a little more visible for students. To do this, click the icon that looks like a thought bubble with a plus sign in it before you click Post. 

You'll see a drop down with three choices in it. The last one is a bell. If you click that, it will change the Update to an Announcement. Then the announcement will appear at the top of each class page until you remove it:


When you are ready, simply click the "x Remove" link that appears under your Class Announcement.

Here's a short video that runs through this process:

Course Announcements from Schoology on Vimeo.

FTT - Adding Assignments in Schoology

Adding Assignments in Schoology

@LisaBerghoff/@Joe_EdTech


Some of the most frustrating words that I hear as a teacher are "I didn't know what to do". I have planned, organized, color-coded, copied, explained, and demonstrated how to complete the assignment and yet it never fails, there is always at least one student who announces that they lost their assignment, they weren't sure what to do, or they didn't understand the instructions. Instead of shaking my head in frustration, I have decided to add my assignments digitally in Schoology.  

Now, I'm a huge fan of "less-paper" and not necessarily "paper-less". I believe in blended learning and using the appropriate materials for the task, which means sometimes my assignments are digital and sometimes my assignments involve turning in a physical thing, such as a piece of paper. 

The good news is that in Schoology, you can enter assignments in one place and they will automatically show up in the students' calendars as well as in the grade book.  One thing that has been so interesting to me in this position is seeing how everyone goes about a similar task in a different way. That being said, there are many ways to add assignments in Schoology. Here are the simple steps to help get you started.

Here are the basic steps to create an assignment.


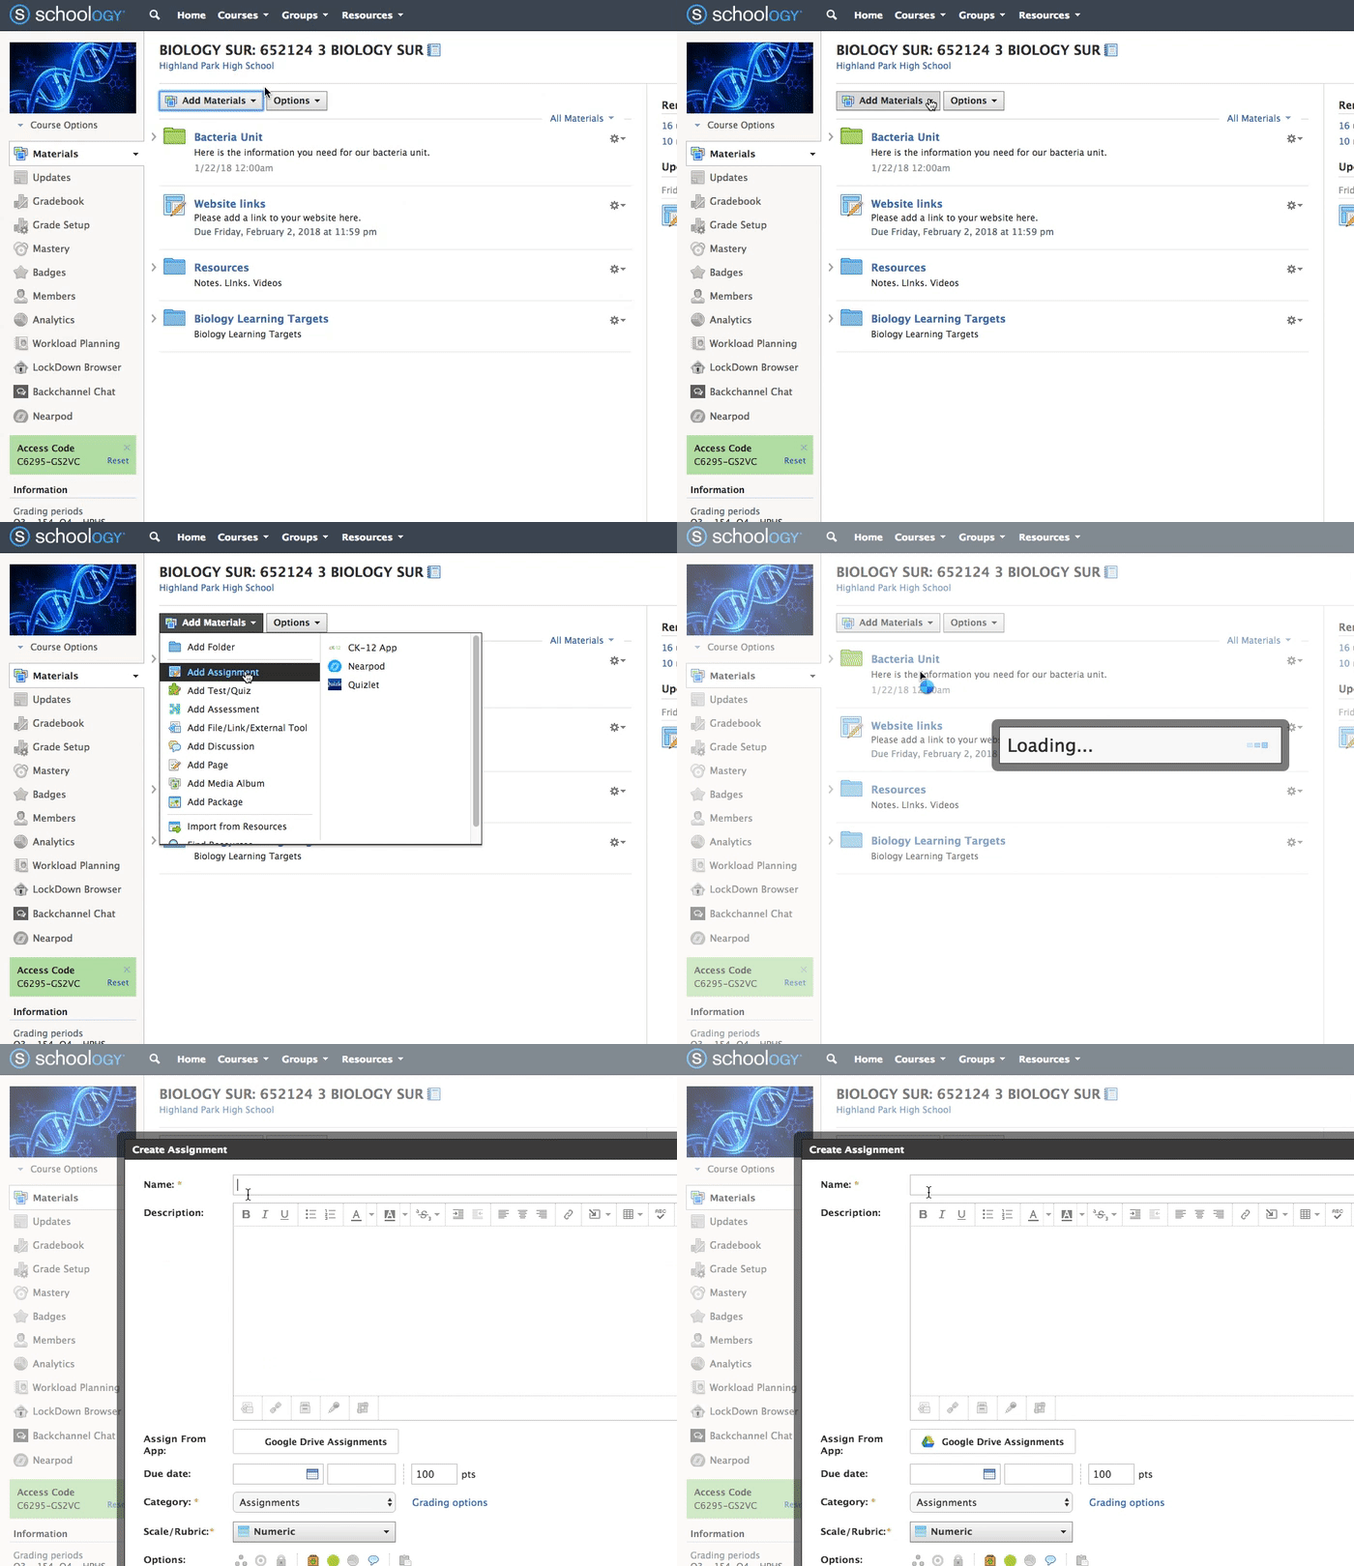
Once you are in your course, use the Add Materials button. You can also find this button within a folder

https://gyazo.com/1ce87c619d40e5dd20accc3ac66bdf88


1. Click Add Materials
2. Select Add Assignment
3. Fill out the details: 
  • Enter a description such as directions that the students need to complete the assignment. 
  • Set a due date to put the assignment on the calendar. It will also show up on the Upcoming area and will send overdue notifications if the student does not submit by the due date. 
  • Select a grading category. If you don't choose one, it will default to Ungraded and will not appear in the grade book. 
  • Select a Scale (THSD113) is the scale for the district, or create a Rubric.
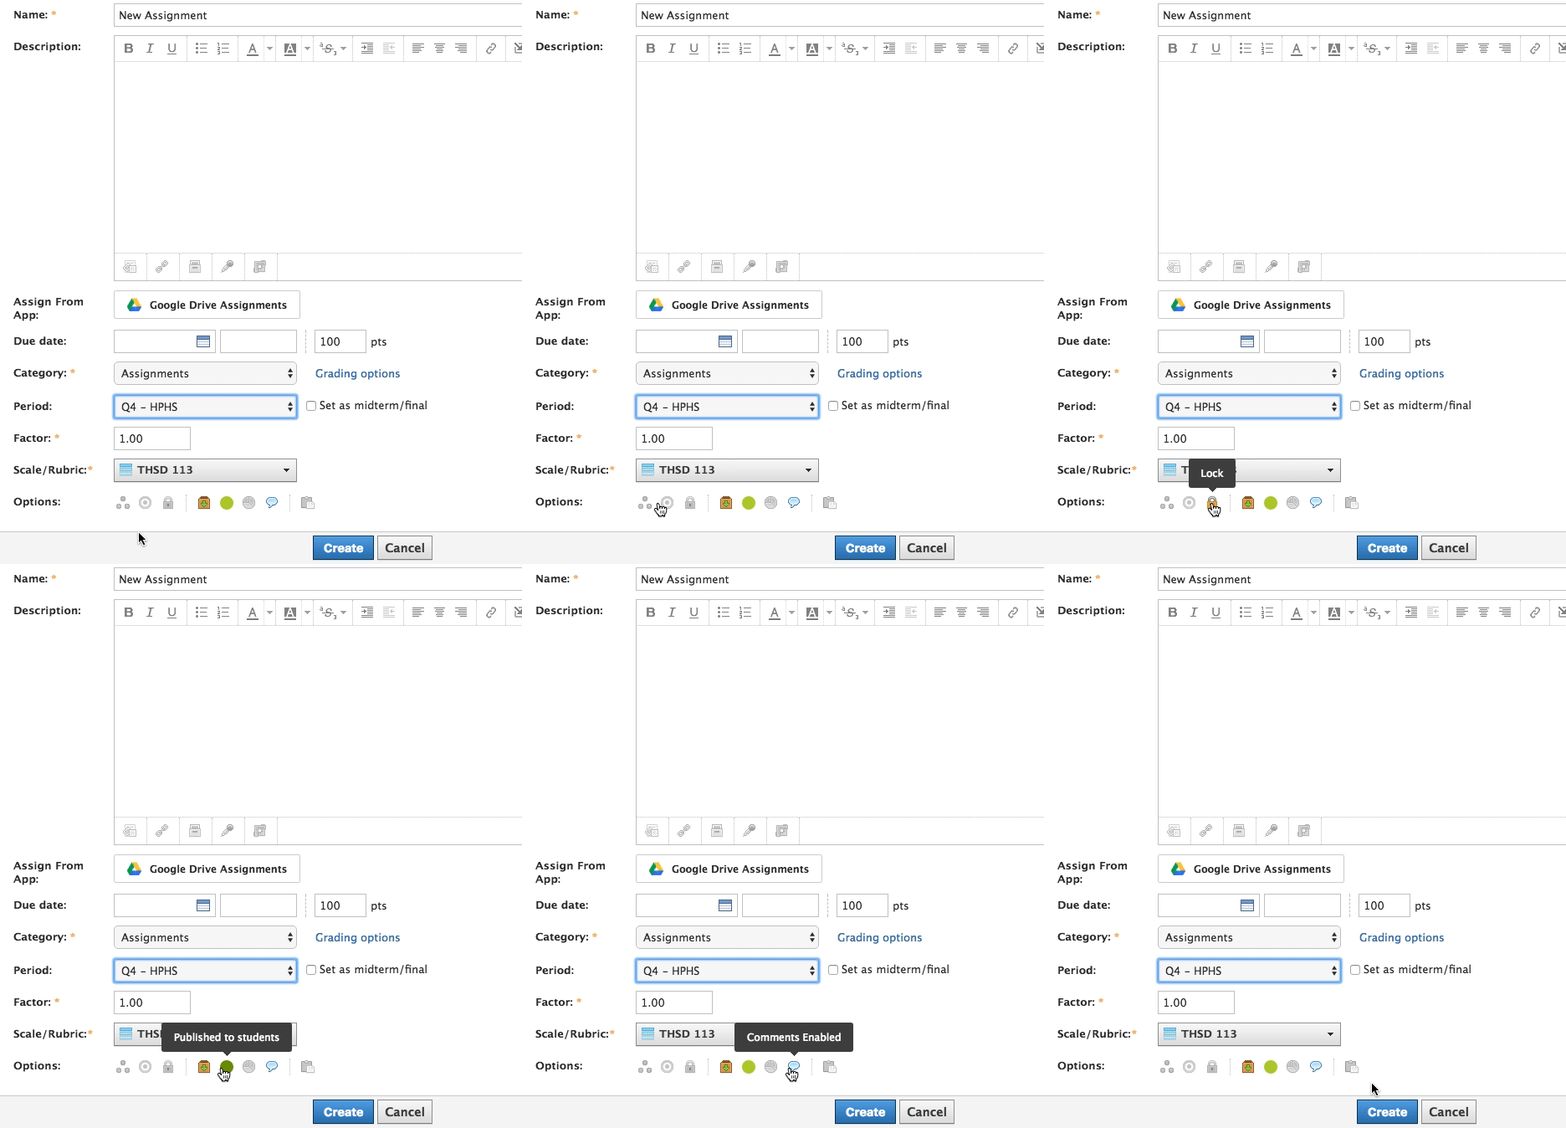
4. Take a look at the Advanced Options that you can turn on or off. Hover over the icons to see what they are. 
  • Individually assign to a specific student or group
  • Align learning objectives (more on this later for our SBG fans!)
  • Lock in order to prevent students from submitting. You might want to do this after the due date has passed.
  • Enable submissions if the assignment requires the students to turn something in.
  • Publish to students or hide from their view if you're not ready for them to see it yet.
  • Grade statistics will show the statistics for the assignments to students
  • Enable comments so students can comment on the assignment
  • https://gyazo.com/3d652a3be227a0c77621de9dac8734f0


5. Click Create

Did you forget something? That's ok. You can always go back in and edit. 

Want to see how it's done? Here is a short video showing the basics of creating a Schoology assignment in your course...


Ready for more? Here's Part 2, which shows additional options. 


You can click here to watch the rest of the videos from the Schoology help center. 

Tuesday, February 6, 2018

FTT - Adding Course Materials to Your Schoology Course

Adding Course Materials:
Folders, Files & Links

@joe_edtech / @LisaBerghoff

It's not a secret. One of the reasons I love Schoology is that I am a control freak. I don't want a sequential stream or timeline. I want to all of my materials in folders, organized the way I want them organized. In a Schoology classroom, that kind of organization is easy. 

If you already have a course, all of the instructions for this post are pretty easy. They all start in the same place. Go to your course and select "Add Materials" from the top of the page:


Folders

The most important thing for me is that I can set my course up in folders. My PD course is set up by topic, like this:


To add a folder, go to "Add Materials" and select "Add Folder" from the drop-down menu. The following "Folder" wizard will appear:

The only thing you have to do on this page is give the folder a title, but you have several additional options. For those of you a little more gifted for color and flair than I am, after you title your folder you can give the folder a color based on themes, standards, content, or just because you like things to be pretty. The "Description" you add, should you choose to do so, will be visible to students. If you choose to give the folder a Start Date, Schoology will create a calendar event for the folder. An End Date will simply remove the calendar from course calendar on a given day. 

If you set up your whole class in advance, the availability drop down gives you a lot of options for automating your class:


  • Published (Visible to students).
  • Unpublished (Hidden from students).
  • Publish on start date.
  • Published during date range.

  • Then click the blue "Create" button to finish.


    If you create all of your folders and then decide that you want to move them around, no worries. This portion of Schoology is drag and drop. Simply click and hold on the folder you want to move and drop it into the right position. However, you can always edit the folder, or copy it to additional sections of the course, by clicking the gear next to the folder on the right side of the screen:


    For those of you as crazy as I am, yes, you can have folders within folders. While there is a limit, it is a pretty big and ridiculous limit. I read "folders that have more than 100 levels of subfolders" in the help section and stopped caring because I know I'll never have that many subfolders. If you do, I think the message is - stop it.

    Files and Links


    OK, now that you have your folders, you'll want to add some items for your students to access. From the same "Add Materials" button you used before, choose "Add File, Link, or External Tool:"


    You'll get another pop up with those three choices in it:


    If you want to add a PDF, Word file, Excel file, movie file, or JPG, click the "File" button. 


    You'll click the "Attach Files" button and search for your documents saved on your computer. You have the option to align the item to standards, publish it/unpublish it for students, and add the same file to multiple courses at the same time. There is a 512 MB/file limit, but there isn't one in Google Drive. So if you have a larger file you want to share with students, add it to Google Drive and share the link to the file using the directions below.

    If you want to add a website, a document you have stored in Google Drive, or a YouTube video, click the "Link" button.


    You'll start by pasting in the link you want to share. Then you have the same options as you have with adding a File plus one. If you share a link, you can decide whether you want that link to appear inside of Schoology or in a new tab by itself. 

    There is one more little feature the "Add Link" wizard that I have always loved. And it is the option to pull the title of the resource directly from the URL. So, for example, I might want to add the story from CNN on the upcoming SpaceX launch. In the past I'd just share the URL:  https://www.cnn.com/videos/cnnmoney/2018/02/05/spacex-falcon-heavy-launch-elon-musks-tesla-mars-orbit-cnntech-original.cnnmoney/video/playlists/spacex/ . However, now I'll paste the URL into the "Add Link" wizard and click the two reversing arrows in the Title box and...viola:


    The title is added for me. Yes, I really am that easily amused.

    There final option on this menu item is to Add External Tool. This may be where we add textbooks, subscription database items, or other online tools. However, this is just complicated enough that it deserves a little further explanation. So it will be included both in a future FTT blog post and some future PD opportunities.

    Good luck and have fun building your folders!

    Tuesday, January 30, 2018

    FTT - Schoology Gradebook

    Set Up Your Gradebook In Schoology

    @LisaBerghoff / @joe_edtech

    One of the first things you will want to do when you access your courses in Schoology is to set up your gradebook. When you access your courses in Schoology by going to lms.dist113.org, you can select a course from the drop-down menu and then along the right side you will see where it says gradebook.


    When you click on Gradebook you will see all of your students and any assignments you have put in so far. When you enter an assignment, if you check that it will be graded then it automatically goes into your Gradebook, no need to enter it.

    Now that you have seen what the gradebook looks like, you will want to set it up so that it works for you.
    Right below Gradebook on the right side menu it says Grade Setup. When you click on Grade Setup your screen will look something like this.


    This is where you can adjust your categories, weights, quarter vs. semester grading, decide about rounding final grades, your grading columns, and settings for visibility.  You make the decisions about what this looks like for your class. Feel free to click around and see how it goes.

    Do you have rubrics that you use for grading? You can add those here. Don't worry, there are lots of places where you can add your rubrics, this is just one of them. When you click Rubrics in the upper right corner and then click Add, you can create and customize your own rubrics and use them to grade right in Schoology. 

    You can adjust every aspect of the rubric to make it meet your needs. When you are done, just click the Create button. 


    Don't forget to click the blue button to save your changes in Gradebook Setup. 

    If you are someone who likes written, step-by-step instructions. I would encourage you to check out the Schoology Help Center.  This will give you instructions along with images so you can just follow the steps.

    If you like video tutorials, here's one from a tech coach at another school who shared his video with the Schoology Teachers Group. 


    And if you want to learn alongside others in person, lunch and learns as well as sessions during the school day will be offered.

    Of course, setting up an appointment is always an option as well.


    Tuesday, January 23, 2018

    FTT - Navigating Schoology's Home Page

    What's In A Homepage?  

    Taking A Closer Look At The Homepage In Schoology


    @LisaBerghoff/@Joe_EdTech


    One of the first questions people ask about our new learning management system, Schoology, is whether or not it is easy to navigate. Navigation is definitely one of those "sink or swim" categories. This is one of the biggest complaints that I hear from students about teacher websites and blogs. Sometimes it's not so easy to know where to click.  If it's not easy to use, we won't want to use it. That being said, what is intuitive to one person is not necessarily intuitive to another. In today's post, we're going to take a deep dive into the home page of Schoology. It's the first thing you'll see when you log in so let's make sure it makes sense. 

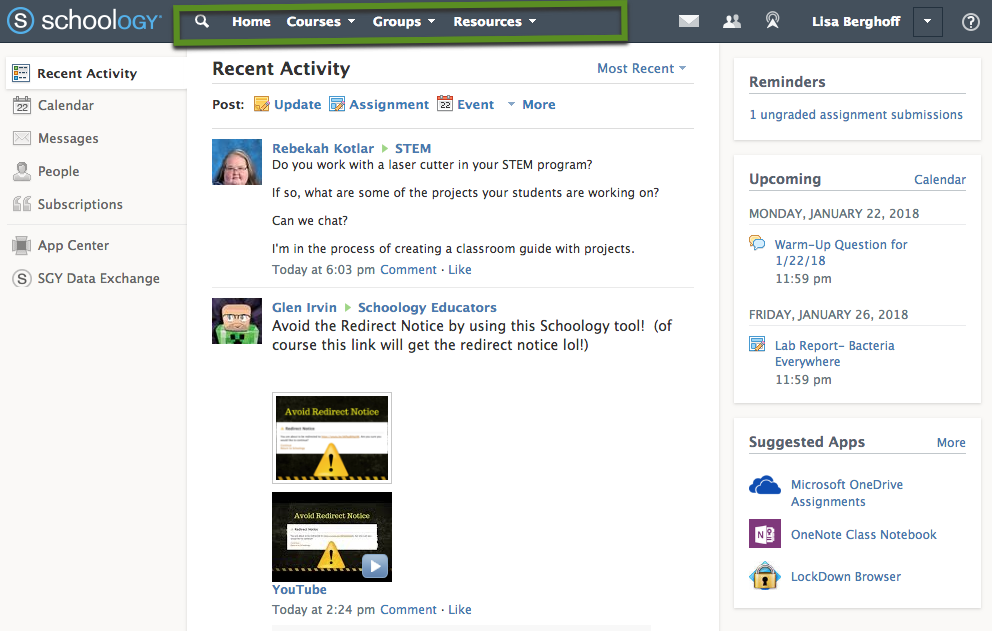
    When you log in here for the first time, you will need to connect to your school account. Then, you will see the homepage. Yours won't look as messy as mine! We're going to start by looking at the top navigation bar.  I'm happy to be your tour guide as we explore the Schoology home page. Feel free to take photos on the tour. Sit back, relax, and learn...


    Clicking where it says Courses will show you your list of courses. This list includes all of the courses you teach as well as the courses you are enrolled in. For those of you who have explored the self-paced course called Extend Your Classroom To The Cloud, this is where you will find it.  Click on any of your courses to open them. There you can add assignments, discussion questions, assessments, etc. 
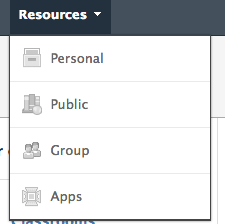
    The next tab over says Groups. This is going to be an amazing feature for extracurriculars, sports, course teams, departments, and inter-building collaboration.  If you go to Groups and click "See All", you will notice that Groups are divided into 3 categories: My Groups, School Groups, and Public Groups. My Groups will show any groups that you are currently in. School Groups are groups that are housed within our district. You can filter them by building. Public Groups are just that, groups of educators who share a common topic and want to collaborate with others. For example, I am a member of Schoology Educators and Blended Learning groups. When people post to these groups, their posts show up on the home page under "Recent Activity". You will need an access code to join groups. Finally, the third tab is called Resources. Clicking on Resources will open up 4 options. You can think of Resources as your digital filing cabinet. 
    This is pretty obvious. Personal is any resource that is just for you. Maybe you created an assignment for your classes and you want to make sure to hang on to it for the future. It will save as a template so you can adjust it each time you use it. Public resources are files, videos, assignments, assessments, etc. all made by Schoology teachers who are willing to share because they want to make the world a better place. You can filter your search for public resources to find just what you need thereby negating the need to reinvent the wheel. The resources are also rated by others so you can use the Yelp/Amazon style of shopping for your course. Finally, the apps section is where you will find your resource apps. More on that to come!

    Also across the top you will see icons that show messages, connections, and notifications. There is also a link to your personal profile. Anytime you get a message or someone wants to connect with you, you can access that information right here in the upper right corner. It is all in chronological order and you can click on them directly for easy access. 


    Looking at the center of the screen you will see that it is divided into three sections. On the left is a navigation panel. This gives you easy access to your calendar, messages, school directory (people tab), as well as any blog subscriptions you have. 


    The center of the screen shows whatever tab you chose on the left. Here, in the recent activity view, you can see that there is a way to quickly post updates, assignments, events, etc. 

    On the far right is an area for reminders and upcoming events. The reminders tab shows that I have homework that was submitted and needs to be graded. Upcoming shows all of my assignments, along with due dates and calendar events. 

    Go ahead and log in and take a look at your home screen. Ready for more? You can check out this article from the Schoology Help Center: Navigating Schoology

    Want to join the self-paced course? Log in to Schoology here and use your school credentials to log in. Go to the Courses tab and click Join. Enter this code to enroll in the self-paced course on getting started with Schoology. 8C2DG-TV9VN

    Remember, early adopters are jumping in but you can dip your toes in the water. Go ahead and log in and see what is on your homepage. Let us know if you have any questions.


    Monday, January 15, 2018

    FTT - Setting Up Schoology

    Designing Your Class with Schoology

    @Joe_EdTech / @Lisa Berghoff

    It is finals week and you are busy. This blog is really about templates for setting up Schoology courses. The Free Tool is actually a blog post with 7 templates in it. Click here if you'd like to skip my inspiring prose, grab the tool, and get back to grading. Full text of inspiring prose is below.

    One of the very frequently asked questions I've had over the last four years in District 113 is about organizing posts on Google Communities or Google Classroom. Not a few of my colleagues have been frustrated by my answer that, with a few minor exceptions, you can't. Posts (at least within topics) are listed by date. Classroom and Communities can still be very good tools for teachers, but I'll have to admit that I don't like the limited organization. I especially don't like the Stream in Communities. I've always thought that was hard for many students to navigate.

    One of the strengths of Schoology is that you have the power to reimagine what your class looks like online. It could be a sign of a lack of imagination, but I have to admit that I'm a minimalist. My courses usually look like this:

    Topics or themes are arranged in folders, and those are almost always arranged in chronological order. I tend to "hide" future topics or assignments for students, but I leave old topics up for review. I like the organization and simplicity. 

    However, for those of you with more imagination than I have, Schoology offers several different design options. The other day I saw Ryan Leist's Schoology page for Freshman English Survey. It is MUCH prettier than my page:

    In this case, he has folders for his syllabus and weekly agendas always available for his students. However, he only displays one unit at a time. Everything the students need for class during the unit is in that one folder. The unit has a full description and is linked to an Essential Question for learning. Important for this week, you can see that Ryan has also included a couple of links to help students get ready for finals.

    The basic question is this, "When your students log in to see your class, what do you want them to see?" With Schoology, you really will be able to design your online presence to match your educational style and classroom goals.

    A great place to start when designing your course is with Schoology's online Pro Tip blog. One of the most important pieces for getting started is a piece called, "7 Simple Ways to Set Up Your Courses with an LMS," by Dylan Rodgers. The blog post gives you an example of 7 different course structures and explains why you might want to use them. But more importantly, it'll link you to a free ebook that you can download with more detailed instructions and examples. 

    ----------------------------------------------------------------------------------------------------------------
    Already set up your course and want to share your idea? Include a screenshot and a short description in the comment box below!